Summary of Arduino Automatic Temperature& Humidity Controller for Pets
This article details a DIY automated pet house project for hamsters, created after the author lost two pets to cold weather. The system uses an Arduino-compatible platform to monitor temperature and humidity, automatically activating a thermal tablet heater or an ultrasonic nebulizer when conditions become too cold or dry.
Parts used in the Hamster House Project:
- Crowduino (Arduino compatible platform)
- Temperature & Humidity Sensor (AM2302)
- 4.7K Resistor
- LCD Keypad Shield
- 2-Channel Relay Module
- Ultrasonic Nebulizer
- Screw Shield
- Thermal Tablet
- Wires/Jumper wires
Jack and Jose, a pair of beautiful hamster, has accompanied me over 100 days and nights. Their soft white fur makes me quiet and warm, especially when I coding in the winner.
But the very tragic things happened in the last week. As the cold air from Siberia, Shenzhen has suffered low temperature and humidity for than 10 days. The temperature is about 10 degree, makes me fell chilling every day. The very bad thing happened: Jack and Jose, leaved me away……
It was such a sad afternoon. After I buried them, I had a new idea on my way home: I need to create a house, a house with floor heating, air conditioning, for my further new friends.
Step 1: Module Preparing
As a software engineer, I am not good at hardware, So i decided to use the most easy-to-use platform: Arduino
After browsing on the web, I got the following modules:
1. Crwoduino: an Arduino compatible platform, with some upgrading features to make it easy to use.
2. Temperature & Humidity Sensor and a 4.7K Resistor. I need this sensor to report the controller the current temperature and humidity.
3. LCD Keypad Shield. With this LCD I can monitor the current temperature and humidity, thus to make this project practical in my daily life.
4. 2-Channel Relay Module. As the Ultrasonic Nebulizer uses power more than 5V, so a relay module was used to control the Ultrasonic Nebulizer on/off.
5.A Ultrasonic Nebulizer to increase the air humidity.
6. Screw Shield , this shield helps me connecting the wires easier.
7. Thermal Tablet: this thermal tablet acts as heater for the pet house.
8. Some Wires or Wires would be needed
Basically, the temperature& humidity sensor reports to the Crowduino how cold it is now. If the Crowduino “think” it is too cold, then it will open the thermal tablet to warm the hamster or the ultrasonic nebulizer to begin the air humidification.
Step 2: Temperature& Humidity Measurement
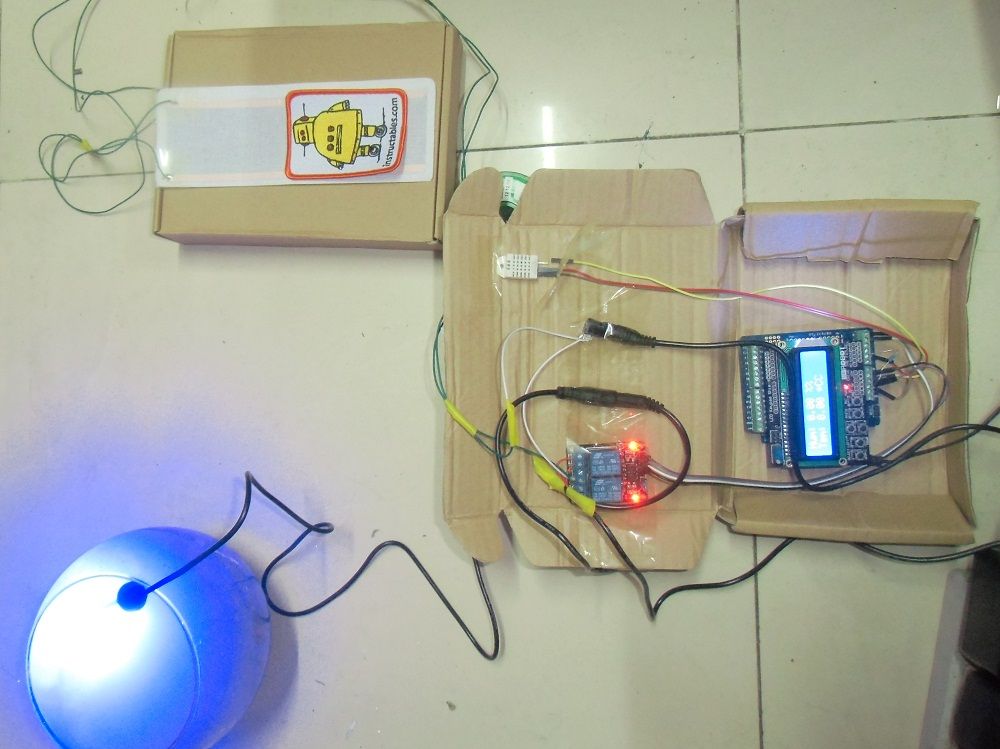
The Basic Connection of all the modules(Crowduino, temperature sensor, relay module…) as above image.
First, connect the temperature& humidity sensor AM2302 to Crowduino board. Using the wire jumper, connect the AM2302 power supply pins to Corwduino VCC and GND, connect the “SIG” pin of AM2302 to A1 of Crowduino.
Note that a 4.7K pull up resistor is needed between “SIG” of AM230 and VCC. Actually, you can also find many temperature and humidity module that had integrated the pull up resistor on the module, so you do not need to add the pull up resistor by yourself and thus the story would be easier .
Step 3: Connect the relay to Crowduino, to control the ultrasonic nebulizer and thermal tablets.
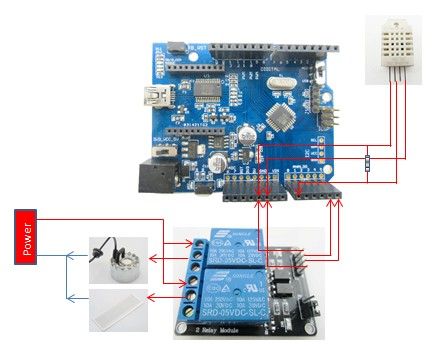
Connect the “IIN1”and “IN2” of the 2-channel relay module to A4 and A5 pin of Crowduino (or Screw Shied), power the relay module using jumper wires. In this way, Crowduino can control the 2 relays separately to power on/off the ultrasonic nebulizer and thermal tablets.
At last, connect the ultrasonic nebulizer and thermal tablets to relays. For the ultrasonic nebulizer, I cut off it is positive wire, and connect its one end to the relay1 “COM” port (the port in the middle), connect the other end to relay1”NO” terminal. For the thermal tablets, it would easier, solder its terminals to DC jack and connect to relay2 with the same way of ultrasonic nebulizer
After the connecting, the basic hardware for hamster new house completed.
To monitor the current temperature and humidity, I added a keypad shield to my system. Plug the Keypad Shield on the Screw shield. Actually, this shield is optional if you do not care about the measured current temperature and humidity.
For more detail: Arduino Automatic Temperature& Humidity Controller for Pets
- Why did the author create this project?
The author built the house to protect future pets from low temperatures and humidity after losing previous hamsters to the cold. - Which platform was chosen for the hardware project?
The author selected Crowduino because it is an easy-to-use Arduino compatible platform suitable for someone not skilled in hardware. - How does the system detect environmental changes?
The Temperature & Humidity Sensor reports current data to the Crowduino to determine if it is too cold or dry. - What components are used to control the heating and humidifying devices?
A 2-Channel Relay Module controls the power on/off for the Ultrasonic Nebulizer and the Thermal Tablet. - Can I skip the LCD Keypad Shield?
Yes, the shield is optional if you do not need to monitor the current temperature and humidity visually. - What resistor value is required for the AM2302 sensor connection?
A 4.7K pull-up resistor is needed between the SIG pin and VCC unless the module already has one integrated. - How is the Ultrasonic Nebulizer connected to the relay?
The positive wire of the nebulizer is cut and connected between the COM port and the NO terminal of relay1. - What pins on the Crowduino connect to the relay module inputs?
The IN1 and IN2 pins of the relay module connect to A4 and A5 pins on the Crowduino or Screw Shield.