
Summary of Acrylic Arduino Prototyping Stand
This article describes a DIY project to create an acrylic stand that secures an Arduino board and a mini breadboard, preventing them from moving on a workbench. The author used a laser cutter for precision but noted that manual cutting and drilling are viable alternatives. Two versions of the stand are provided: one for the Arduino Uno and another for the Duemilanove/Diecimila models.
Parts used in the Acrylic Arduino Prototyping Stand:
- 1/4" acrylic sheet (at least 4.5" x 6.5")
- Four 19mm vinyl bumpers
- One mini breadboard (approx 3.3" x 2.2")
- Three 1/4" #6 nylon spacers (for Diecimila/Duemilanove)
- Three or four 1/4" #6 nylon spacers (for Uno)
- M2 x 20 machine screw (for Diecimila/Duemilanove)
- M3 x 20 machine screws (for Uno, or substitute #4-40 x 3/4")
- M2 hex nut (for Diecimila/Duemilanove)
- M3 hex nuts (for Uno, or substitute #4-40 hex nut)
- M2 washer (for Diecimila/Duemilanove)
- M3 or M4 washers (for Uno, or substitute #4-40 washer)
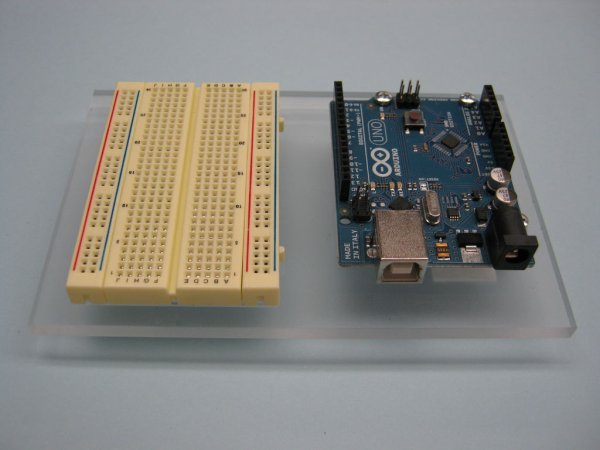
I do a lot of projects with Arduino’s and breadboards. Often as I work on a messy workbench, the Arduino or breadboard get jostled and the wires pop out of the headers or the breadboard. To solve this problem, I decided to make a simple acrylic stand for mounting an Arduino and a breadboard that would prevent them from moving around.
I used a laser cutter to cut the acrylic to size, to cut the holes for mounting the Arduino and to engrave a rectangle on the base to help align the breadboard. Don’t despair if you don’t have access to a laser cutter: you could use a saw to cut the acrylic and a drill press to drill the holes.
There are two versions of the stands: one for the Arduino Duemilanove and Diecimila and one for the Arduino Uno.
The photos show two views of an Uno stand made out of clear acrylic and a Duemilanova stand made out of blue acrylic
I made this at TechShop in Menlo Park.
Step 2: Cut out the stand
I used a 45 watt Epilog Helix laser cutter and used the following settings for the laser. You may need to use different settings depending on what model laser cutter you use.
- 1/4″ acrylic:
- Raster: Speed 50, Power 80
- Vector: Speed 6, Power 90, Frequency 5000
If you don’t have a laser cutter, you can print out the CorelDraw files and use them as a template for cutting and drilling the acrylic.
 arduino duemilanove.cdr388 KBarduino uno.cdr389 KB
Parts
You will need the following materials for the Arduino prototyping stands:
- One 1/4″ acrylic sheet (color of your choice) at least 4.5″ x 6.5″ (the stand when cut out is 3.8″ x 5.7″)
- Four 19mm vinyl bumpers (available at any hardware store)
- One mini breadboard (approx 3.3″ x 2.2″) (Radio Shack 276-003 or Jameco #20601 or similar)
For an Arduino Diecimila or Duemilanove prototyping stand you will also need:
- Three 1/4″ #6 nylon spacers
- One M2 x 20 machine screw
- One M2 hex nut
- One M2 washer
- Two M3 x 20 machine screws (you can substitute #4-40 x 3/4″ machine screws)
- Two M3 hex nuts (or #4-40 hex nut if you use the the #4-40 screw)
- Two M3 or M4 washers (or #4-40 washer if you use the #4-40 screw)
For an Arduino Uno prototyping stand you will also need:
- Three or four 1/4″ #6 nylon spacers
- Three or four M3 x 20 machine screws (you can substitute #4-40 x 3/4″ machine screws)
- Three or four M3 hex nuts (or #4-40 hex nut if you use the the #4-40 screw)
- Three or four M3 or M4 washers (or #4-40 washer if you use the #4-40 screw)
One of the holes on the Uno circuit board is very close to a connector. Depending on the size of the machine screw head you use, you may not be able to use the fourth hole to mount the board. Don’t worry if that’s the case, the Uno is securely held with only three screws.
-
How can I cut the acrylic if I do not have a laser cutter?
You can use a saw to cut the acrylic and a drill press to drill the holes. -
What settings should I use for a 45 watt Epilog Helix laser cutter?
For raster, use Speed 50 and Power 80; for vector, use Speed 6, Power 90, and Frequency 5000. -
Can I substitute specific screw types for the Arduino Uno stand?
Yes, you can substitute M3 x 20 machine screws with #4-40 x 3/4" machine screws. -
Why might I only be able to use three screws for the Arduino Uno?
One hole is very close to a connector, so depending on the screw head size, the fourth hole may not be usable. -
Where can I find the CorelDraw files for this project?
The files arduino duemilanove.cdr and arduino uno.cdr are available as attachments in the article. -
What is the purpose of engraving a rectangle on the base?
The engraved rectangle helps align the breadboard when mounting it. -
Do I need to remove the protective paper before assembling the stand?
Yes, the photos show the paper removed after cutting, implying it is part of the process. -
Is the stand design different for the Arduino Uno compared to the Duemilanove?
Yes, there are two distinct versions of the stands designed specifically for these models.
