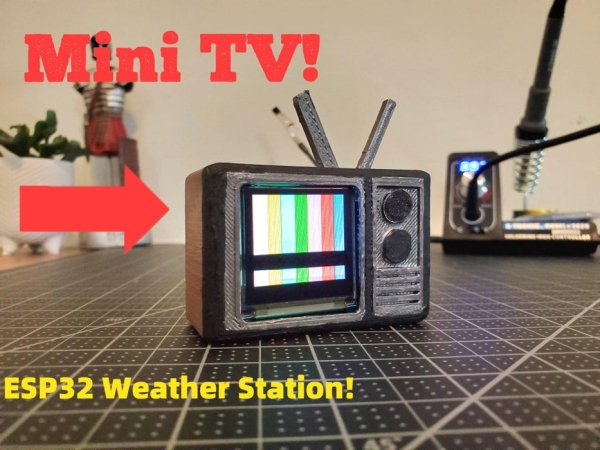
Hello everyone, today I’m going to show you how I built a Mini-TV weather station with Open Weather Map and the ESP32!
Background and Troubleshooting
I’m not kidding when I say the inspiration for this project came from boredom! I had been working on the same project for a long time, but enough was enough and I set a goal for myself to design and build a project over Christmas break. This commercial-less miniature weather station is what I came up with. Although there were a couple of road blocks along the way… Originally I designed this to display one’s Instructable stats; however the Arduino library was outdated and the author wasn’t responding to my pleads for help. So, my next idea was a weather station powered by OpenWeatherMap, which seemed easy enough, as I had used this API several times prior in different projects. However, this only opened another door for errors and bugs. Some of the problems which surfaced were multiple failed prints, trouble with bitmaps(custom images), and bad button configuration. The failed prints were due to measuring errors, which were easy enough to fix in TinkerCAD. However, the trouble with bitmaps is what occupied the majority of my time; only after buying everything did I realize that the ESP32 didn’t have enough flash memory to support bitmaps and they simply wouldn’t work. In order to fix this one would have to buy a 128×128 OLED from Adafruit with an sd-card reader on the back if you truly desire bitmaps. (though they are not essential.) Only one error left, the ESP32 kept reading the button as on even when it wasn’t being pressed and would thus refresh the contents of the display every second or so. I could not figure this out for the life of me only to realize I connected the wire to the wrong button terminal.
In the end it was tough and there were many problems to overcome, but it was also very rewarding! I even got it done just before school started up again therefore, I completed my goal!
This unique Arduino project should be relatively easy for people of all skill levels and would be a good project for people just starting up. If you are like me, you didn’t start out with a 3D printer. One way to overcome this would be to use a breadboard and power it from your laptop. That way you don’t need to worry about LI-POs or soldering.
Here is the weather data that the ESP32 will display
- Current Temperature
- Minimum Temperature
- Maximum Temperature
- Atmospheric Pressure
- Humidity
- Wind Speed
Let’s get started!
Supplies
Here are the parts as well as the links to buy them:
- 128×128 RGB OLED Here
- ESP32 Dev Module Here
- Brown, Black, and Grey paint Here
- Li-Po Here
- Charging Circuit Here
- 3.3v to 5v converter Here
- Slide switch Here
- Wire Here
- Push Button Here
- Multimeter Here
- Lead free Solder Here
- Soldering Iron Kit Here
(don’t use solder in kit)
Step 1: Wire It Up!
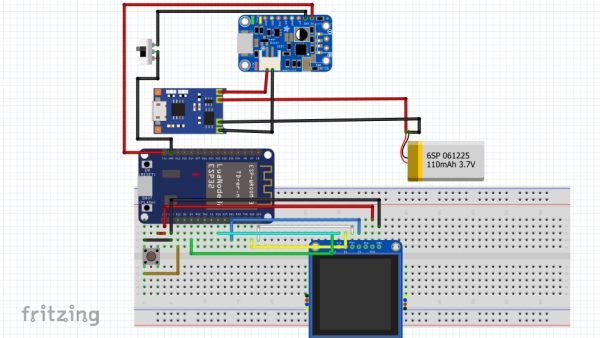
You will need to solder this circuit because the ESP32 doesn’t fit on a bread board, even if it did it probably wouldn’t fit inside the case. Make sure you don’t forget to set the output of the boost converter to 5v; to do this measure the output with a multimeter as you adjust the onboard potentiometer. If the voltage output is too high it could fry the ESP32[and possibly yourself], but if it’s too low the ESP32 won’t get enough power and the circuit won’t work. Make sure all of your connections are secure and there is no opportunity for a short circuit. I use hot glue to solve both these problems as hot glue isn’t conductive and holds solder to the board really well.
Connections:
Li-Po, TP4056 Charging Circuit
Vs–>B+
GND–>B-
~~~~~~~~~~~~~~
TP4056, Boost Converter
OUT+–>VIN+
OUT(-)–>Slide Switch –>VIN(-)
~~~~~~~~~~~~~~
Boost Converter, ESP32
VOUT+–>VIN
VOUT(-)–>GND
~~~~~~~~~~~~~~
ESP32, 128x128OLED
3v3–>VCC
GND–>GND
18–>CLK
4–>MOSI(DIN)
22–>DC
21–>CS
RST–>23
~~~~~~~~~~~~~~
ESP32, Push Button
3v3–>Left Pin
10k_resistor–>GND–>Right Pin
15–>Top Right Pin
(The circuit in the picture has been altered, please use connections above as a guide and NOT the image.)
Step 2: Printing & Assembly!

Print time will take ~3.5hours, not too bad! After it’s cooled down paint the whole thing poo brown[for some reason old TVs are poo brown] with a black border around the screen and control panel then throw some silver inside those black borders. As you can hopefully see the button goes through the front hole; hot glue works well for securing it in place[I love hot glue]. Then glue one of the circles onto the button from the outside. I have included 4 extra circles in the STL file, because 3D printers aren’t the best at printing small circles such as these, or at least mine isn’t. Make sure you put the screen and button in first, then ESP32, charging circuit, and finally boost converter with the Li-Po. Skadoosh, you just made an circuit board sandwhich.
Step 3: Ugh, Coding Time
You will have to manually fill in your Wi-Fi credentials since I don’t know them. Once you have done that go to Open Weather Map and sign-in if you have an account, or sign-up to get one. When you finish that you will be presented with an API key, copy and paste it onto line 17. [to turn on line numbers go to File>Preferences>Display Line Numbers] On lines 19 and 20 put your city name and country code in their respective places. Make sure you have all of these libraries installed:
WiFi.h, HTTPClient.h, Arduino_JSON.h, SPI.h, Adafruit_SSD1351.h, and Adafruit_GFX.h
[to install them go to Tools>Manage Libraries]
We are almost done with setup, all you have to do now is add the ESP32 to the boards manager. Go to File>Preferences>Additional Boards Manager URLs: and copy this URL into it: https://dl.espressif.com/dl/package_esp32_index.json. If you need to add additional boards later on for a different project just add a comma after this URL and add it.
Code:
#include <WiFi.h>
#include <HTTPClient.h>
#include <Arduino_JSON.h>
#include <SPI.h>
#include <Adafruit_SSD1351.h>
#include <Adafruit_GFX.h>
//uint16_t time = millis();
const char* ssid = "Your Network Name Here";//enter the name of your Wi-Fi network
const char* password = "Your Network Password Here";//enter the password to your network
const int buttonPin = 15;
int buttonState = 0;
// Your Domain name with URL path or IP address with path
String openWeatherMapApiKey = "aBunchOfRandomNumbers&LettersGoHere";//your open weather map API key
String city = "New York";//Your city name, New York is an example I dont actually live there
String state = "NY";//enter your state abbreviation. Thx paul159 for figuring this out!
String countryCode = "US";// Your country code
String jsonBuffer;
///\/OLED SETUP\///////////////
// Screen dimensions
#define SCREEN_WIDTH 128
#define SCREEN_HEIGHT 128 // Change this to 96 for 1.27" OLED.
// You can use any (4 or) 5 pins
#define SCLK_PIN 18
#define MOSI_PIN 4
#define DC_PIN 22
#define CS_PIN 21
#define RST_PIN 23
// Color definitions
#define BLACK 0x0000
#define BLUE 0x001F
#define RED 0xF800
#define GREEN 0x07E0
#define CYAN 0x07FF
#define MAGENTA 0xF81F
#define YELLOW 0xFFE0
#define WHITE 0xFFFF
Adafruit_SSD1351 tft = Adafruit_SSD1351(SCREEN_WIDTH, SCREEN_HEIGHT, CS_PIN, DC_PIN, MOSI_PIN, SCLK_PIN, RST_PIN);
///////////////////////////////
void setup() {
Serial.begin(9600);
tft.begin();
pinMode(buttonPin, INPUT);
WiFi.begin(ssid, password);
Serial.println("Connecting");
while(WiFi.status() != WL_CONNECTED) {
delay(500);
Serial.print(".");
}
Serial.println("");
Serial.print("Connected to WiFi network with IP Address: ");
Serial.println(WiFi.localIP());
}
void loop() {
buttonState = digitalRead(buttonPin);
// Send an HTTP GET request
if (buttonState == HIGH) {
Serial.println("Button was pressed");
tft.fillScreen(BLACK);
//////////////
tft.fillRect(0, 0, 18, 128, WHITE );
tft.fillRect(18, 0, 37, 128, YELLOW);
tft.fillRect(37, 0, 56, 128, CYAN);
tft.fillRect(56, 0, 75, 128, GREEN);
tft.fillRect(75, 0, 94, 128, MAGENTA);
tft.fillRect(94, 0, 113, 128, RED);
tft.fillRect(113, 0, 128, 114, BLUE);
tft.fillRect(0, 114, 128, 14, BLACK);
//////////////
//lcdTestPattern();
delay(1200);
// Check WiFi connection status
if(WiFi.status()== WL_CONNECTED){
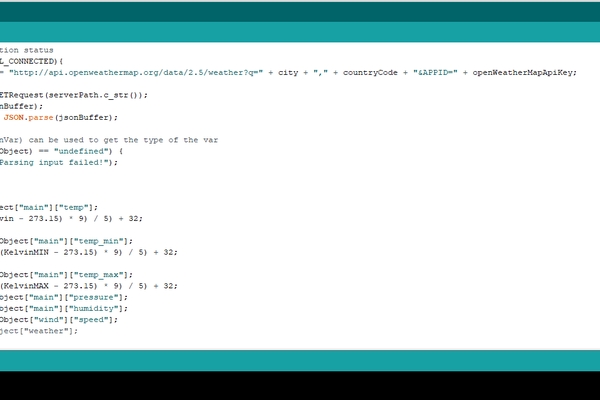
String serverPath = "http://api.openweathermap.org/data/2.5/weather?q=" + city + "," + state + "," + countryCode + "&APPID=" + openWeatherMapApiKey;
jsonBuffer = httpGETRequest(serverPath.c_str());
Serial.println(jsonBuffer);
JSONVar myObject = JSON.parse(jsonBuffer);
// JSON.typeof(jsonVar) can be used to get the type of the var
if (JSON.typeof(myObject) == "undefined") {
Serial.println("Parsing input failed!");
return;
}
int Kelvin = myObject["main"]["temp"];
int FTemp = (((Kelvin - 273.15) * 9) / 5) + 32;
int KelvinMIN = myObject["main"]["temp_min"];
int FTemp_MIN = (((KelvinMIN - 273.15) * 9) / 5) + 32;
int KelvinMAX = myObject["main"]["temp_max"];
int FTemp_MAX = (((KelvinMAX - 273.15) * 9) / 5) + 32;
int Pressure = myObject["main"]["pressure"];
int Humidity = myObject["main"]["humidity"];
int WindSpeed = myObject["wind"]["speed"];
//char test = myObject["weather"];
Serial.print("JSON object = ");
Serial.println(myObject);
Serial.println(JSON.typeof(myObject));
Serial.print("Temperature: ");
Serial.println(FTemp);
Serial.print("Temperature MIN: ");
Serial.println(FTemp_MIN);
Serial.print("Temperature MAX: ");
Serial.println(FTemp_MAX);
Serial.print("Pressure: ");
Serial.println(Pressure);
Serial.print("Humidity: ");
Serial.println(Humidity);
Serial.print("Wind Speed: ");
Serial.println(WindSpeed);
Serial.print("Weather description: ");
Serial.println(myObject["weather"]);
String SFTemp = String(FTemp);
String SFTemp_MIN = String(FTemp_MIN);
String SFTemp_MAX = String(FTemp_MAX);
String SPressure = String(Pressure);
String SHumidity = String(Humidity);
String SWindSpeed = String(WindSpeed);
//probably should have made a function for this, but guess what, I didnt, so deal with it.
tft.fillScreen(BLACK);
tft.setCursor(40, 16);
tft.setTextSize(4);
tft.setTextColor(YELLOW);
tft.print(SFTemp);
tft.setTextSize(2);
tft.setCursor(90, 13);
tft.print("o");
tft.setCursor(0,50);
tft.setTextSize(1);
tft.setTextColor(BLUE);
tft.print("Minimum Temp: " + SFTemp_MIN);
tft.setCursor(0,62);
tft.setTextSize(1);
tft.setTextColor(BLUE);
tft.print("Maximum Temp: " + SFTemp_MAX);
tft.setCursor(0,74);
tft.setTextSize(1);
tft.setTextColor(BLUE);
tft.print("Pressure: " + SPressure + "hPa");
tft.setCursor(0, 86);
tft.setTextSize(1);
tft.setTextColor(BLUE);
tft.print("Humidity: " + SHumidity + "%");
tft.setCursor(0, 98);
tft.setTextSize(1);
tft.setTextColor(BLUE);
tft.print("Wind Speed: " + SWindSpeed + "mph");
}
else {
Serial.println("WiFi Disconnected");
}
}
}
String httpGETRequest(const char* serverName) {
HTTPClient http;
// Your IP address with path or Domain name with URL path
http.begin(serverName);
// Send HTTP POST request
int httpResponseCode = http.GET();
String payload = "{}";
if (httpResponseCode>0) {
Serial.print("HTTP Response code: ");
Serial.println(httpResponseCode);
payload = http.getString();
}
else {
Serial.print("Error code: ");
Serial.println(httpResponseCode);
}
// Free resources
http.end();
return payload;
delay(1000);
}<br>
That only took three straight days to code. *tired chuckle*
Source: Mini-TV Weather Station With the ESP32!!