Christmas is just around the corner and its time to start planning things to lighten up this festive season. Today you are about to see building of Remote controlled lights with adjustable lighting effects using Arduino. The coolest thing about this project is controlling the effects of LED lighting using a typical household Remote and Arduino. This eliminates the primitive way of using pot to control LED effects and go wireless.
PARTS REQUIRED:
- TSOP1738 – Buy here
- Arduino Uno – Buy here
- LEDs – Buy here
- Transistors
DESIGN OF REMOTE CONTROLLED LIGHTS:
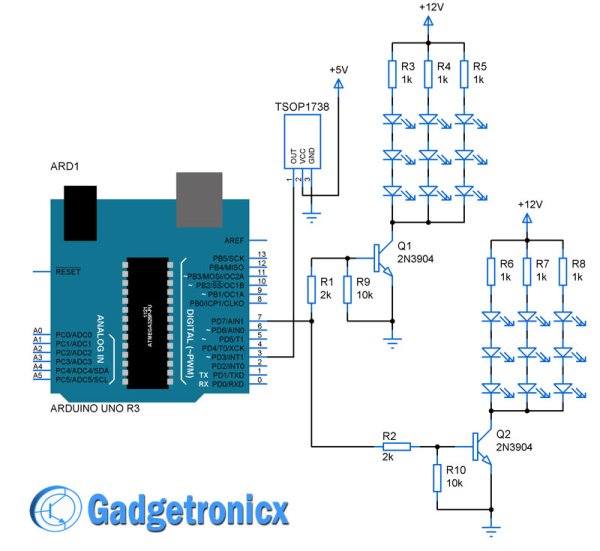
Arduino forms the heart of this system where a simple blink code with varied time delays is used to produce the lighting effect. Two NPN transistors was used here as a switch to turn the LED’s ON and OFF since the Arduino cannot source large current to power up the LED’s by itself. And TSOP1738 IR receiver to receive the IR beam from the remote and send signals to the Arduino.
TSOP 1738:
TSOP1738 is a simple IR signal receiver that is capable of receiving IR signals of frequency 38Khz at which most of our household remotes work. This made the project fit to be controlled with any remotes we use in our house. This is an active low sensor which gives low output when IR signal incident and high in absence of IR signal. We have to program Arduino accordingly to receive this TSOP1738 input accordingly.
WORKING EXPLANATION:
The Arduino acts as a simple activator and a delay generator for the effects. Meanwhile the transistor is to switch the LED sets connected to the pin 7 of the LED. The IR receiver receives the incoming IR signal and triggers interrupt to the Arduino. So when user presses any button in the remote facing the sensor it give low signal in its output pin which in turn create an interrupt in Arduino. With each encountered interrupt the Arduino uses set of delay value between the ON and OFF state of the LED which will be predefined in the code. This way the LED blink will overall looks like a beautiful effect to the user.
This makes the two set of LED’s to turn on and off at the same time. And varying time delay will take care of creating attractive effect.
Read More: Remote controlled light effects using Arduino