What are the paper instruments made of?
Using Conductive Paint, we were able to create a paper piano & guitar that plays notes and changes graphics on a screen.
Paper Piano Arduino Code
Step by step – Paper Instrument Development
Software needed
Processing: https://processing.org/
Capacitive Arduino Library:http://playground.arduino.cc/Main/CapacitiveSensor?from=Main.CapSense
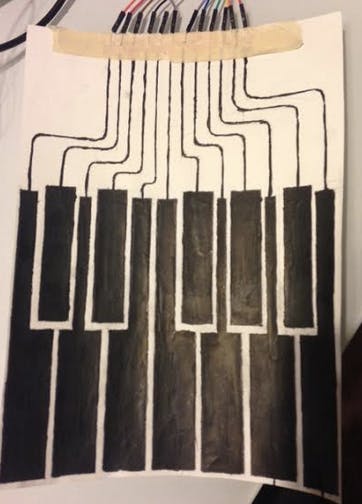
1. Draw paper piano
Use conductive ink to draw the keyboard. Make sure to not have any of the lines intersect (as the lines act as wires to the arduino). Also, ensure that there is no gaps in your ink lines as a gap in the paint would be equivalent to a cut wire (it won’t work!)

2. Wire up hardware
Follow the Fritzing Schematic on the left. The Arduino Capacitive Sensor library (see useful resources) has a great description of how the conductive painted keys act as capacitive sensors.
Before hooking up all 12 sensors (or however many you want), test your setup on one sensor first and running the Arduino sample code (http://playground.arduino.cc/Main/CapacitiveSensor?from=Main.CapSense). To wire up everything, connect a resistor (~1Mega Ohm) from Digital Pin 4 to Digital Pin 2. Connect Digital Pin 2 with a wire to the painted key. A quick way to do this is to simply tape the wire so it is physically touching the paint. (For those who are interested in a more robust ways, here is a great site for examples of doing hard/soft connection is http://www.kobakant.at/DIY/?p=1272.). Now that everything is wired up, upload the Arduino sample code and open the Serial port. You should see the values change as your finger touches the painted key. To play around with the sensitivity (how large of a change in value you read) play around with different resistors.
Now that you’ve got one fully working, let’s connect the other 12 (or however many others you want!). In order to save the number of pins the Arduino uses, we’ll use multiplexing. Multiplexing is a great cheap way to maximize the amount of analog input/output pins. For this project we will use a 16 analog multiplexer which will use a total of 5 pins on the Arduino (4 control Digital Pins and 1 Analog read pin). From this 1 Analog read pin on the Arduino we will cycle between all 12 notes (you can expand to 16). As we are only using 5 pins on the Arduino you can see that you can add even more painted keys with more multiplexing.
Follow the Fritzing schematic exactly (and reference the Useful Resources multiplexing link) and connect your painted keys to the multiplexor in the order you want to read them. Now run the code attached. Your serial monitor should now read all the keys and spit out the values, which are delimited (separated) by a semicolon (we use this in processing in the next step to separate all the signals). If this is working so far you’re in great shape!
3. Connect Arduino to Processing
The final step is to connect Arduino to the Processing sketch. Essentially the Arduino is sending all the piano key values to processing through the Serial port. As such, you have to define which serial port your computer is using ( Change the following line in the processing sketch: String portName = Serial.list()[2]; On my computer it is 2, but it might be different on yours) as well as the baud rate (i.e. in the Arduino sketch the line Serial.begin(115200) must match the processing sketch line myPort = new Serial(this, portName, 115200);.
The cool graphics is open sourced from open processing (see Useful Resources processing sketch) and the midi controller to make the piano sounds is a java library.
This should get you set to run 12 painted keys through the Arduino and create cool graphics and piano sounds through your laptop! You can definitely tweak the components (such as the resistors) to make the instrument as sensitive to touch as you want as well as add more painted keys (since the multiplexer saved some pins on your Arduino!)