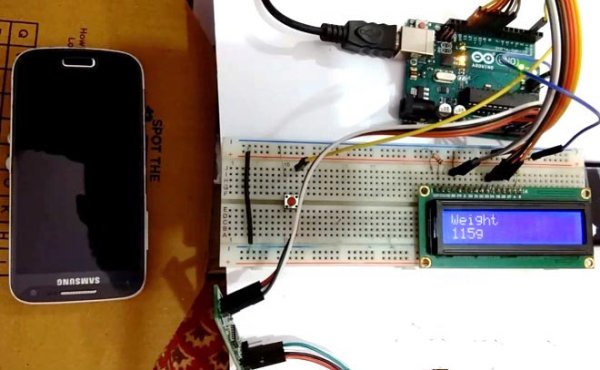
Today we are going to Measure the Weight by interfacing Load Cell and HX711 Weight Sensor with Arduino. We have seen weight machines at many shops, where machine displays the weight just by placing any item on the weighing platform. So here we are building the same Weighing machine by using Arduino and Load cells, having capacity of measuring upto 40kg. This limit can be further increased by using the Load cell of higher capacity.
Required Components:
- Arduino Uno
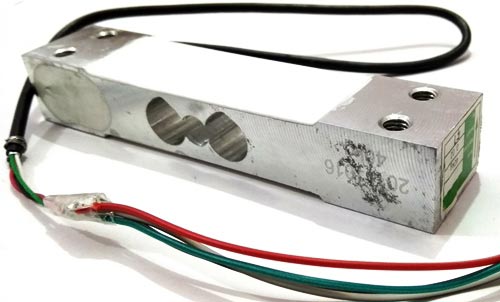
- Load cell (40kg)
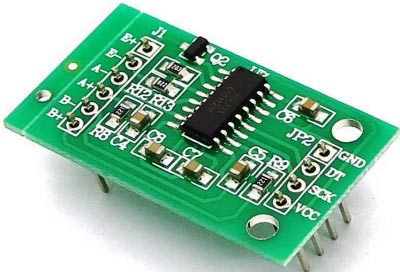
- HX711 Load cell Amplifier Module
- 16×2 LCD
- Connecting wires
- USB cable
- Breadboard
- Nut bolts, Frame and base
Load Cell and HX711 Weight Sensor Module:
Load cell is transducer which transforms force or pressure into electrical output. Magnitude of this electrical output is directly proportion to the force being applied. Load cells have strain gauge, which deforms when pressure is applied on it. And then strain gauge generates electrical signal on deformation as its effective resistance changes on deformation. A load cell usually consists of four strain gauges in a Wheatstone bridge configuration. Load cell comes in various ranges like 5kg, 10kg, 100kg and more, here we have used Load cell, which can weight upto 40kg.
Now the electrical signals generated by Load cell is in few millivolts, so they need to be further amplify by some amplifier and hence HX711 Weighing Sensor comes into picture. HX711 Weighing Sensor Module has HX711 chip, which is a 24 high precision A/D converter (Analog to digital converter). HX711 has two analog input channels and we can get gain up to128 by programming these channels. So HX711 module amplifies the low electric output of Load cells and then this amplified & digitally converted signal is fed into the Arduino to derive the weight.
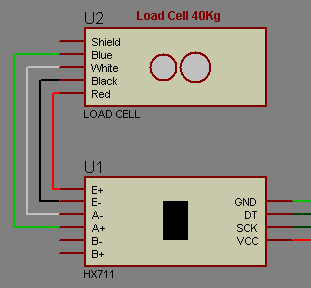
Load cell is connected with HX711 Load cell Amplifier using four wires. These four wires are Red, Black, White and Green/Blue. There may be slight variation in colors of wires from module to module. Below the connection details and diagram:
- RED Wire is connected to E+
- BLACK Wire is connected to E-
- WHITE Wire is connected to A-
- GREEN Wire is connected to A+
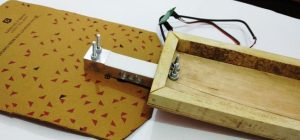
Fixing Load Cell with Platform and Base:
This step is optional and you can directly put the weights on the Load cell without Platform and can simply clamp it without fixing it with any base, but it’s better to attach a platform for putting the large things on it and fix it on a Base so that it stand still. So here we need to make a frame or platform for putting the things for weight measurement. A base is also required to fix the load cell over it by using nuts and bolts. Here we have used a hard cardboard for the frame for placing things over it and a wooden board as Base. Now do the connections as shown in the circuit diagram and you are ready to go.
Circuit Explanation:
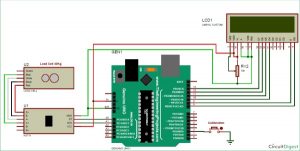
Connections for this project are easy and the schematic is given below. 16×2 LCD pins RS, EN, d4, d5, d6, and d7 are connected with pin numbers 8, 9, 10, 11, 12, and 13 of Arduino respectively. HX711 Module’s DT and SCK pins are directly connected with Arduino’s pins A0 and A1. Load cell connections with the HX711 module are already explained earlier and also shown in the below circuit diagram.
Working Explanation:
The working principle of this Arduino Weight Measurement project is easy. Before going into details, first, we have to calibrate this system for measuring the correct weight. When the user will power it up the system will automatically start calibrating. And if the user wants to calibrate it manually then press the push button. We have created a function void calibrate() for calibration purposes, check the code below.
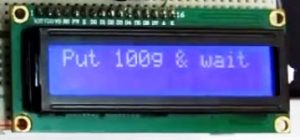
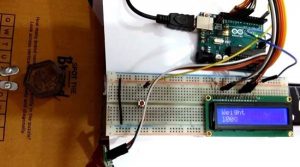
For calibration, wait for LCD indication for putting 100 gram over the load cell as shown in the below picture. When LCD will show “put 100g” then put the 100g weight over the load cell and wait. After some seconds the calibration process will be finished. After calibration user may put any weight (max 40kg) over the load cell and can get the value over LCD in grams.
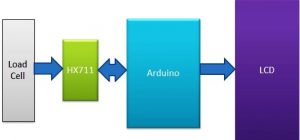
In this project, we have used Arduino to control whole the process. Load cell senses the weight and supplies an electrical analog voltage to HX711 Load Amplifier Module. HX711 is a 24bit ADC, which amplifies and digitally converts the Load cell output. Then this amplified value is fed to the Arduino. Now Arduino calculates the output of HX711 and converts that into the weight values in grams and shows it on LCD. A push-button is used for calibrating the system. We have written an Arduino program for the whole process, check the Code and demo Video at the end of this tutorial.
Arduino Weighing Scale Code:
The programming part of this project is a little complex for beginners. In this project, we did not use any library for interfacing the HX711 load sensor with Arduino. We have just followed the datasheet of HX711 and application notes. Although there are some libraries present for this purpose, where you only need to include that library and you can get the weight using one line of code.
First of all, we have included a header file for LCD and defined the pins for the same. And for push-button also. Then declared some variables for calculation purpose.
#include <LiquidCrystal.h>
LiquidCrystal lcd(8, 9, 10, 11, 12, 13);

#define DT A0
#define SCK A1
#define sw 2

long sample=0;
float val=0;
long count=0;
After it, we have created the below function for reading data from the HX711 module and return its output.
unsigned long readCount(void)
{
  unsigned long Count;
  unsigned char i;
  pinMode(DT, OUTPUT);
  digitalWrite(DT,HIGH);
  digitalWrite(SCK,LOW);
  Count=0;
  pinMode(DT, INPUT);
  while(digitalRead(DT));
  for (i=0;i<24;i++)
  {
    digitalWrite(SCK,HIGH);
    Count=Count<<1;
    digitalWrite(SCK,LOW);
    if(digitalRead(DT))
    Count++;
  }
  digitalWrite(SCK,HIGH);
  Count=Count^0x800000;
  digitalWrite(SCK,LOW);
  return(Count);
}
After it, we have initialized LCD and give directions to input and output pins in void setup().
void setup()
{
  Serial.begin(9600);
  pinMode(SCK, OUTPUT);
  pinMode(sw, INPUT_PULLUP);
  lcd.begin(16, 2);
  lcd.print("    Weight ");
  lcd.setCursor(0,1);
  lcd.print(" Measurement ");
  delay(1000);
  lcd.clear();
  calibrate();
}
Next in void loop() function, we have read data from HX711 module and converted this data into weight (grams) and sent it to the LCD.
void loop()
{
  count= readCount();
  int w=(((count-sample)/val)-2*((count-sample)/val));
  Serial.print("weight:");
  Serial.print((int)w);
  Serial.println("g");
  lcd.setCursor(0,0);
  lcd.print("Weight            ");
  lcd.setCursor(0,1);
  lcd.print(w);
  lcd.print("g             ");

  if(digitalRead(sw)==0)
  {
    val=0;
    sample=0;
    w=0;
    count=0;
    calibrate();
  }
}
Before this, we have created a calibration function in which we have calibrated the system by placing the 100gm weight over the Load cell.
void calibrate() { lcd.clear(); lcd.print(“Calibrating…”); lcd.setCursor(0,1); lcd.print(“Please Wait…”); for(int i=0;i<100;i++) { count=readCount(); sample+=count; Serial.println(count); } ….. …. ….. …..
So here we have learned the basic Interfacing of Load cell and HX11 Weight Sensor with Arduino to measure the weights. In our text tutorials, we will create some applications based on weight measurement like Smart container, Automatic gate etc.
Code
#include <LiquidCrystal.h>
LiquidCrystal lcd(8, 9, 10, 11, 12, 13);
#define DT A0
#define SCK A1
#define sw 2
long sample=0;
float val=0;
long count=0;
unsigned long readCount(void)
{
unsigned long Count;
unsigned char i;
pinMode(DT, OUTPUT);
digitalWrite(DT,HIGH);
digitalWrite(SCK,LOW);
Count=0;
pinMode(DT, INPUT);
while(digitalRead(DT));
for (i=0;i<24;i++)
{
digitalWrite(SCK,HIGH);
Count=Count<<1;
digitalWrite(SCK,LOW);
if(digitalRead(DT))
Count++;
}
digitalWrite(SCK,HIGH);
Count=Count^0x800000;
digitalWrite(SCK,LOW);
return(Count);
}
void setup()
{
Serial.begin(9600);
pinMode(SCK, OUTPUT);
pinMode(sw, INPUT_PULLUP);
lcd.begin(16, 2);
lcd.print(” Weight “);
lcd.setCursor(0,1);
lcd.print(” Measurement “);
delay(1000);
lcd.clear();
calibrate();
}
void loop()
{
count= readCount();
int w=(((count-sample)/val)-2*((count-sample)/val));
Serial.print(“weight:”);
Serial.print((int)w);
Serial.println(“g”);
lcd.setCursor(0,0);
lcd.print(“Weight “);
lcd.setCursor(0,1);
lcd.print(w);
lcd.print(“g “);
if(digitalRead(sw)==0)
{
val=0;
sample=0;
w=0;
count=0;
calibrate();
}
}
void calibrate()
{
lcd.clear();
lcd.print(“Calibrating…”);
lcd.setCursor(0,1);
lcd.print(“Please Wait…”);
for(int i=0;i<100;i++)
{
count=readCount();
sample+=count;
Serial.println(count);
}
sample/=100;
Serial.print(“Avg:”);
Serial.println(sample);
lcd.clear();
lcd.print(“Put 100g & wait”);
count=0;
while(count<1000)
{
count=readCount();
count=sample-count;
Serial.println(count);
}
lcd.clear();
lcd.print(“Please Wait….”);
delay(2000);
for(int i=0;i<100;i++)
{
count=readCount();
val+=sample-count;
Serial.println(sample-count);
}
val=val/100.0;
val=val/100.0; // put here your calibrating weight
lcd.clear();
}
Video
Read More: Arduino Weight Measurement using Load Cell and HX711 Module