I’ve always been interested in monitoring my local weather, and noticed the difference between what weather.com and accuweather.com think my local weather is, and what I see out the window. I also wanted better control over my heating and A/C system. As a computer and electronics nut, I’ve been playing with the Arduino Microcontroller, and decided to to meld my interests. So here goes the documentation on my home built solar powered weather station (always being modified, and expanded) with HVAC Control.
Step 1: The Arduino
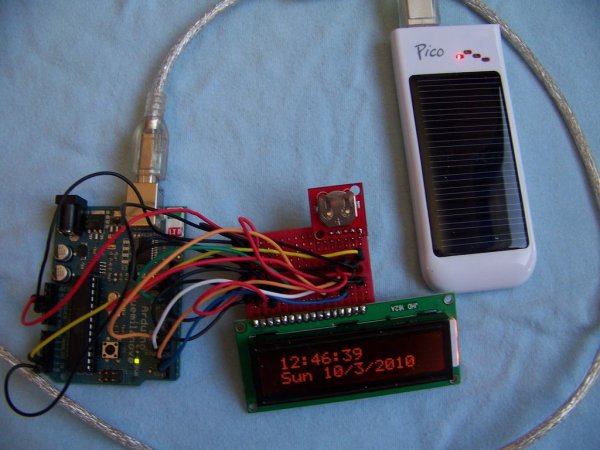
The first step was obtaining a Arduino board. We purchased ours from hacktronics.com. After working through the tutorials on their site, I felt confident that I understood the simple scripting and connection concepts, and moved forward.
Arduino is an open-source electronics prototyping platform based on flexible, easy-to-use hardware and software. It’s intended for artists, designers, hobbyists, and anyone interested in creating interactive objects or environments. – http://arduino.cc/
The Arduino requires 5v to run, and we supply this with our Pico Solar PV / Lithium battery pack.
Step 2: The LCD Display
I needed the ability to display temperature, humidity, barometric pressure, and time/date, so I picked a 4 line white on blue LCD display from Hacktronics. I used their LCD tutorial to get it connected and display some sample text on the screen.
// character LCD example code
// www.hacktronics.com
// Connections:
// rs (LCD pin 4) to Arduino pin 12
// rw (LCD pin 5) to Arduino pin 11
// enable (LCD pin 6) to Arduino pin 10
// LCD pin 15 to Arduino pin 13
// LCD pins d4, d5, d6, d7 to Arduino pins 5, 4, 3, 2
LiquidCrystal lcd(12, 11, 10, 5, 4, 3, 2);
int backLight = 13; // pin 13 will control the backlight
void setup()
{
pinMode(backLight, OUTPUT);
digitalWrite(backLight, HIGH); // turn backlight on. Replace ‘HIGH’ with ‘LOW’ to turn it off.
lcd.begin(16,2); // columns, rows. use 16,2 for a 16×2 LCD, etc.
lcd.clear(); // start with a blank screen
lcd.setCursor(0,0); // set cursor to column 0, row 0 (the first row)
lcd.print(“Hello, World”); // change this text to whatever you like. keep it clean.
lcd.setCursor(0,1); // set cursor to column 0, row 1
lcd.print(“hacktronics.com”);
// if you have a 4 row LCD, uncomment these lines to write to the bottom rows
// and change the lcd.begin() statement above.
//lcd.setCursor(0,2); // set cursor to column 0, row 2
//lcd.print(“Row 3”);
//lcd.setCursor(0,3); // set cursor to column 0, row 3
//lcd.print(“Row 4”);
}
void loop()
{
}
See http://www.hacktronics.com/Tutorials/arduino-character-lcd-tutorial.html for actual code as instructables breaks our include statements.
For more detail: The Arduino Weather Station