“Hello world”,I am not going to start this blog with typical “Hello world” program,since lot of resources already covered Arduino way of telling “hello world”,that is Blinking a LED.
This project is absolutely for beginners who prefers to run than taking a walk,I am going to control 7 segment display to automatically count numbers from 1-9 using Arduino,well I hope you know the basics of 7 segment display.If not,don’t worry here is a concise tutorial about 7 segment display.
lets get started,Here is some components you need before proceeding
- Arduino (Uno will be cheap)
- Breadboard
- 7 segment display (common anode or cathode)
- 220ohm resistor – 8 pieces
- some wire stripes (at least 8 pieces)
In this tutorial I am going to build the project using common anode type 7 segment display but at the end of the post you can find program and schematic for common cathode also.
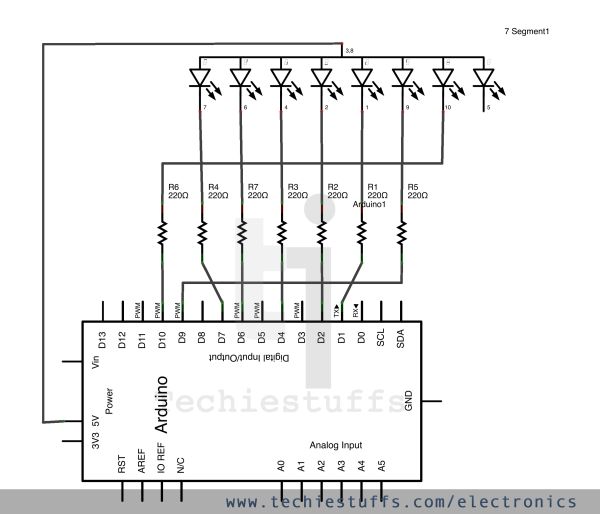
The connection is pretty simple,Just connect pin 1-10 (excluding 3,5,8) to series resistors.First short, pin 3 and 8 os seven segment display,which is to be connected with +5V pin on Arduino.Now connect other end of R1 with Arduino Digital pin 1,Here note that R1 is connected with the pin 1 of seven segment display.
Now similarly connect other series resistor pins to corresponding pins of Arduino.
Note that since we are not going to use pin 5,which is used to display a dot.Also the pin 3 and 8 are connected with 5V,So the corresponding Arduino pins 3 and 8 will also be not used.
If You want to change the pin configuration you need to modify the code as well.
Program :
In above code snippet I have defined seven constants which will be defined as INPUT or OUPUT port,later in the program(void setup()).
I have assigned a=7,since the In 7 segment display the segment ‘a’ is connected to pin ‘7’.You can vary this according to your wish but I did like this since you don’t need to remember anything while connecting Arduino pins and 7 segment display.Just connect pin 1 with Arduino pin 1,pin 2 with Arduino pin 2 and so on.
void LightLed(int n){  switch(n)  {    case 0:
    digitalWrite(a, LOW);
    digitalWrite(b, LOW);
    digitalWrite(c, LOW);
    digitalWrite(d, LOW);
    digitalWrite(e, LOW);
    digitalWrite(f, LOW);
    digitalWrite(g, HIGH);
    break;

        case 1:
    digitalWrite(a, HIGH);
    digitalWrite(b, LOW);
    digitalWrite(c, LOW);
    digitalWrite(d, HIGH);
    digitalWrite(e, HIGH);
    digitalWrite(f, HIGH);
    digitalWrite(g, HIGH);
    break;

        case 2:
    digitalWrite(a, LOW);
    digitalWrite(b, LOW);
    digitalWrite(c, HIGH);
    digitalWrite(d, LOW);
    digitalWrite(e, LOW);
    digitalWrite(f, HIGH);
    digitalWrite(g, LOW);
    break;
        case 3:
    digitalWrite(a, LOW);
    digitalWrite(b, LOW);
    digitalWrite(c, LOW);
    digitalWrite(d, LOW);
    digitalWrite(e, HIGH);
    digitalWrite(f, HIGH);
    digitalWrite(g, LOW);
    break;

        case 4:
    digitalWrite(a, HIGH);
    digitalWrite(b, LOW);
    digitalWrite(c, LOW);
    digitalWrite(d, HIGH);
    digitalWrite(e, HIGH);
    digitalWrite(f, LOW);
    digitalWrite(g, LOW);
    break;

        case 5:
    digitalWrite(a, LOW);
    digitalWrite(b, HIGH);
    digitalWrite(c, LOW);
    digitalWrite(d, LOW);
    digitalWrite(e, HIGH);
    digitalWrite(f, LOW);
    digitalWrite(g, LOW);
    break;
case 4:
digitalWrite(a, HIGH);
digitalWrite(b, LOW);
digitalWrite(c, LOW);
digitalWrite(d, HIGH);
digitalWrite(e, HIGH);
digitalWrite(f, LOW);
digitalWrite(g, LOW);
break;
case 5:
digitalWrite(a, LOW);
digitalWrite(b, HIGH);
digitalWrite(c, LOW);
digitalWrite(d, LOW);
digitalWrite(e, HIGH);
digitalWrite(f, LOW);
digitalWrite(g, LOW);
break;
For more detail: Single Digit Decimal counter