Summary of DIY Skee Ball Machine
Summary: A DIY skee ball machine recreates the arcade experience using plywood cabinets cut on a ShopBot, a cork-covered ramp, sensors, Arduino-driven electronics, and a HDTV display. Designed for portability, it assembles with tab-and-slot pieces, features a glued s-shaped kicker, and was built for Maker Faire with assistance from Because We Can. The project is mostly functional but needs refinements.
Parts used in the DIY Skee Ball Machine:
- Digital distance sensors
- Arduino Uno
- Breadboard
- Laptop
- 100mm arcade button
- Wires
- Stereo
- Arduino software
- Processing software
- Illustrator or other vector graphics program
- 32" HDTV
- HDTV mount
- 3/4" plywood (7 sheets)
- Gorilla tape
- Netting
- Wood screws
- Paint
- ShopBot (for cutting)
- Cordless drill
- Balls (ice ball game balls bought on eBay)
- Cork (for ramp covering)
- Metal bracket (ramp front protection)
The skee ball machine is a wonderful thing. The simple experience of rolling a ball into a target is so freakishly satisfying that I used to play as much as I could as a kid at the local amusement park/mini-golf course. The sound of the rolling ball on the ramp, the pop as it launched in the air, and the bouncing as you hoped it would hit the 50 or even the 100.
So when the idea for doing a bigger project came up, I jumped at the chance to make a DIY version. I was amazingly lucky to get a lot of help from the folks at Because We Can who did the design and fabrication of the machine on a Shopbot.
Note: this version was made for Maker Faire and as such has a few loose ends. It survived Maker Faire (mostly), but needs some more work to be bullet-proof.
Step 1: Get Stuff
Electronics
- Digital Distance sensors
- Arduino Uno
- breadboard
- laptop
- 100mm arcade button
- wires
- stereo
Software
- Arduino
- Processing
- Illustrator (or other vector graphics program)
Display
- 32″ HDTV
- HDTV mount
Cabinet
- 7 sheets of 3/4″ plywood
- gorilla tape
- netting
- wood screws
- paint
Tools
- ShopBot
- Cordless Drill
Other
- Balls. These are balls from the ice ball game and were bought on eBay (search for “ice balls skee”) for $10 each
Step 2: The four main pieces
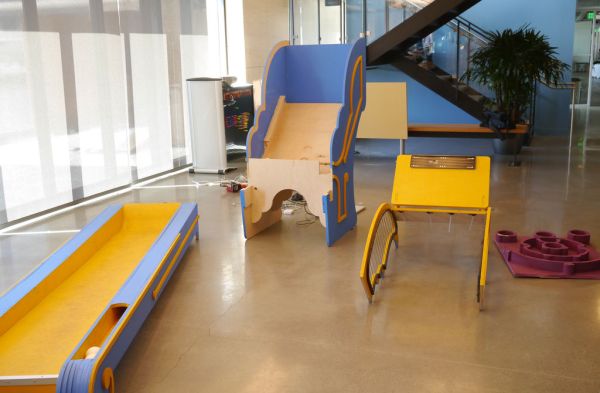
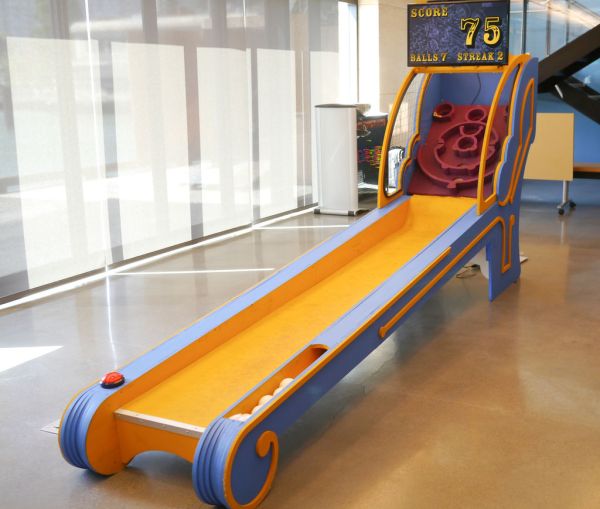
These are the four main pieces of the skee ball machine. These can be easily taken apart so that the whole thing can be moved in a 10′ U-Haul truck. The ramp slots onto the cabinet and doesn’t use any fasteners to be attached.
The Revit files for the skee ball machine are attached. With this design, the pieces were cut out of 3/4″ ply on a ShopBot. The assembly is straightfoward as it’s a tab-and-slot design.
Step 3: The playfield
The pieces for the playfield are straightforward. Most of the pieces fit together as in the picture above. The kicker at the end of the playfield is made up of several s-shaped pieces of cut plywood all glued together.
The ramp itself is covered with cork and the front end of the ramp has a metal bracket to protect against wayward throws.
For more detail: DIY Skee Ball Machine
- What are the major electronic components used?
Digital distance sensors, an Arduino Uno, a breadboard, a laptop, a 100mm arcade button, wires, and a stereo. - How is the cabinet and ramp constructed?
The cabinet and ramp are cut from 3/4" plywood using a ShopBot as a tab-and-slot design so pieces can be taken apart for transport. - What software is required for the project?
Arduino, Processing, and Illustrator or another vector graphics program are used. - How many sheets of plywood are needed?
The project uses seven sheets of 3/4" plywood. - How is the ramp surface finished?
The ramp is covered with cork and has a metal bracket on the front end for protection. - Can the machine be transported easily?
Yes; the four main pieces disassemble and fit in a 10' U-Haul truck. - What tool was used to cut the plywood pieces?
The ShopBot was used to cut the plywood pieces. - What kind of balls were used?
Balls from the ice ball game purchased on eBay were used. - Is the design fully finished and foolproof?
No; the Maker Faire version survived mostly but needs more work to be bullet-proof.