Summary of Arduino Timer Millis ; A timer without delay
This article explains replacing Arduino delay() with non-blocking timers using millis(), handling unsigned long overflow and subtraction, and using the millisDelay library for simpler delays and repeating timers. It includes examples (blocking vs non-blocking, single-shot, repeating), library functions (start, justFinished, repeat, stop, remaining, etc.), installation instructions, and advice to add a loop monitor to ensure loop() runs frequently.
Parts used in the Arduino Timer Millis project:
- Arduino board (e.g., Uno)
- LED (on-board LED on pin 13)
- Wiring or breadboard as needed
- Computer with Arduino IDE
- millisDelay library (software)
- Digital multimeter (Hz range) for loop monitor
Every month, we will post a list of updates to our projects, which are being worked on daily. PDF is a beneficial resource for use without an internet connection. The majority of tech enthusiasts are requesting the complete Arduino projects PDF. We will provide a direct link to download the PDF file with details on the release date and the number of projects.
Introduction of timer without delay arduino:
Don’t use delay( )
When delay() is utilized, your system becomes unresponsive as it waits for the delay to finish. Yet, caution is needed when replacing delays. This page details how to substitute Arduino delay() with a non-blocking alternative, enabling your code to run uninterrupted during the delay period.
These simple sketches illustrate turning on an LED when the Arduino board is powered up or reset, and then turning it off after 10 seconds. The initial one serves as a demonstration of how the code should NOT be written. The second code functions correctly, while the third utilizes the millisDelay library to streamline the code. Examples of both one-time and repetitive timers can be found as well.
If you are already aware of the reasons to avoid using delay() in Arduino, understand the significance of using unsigned longs, overflow, and unsigned subtraction, you can proceed directly to using the millisDelay library in Step 4.
The millisDelay library offers features for delays and timers, making it user-friendly and straightforward for beginners in Arduino.
This instructable is also on-line at How to code Timers and Delays in Arduino
Step 1: How Not to Code a Delay in Arduino
Here is how NOT to code a delay in a sketch.
int led = 13;<br>unsigned long delayStart = 0; // the time the delay started
bool delayRunning = false; // true if still waiting for delay to finish
void setup() {
  pinMode(led, OUTPUT);   // initialize the digital pin as an output.
  digitalWrite(led, HIGH); // turn led on
  delayStart = millis();   // start delay
  delayRunning = true; // not finished yet
}
void loop() {
  // check if delay has timed out after 10sec == 10000mS
  if (delayRunning && ((millis() - delayStart) >= 10000)) {
    delayRunning = false; // // prevent this code being run more then once
    digitalWrite(led, LOW); // turn led off
    Serial.println("Turned LED Off");
  }
//  Other loop code here . . .
  Serial.println("Run Other Code");
}
In the setup() method, which Arduino calls once on starting up, the led is turned on. Once setup() is finished, Arduino calls the loop() method over and over again. This is where most of your code goes, reading sensors sending output, etc. In the sketch above, the first time loop() is called, the delay(10000) stops everything for 10secs before turning the led off and continuing. If you run this code you will see that the Run Other Code is not printed out for 10sec after the startup, but after the led is turned off (ledOn equals false) then is printed out very fast as a loop() is called over and over again.
The point to note here is that you really should not the delay() function at all in the loop() code. It is sometimes convenient to use delay() in the setup() code and you can often get away with very small using very small delays of a few milliseconds in the loop() code, but you really should avoid using them at all in the loop() method.
Step 2: How to Write a Non-blocking Delay in Arduino
The previous drawing employed a blocking delay, meaning it halted all other code execution until the delay elapsed. This upcoming example illustrates how to create a delay in the code that does not block, allowing it to keep executing while waiting for the delay to finish.
int led = 13;
unsigned long delayStart = 0; // the time the delay started
bool delayRunning = false; // true if still waiting for delay to finish
void setup() {
  pinMode(led, OUTPUT);   // initialize the digital pin as an output.
  digitalWrite(led, HIGH); // turn led on
  delayStart = millis();   // start delay
  delayRunning = true; // not finished yet
}
void loop() {
  // check if delay has timed out after 10sec == 10000mS
  if (delayRunning && ((millis() - delayStart) >= 10000)) {
    delayRunning = false; // // prevent this code being run more then once
    digitalWrite(led, LOW); // turn led off
    Serial.println("Turned LED Off");
  }
//  Other loop code here . . .
  Serial.println("Run Other Code");
}
In the sketch above, in the setup() method, the delaystart variable is set to the current value of millis().
millis() is a built-in method that returns the number of milliseconds since the board was powered up. It starts at 0 each time the board is reset and is incremented each millisecond by a CPU hardware counter. More about millis() later. Once setup() is finished, Arduino calls the loop() method over and over again.
Each time loop() is called the code checks
a) that the delay is still running, and
b) if the millis() has moved on 10000 mS (10sec) from the value stored in delaystart.
When the time has moved on by 10000mS or more, then delay running is set to false to prevent the code in the if the statement is executed again and the led turned off.
If you run this sketch, you will see Run Other Code printed out very quickly and after 10sec the Led will be turned off and if you are quick you might just see the Turned LED Off message before it scrolls off the screen.
See Step 4, below for how the millisDelay library simplifies this code.
Step 3: Unsigned Long, Overflow and Unsigned Subtraction
The previous drawing employed a blocking delay, meaning it halted all other code execution until the delay elapsed. This upcoming example illustrates how to create a delay in the code that does not block, allowing it to keep executing while waiting for the delay to finish.
(millis() - delayStart) >= 10000
This test has to be coded in this very specific way for it to work.
Unsigned Long and Overflow
Both the delayStart variable and the value returned from the millis() function are of type unsigned long. This is a number ranging from 0 to 4,294,967,295.
Adding 1 to the highest value of an unsigned long, 4,294,967,295, will result in the value becoming 0. The number overflowed and then reset to 0. The overflow bit is simply discarded in this scenario. For instance, in a 3-bit unsigned integer, 111 represents the highest value (7). If 1 is added to this value, it becomes 1000 (8), but the first 1 exceeds the storage limit of 3 bits and is therefore not included, resulting in a wrap-around back to 000.
This implies that when the CPU increments the it variable storing the millis() result by one more, it will reset to 0. Millis() will reset to 0 and begin counting again. If you let your Arduino board stay on for 4,294,967,295 milliseconds, which is approximately 49 days and 17 hours, or simply 50 days, then this scenario will occur.
Now let’s explore a different method of encoding the test as (millis() – delayStart) >= 10000
Mathematically, this test is equivalent to millis() being greater than or equal to (delayStart + 10000)
But if you initiate the delay after around 50 days, such as when millis() shows 4,294,966,300 mS, delayStart + 10000 will cause an overflow to 995. This will make the condition millis() >= (delayStart + 10000) true right away, resulting in no delay. Therefore, this particular test method is not consistently effective.
Unfortunately, it is improbable that you will encounter this situation while conducting your tests, but it could unexpectedly arise in a device that runs continuously for months, such as a garage door control system. Using it will lead to a similar issue.
The time when the delay will end is equal to the current time in milliseconds plus 10000 milliseconds.
and afterwards, the assessment (millis() >= delayEnd)
In conclusion, the delayStart variable should be of type unsigned long. Using a long (i.e. long int), int, or unsigned int will result in a smaller maximum value compared to the unsigned long returned by millis(). In the end, millis() will exceed the capacity of the variable storing it, causing time to suddenly move backwards. If unsigned int is used for startDelay, it will occur after 65 seconds on an Uno board as an example.
Unsigned Subtraction
Another interesting aspect is the outcome of millis() – delayStart when delayStart is set to 4,294,966,300 and we require a 10000mS waiting period.
The millis() function will reset to zero before that occurs. Keep in mind that increasing the maximum value an unsigned long can hold by 1 will result in it starting back at 0. An alternative perspective on the calculation millis() – delayStart when millis() has looped back and is less than delayStart is: “What value needs to be added to delayStart to match millis() (post-wraparound)?” In other words, what is the unknown X in the equation delayStart + X == millis()
To illustrate with a 3-bit unsigned variable once more, when computing 2 – 4 (unsigned), imagine a clock starting at 0 and incrementing all the way to 111 (7) before resetting to 0. To go from 4 to 2, you must increase by 6. This is how the calculation works, but the CPU will execute it differently.
The gap between two unsigned longs will consistently result in a non-negative value ranging from 0 to 4,294,967,295. If startDelay is set to 1 and millis() resets to 0 (after 50 days), the result of millis() – startDelay will be 4,294,967,295. You can set a DELAY_TIME between 0 and 4,294,967,295 milliseconds, and (millis() – delayStart) >= DELAY_TIME will function correctly no matter when the delay began
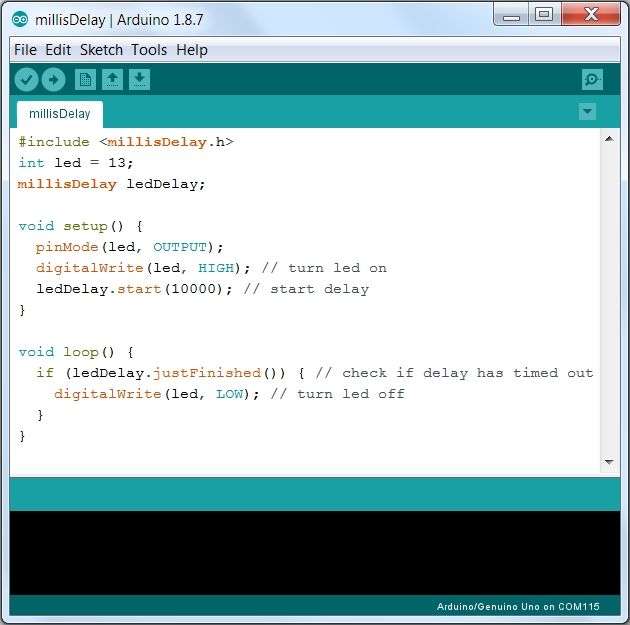
Step 4: Using the MillisDelay Library
To install the millisDelay library. Downloaded the millisDelay.zip file.
Unzip this file to your Arduino/libraries directory (open the IDE File->preferences window to see where your local Arduino directory is). Some times the instructions for How to Install a Library – Automatic installation work, but not always. Unzipping the file manually is safest. Once you install the millisDelay library, there will be three interactive examples available that you can load on your Arduino board and then open the Serial Monitor (within 5sec) at 9600baud to use them. Here is the previous non-blocking delay sketch re-written using the millisDelay library.
#include "millisDelay.h"
int led = 13;
millisDelay ledDelay;

void setup() {
  pinMode(led, OUTPUT);   // initialize the digital pin as an output.
  digitalWrite(led, HIGH); // turn led on

  ledDelay.start(10000);  // start a 10sec delay
}

void loop() {
  // check if delay has timed out
  if (ledDelay.justFinished()) {
    digitalWrite(led, LOW); // turn led off
    Serial.println("Turned LED Off");
  }
//  Other loop code here . . .
  Serial.println("Run Other Code");
}
If you look at the millisDelay library code you will see that the previous sketch’s code has just been moved to the start() and justFinished() methods in the library.
Is this a ledDelay or a ledTimer? You can use whichever term you like. I tend to use …delay for single-shot delays that execute once and use …timer for repeating ones.
Step 5: Delay and Timer Examples
Here are two simple delay and timer examples along with their corresponding millisDelay library versions. These instances pertain to a one-time delay and a recurring delay/timer.
Single-Shot Delay
A one-time shot delay occurs only once before coming to a halt. It serves as a direct substitute for the Arduino delay() function. You initiate a pause, and upon completion, you take action. BasicSingleShotDelay is the naked code while SingleShotMillisDelay utilizes the millisDelay library.
BasicSingleShotDelay
This sketch is available in BasicSingleShotDelay.ino
int led = 13; // Pin 13 has an LED connected on most Arduino boards.
unsigned long DELAY_TIME = 10000; // 10 sec
unsigned long delayStart = 0; // the time the delay started
bool delayRunning = false; // true if still waiting for delay to finish
void setup() {
  pinMode(led, OUTPUT);   // initialize the digital pin as an output.
  digitalWrite(led, HIGH); // turn led on
  // start delay
  delayStart = millis();
  delayRunning = true;
}
void loop() {
  // check if delay has timed out
  if (delayRunning && ((millis() - delayStart) >= DELAY_TIME)) {
    delayRunning = false; // finished delay -- single shot, once only
    digitalWrite(led, LOW); // turn led off
  }
}
In the code above the loop() continues to run without being stuck waiting for the delay to expire.
During each pass of the loop(), the difference between the current millis() and the delayStart time is compared to the DELAY_TIME. When the timer exceeds the value of the interval the desired action is taken. In this example, the delay timer is stopped and the LED turned off.
SingleShotMillisDelay
Here is the BasicSingleShotDelay sketch re-written using the millisDelay library. This sketch is available in SingleShotMillisDelay.ino
Here is the millisDelay version where the code above has been wrapped in class methods of the millisDelay class.
#include <millisDelay.h><br><br>int led = 13;
// Pin 13 has an LED connected on most Arduino boards.
millisDelay ledDelay;
void setup() {
  // initialize the digital pin as an output.
  pinMode(led, OUTPUT);
  digitalWrite(led, HIGH); // turn led on
  // start delay
  ledDelay.start(10000);
}
void loop() {
  // check if delay has timed out
  if (ledDelay.justFinished()) {
    digitalWrite(led, LOW); // turn led off
  }
}
Repeating Timers
These are simple examples of a repeating delay/timer. BasicRepeatingDelay is the plain code and RepeatingMillisDelay uses the millisDelay library.
BasicRepeatingDelay
This sketch is available in BasicRepeatingDelay.ino
int led = 13; // Pin 13 has an LED connected on most Arduino boards.
unsigned long DELAY_TIME = 1500; // 1.5 sec
unsigned long delayStart = 0; // the time the delay started
bool delayRunning = false; // true if still waiting for delay to finish
bool ledOn = false; // keep track of the led state
void setup() {
  pinMode(led, OUTPUT);   // initialize the digital pin as an output.
  digitalWrite(led, LOW); // turn led off
  ledOn = false;
  // start delay
  delayStart = millis();
  delayRunning = true;
}
void loop() {
  // check if delay has timed out
  if (delayRunning && ((millis() - delayStart) >= DELAY_TIME)) {
    delayStart += DELAY_TIME; // this prevents drift in the delays
    // toggle the led
    ledOn = !ledOn;
    if (ledOn) {
      digitalWrite(led, HIGH); // turn led on
    } else {
      digitalWrite(led, LOW); // turn led off
    }
  }
}
The reason for using
delayStart += DELAY_TIME;
to reset the delay to run again, is it allows for the possibility that the millis()-delayStart may be > DELAY_TIME because the millis() has just incremented or due to some other code in the loop() that slows it down. For example a long print statement. (See the Adding a Loop Monitor in Step 7)
Another point is to start the delay at the end of startup(). This ensures the timer is accurate at the start of the loop(), even if startup() takes some time to execute.
RepeatingMillisDelay
Here is the BasicRepeatingDelay sketch re-written using the millisDelay library. This sketch is available in RepeatingMillisDelay.ino
#include <millisDelay.h>
int led = 13;
// Pin 13 has an LED connected on most Arduino boards.
bool ledOn = false; // keep track of the led state
millisDelay ledDelay;
void setup() {
  // initialize the digital pin as an output.
  pinMode(led, OUTPUT);   // initialize the digital pin as an output.
  digitalWrite(led, LOW); // turn led off
  ledOn = false;
  // start delay
  ledDelay.start(1500);
}
void loop() {
  // check if delay has timed out
  if (ledDelay.justFinished()) {
    ledDelay.repeat(); // start delay again without drift
    // toggle the led
    ledOn = !ledOn;
    if (ledOn) {
      digitalWrite(led, HIGH); // turn led on
    } else {
      digitalWrite(led, LOW); // turn led off
    }
  }
}
Step 6: Other MillisDelay Library Functions
In addition to the start(delay), justFinished() and repeat() functions illustrated above, the millisDelay library also has
stop() to stop the delay timing out,
isRunning() to check if it has not already timed out and has not been stopped,
restart() to restart the delay from now, using the same delay interval,
finish() to force the delay to expire early,
remaining() to return the number of milliseconds until the delay is finished and
delay() to return the delay value that was passed to start()
Microsecond version of the library
millisDelay counts the delay in milliseconds. You can also time by microseconds. It is left as an exercise for the reader to write that class. (Hint: rename the class to microDelay and replace occurrences of millis() with micros() )
Freezing/Pausing a Delay
You can freeze or pause a delay by saving the remaining() milliseconds and stopping the delay and then later un-freeze it by restarting it with the remaining mS as the delay. e.g. see the FreezeDelay.ino example
mainRemainingTime = mainDelay.remaining();  // remember how long left to run in the main delay
mainDelay.stop(); // stop mainDelay  NOTE: mainDelay.justFinished() is NEVER true after stop()
…
mainDelay.start(mainRemainingTime);  // restart after freeze
Step 7: Word of Warning – Add a Loop Monitor
Unfortunately, many of the standard Arduino libraries use delay() or introduce pauses, such as AnalogRead and SoftwareSerial. Usually the delays these introduce are small but they can add up so I suggest you add a monitor at the top of your loop() to check how quickly it runs.
The loop monitor is very similar to the blink example. A small piece of code at the top of the loop() method just toggles the Led each time loop() is executed. You can then use a digital multimeter with at Hz scale to measure the frequency of the output on the LED pin (pin 13 in this case)
The code is:-
// Loop Monitor – this checks that the loop() is executed at least once every 1mS
// (c)2013 Forward Computing and Control Pty. Ltd.
// <a href="http://www.forward.com.au">  www.forward.com.au>
//
// This example code is in the public domain.
int led = 13; // don't use on FioV3 when battery connected
// Pin 13 has an LED connected on most Arduino boards.
// if using Arduino IDE 1.5 or above you can use pre-defined
// LED_BUILTIN  instead of 'led'

// the setup routine runs once when you press reset:
void setup() {
  // initialize the digital pin as an output.
  pinMode(led, OUTPUT);
  // add your other setup code here
}
// the loop routine runs over and over again forever:
void loop() {
  // toggle the led output each loop The led frequency must measure >500Hz (i.e. <1mS off and <1mS on)
  if (digitalRead(led)) {
    digitalWrite(led, LOW); // turn the LED off by making the voltage LOW
  } else {
    digitalWrite(led, HIGH); // turn the LED on (HIGH is the voltage level)
  }
  // add the rest of your loop code here
}
You can download the monitor code here. When I run this code on my Uno board, the multimeter on the Hz range connected between pin 13 and GND reads 57.6Khz. i.e. about 100 times >500hz.
As you add your code to loop() the Hz reading will reduce. Just check it stays well above 500Hz (1mS per loop() execution) in all situations.
Step 8: Word of Warning – Add a Loop Monitor
Unfortunately many of the standard Arduino libraries use delay() or introduce pauses, such as AnalogRead and SoftwareSerial. Usually the delays these introduce are small but they can add up so I suggest you add a monitor at the top of your loop() to check how quickly it runs. This loop timer can be either the hardware one shown below OR the loopTimer class(also in the SafeString library), used in the Simple Multi-tasking in Arduino tutorial, that prints out the time your loop takes to execute.
A one-time shot delay operates just once before ceasing. It serves as the most straightforward substitute for the Arduino delay() function. You begin the waiting period and then proceed to act once it is over. BasicSingleShotDelay is the simple code while SingleShotMillisDelay utilizes the millisDelay library. The hardware loop monitor closely resembles the blink example. A short snippet of code located at the beginning of the loop() function simply switches the state of the Led whenever the loop() function runs. Next, you can utilize a digital multimeter set at the Hz scale to gauge the frequency of the output on the LED pin (specifically pin 13).
The code is:-
// Loop Monitor – this checks that the loop() is executed at least once every 1mS<br>// (c)2013 Forward Computing and Control Pty. Ltd.
// <a href="http://www.forward.com.au"> <a> www.forward.com.au</a>>
//
// This example code is in the public domain.
int led = 13; // don't use on FioV3 when battery connected
// Pin 13 has an LED connected on most Arduino boards.
// if using Arduino IDE 1.5 or above you can use pre-defined
// LED_BUILTIN  instead of 'led'

// the setup routine runs once when you press reset:
void setup() {
  // initialize the digital pin as an output.
  pinMode(led, OUTPUT);
  // add your other setup code here
}
// the loop routine runs over and over again forever:
void loop() {
  // toggle the led output each loop The led frequency must measure >500Hz (i.e. <1mS off and <1mS on)
  if (digitalRead(led)) {
    digitalWrite(led, LOW); // turn the LED off by making the voltage LOW
  } else {
    digitalWrite(led, HIGH); // turn the LED on (HIGH is the voltage level)
  }
  // add the rest of your loop code here
}
You can download the monitor code here. When I run this code on my Uno board, the multimeter on the Hz range connected between pin 13 and GND reads 57.6Khz. i.e. about 100 times >500hz.
As you add your code to loop() the Hz reading will reduce. Just check it stays well above 500Hz (1mS per loop() execution) in all situations.
Source: Arduino Timer Millis
- Why should I avoid using delay() in loop()?
Because delay() blocks execution making the system unresponsive while waiting, so other code cannot run during the delay. - How can I implement a non-blocking delay?
Store millis() in a unsigned long at start and in loop compare millis() - start >= DELAY_TIME to trigger actions without blocking. - What type should I use to store millis() values?
Use unsigned long to match millis() and avoid overflow issues. - How does unsigned subtraction help with millis() wraparound?
Unsigned subtraction yields the correct non-negative difference even if millis() has wrapped, so (millis() - start) >= DELAY_TIME still works. - What does the millisDelay library provide?
It offers start, justFinished, repeat, stop, isRunning, restart, finish, remaining, and delay functions to simplify delays and timers. - How do I install the millisDelay library?
Unzip millisDelay.zip into your Arduino/libraries directory (manual install is recommended) so its examples appear in the IDE. - How do I create repeating timers without drift?
For manual code use delayStart += DELAY_TIME each repeat; with millisDelay use justFinished then call repeat() to restart without drift. - Can I pause or freeze a delay?
Yes: save remaining(), stop() the delay, then start() again with the saved remaining milliseconds to resume. - Why add a loop monitor?
Because some libraries use delay() or pauses; a loop monitor (toggling pin 13 each loop) ensures loop() runs quickly (above 500Hz recommended). - Is there a microsecond version of millisDelay?
The article notes you can write a microsecond version by replacing millis() with micros() and renaming the class.