
Summary of Arduino Bracket
This article describes building a simple "Arduino Bracket" to organize wiring and allow easy Arduino removal. The project uses two header pin strips soldered together with a wire segment to create a right-angle connector. It emphasizes careful soldering to avoid damaging the board and suggests removing an intermediate pin for easier counting.
Parts used in the Arduino Bracket:
- 40-Pin 2.54mm Header Pin Strip x2
- 10cm Black Stranded Wire
- Soldering Iron
- Solder
- Wire Strippers
- Side Cutters
When you are tinkering around with your Arduino and a breadboard you might want to make yourself an “Arduino Bracket”. Nothing more than header pins and a piece of wire, the “Arduino Bracket” keeps wiring neat and tidy, and lets you easily disconnect your Arduino for use in other projects.
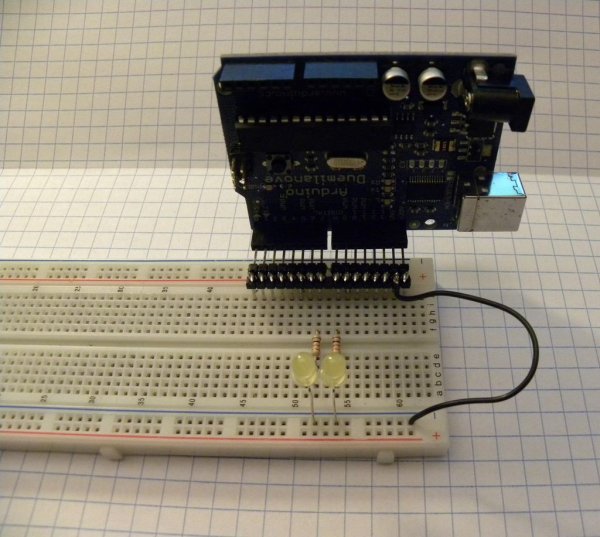
Step 1: Gather Necessary Supplies and Tools
Materials:
40-Pin 2.54mm (0.1″) Header Pin Strip x2 (Digikey, Newark, Local Electronics Shop)
10cm (4″) 22AWG Black Stranded Wire
The header pins I used were 20cm long. These longer pins may be difficult to find, but you should be able to order them from an online supplier. The standard length (~8mm) can be used, however they may make things a bit tight.
Tools:
– Soldering Iron
– Solder
– Arduino
– Wire Strippers
– Side Cutters
Step 2: Prepare the Parts
Cut the header pin strips into two, 8-pin strips and one, 17-pin strip. Insert the two 8-pin strips into the digital IO receptacles.
Next, take the 17-Pin strip and wedge it into the two 8-pin strips at a 90-degree angle. Be sure to insert the pins such that there is one disconnect pin between the two receptacles, as shown below.
Step 3: Solder the Joints
Next, carefully solder one pin at each end. Once you are sure that the two sets of header pins are sitting a more-or-less right angle, solder the rest of the pins.
Optional – Remove the unconnected pin between pins seven and eight. I personally find that this makes it easier when counting the pins. The pin can be removed by gripping the long end with a pair of side cutters and briefly heating the short end with a soldering iron. This will melt the plastic base of the header pin strip just enough to pull the pin out.
Be very careful not to get any solder on the Arduino, as a solder bridge may render it useless.
For more detail: Arduino Bracket
- What is the purpose of the Arduino Bracket?
It keeps wiring neat and tidy and allows you to easily disconnect your Arduino for other projects. - How many header pin strips are needed?
You need two 40-Pin 2.54mm Header Pin Strips. - Can I use standard length pins instead of long ones?
Yes, standard length pins can be used but they may make things a bit tight. - How should the header pin strips be cut?
Cut them into two 8-pin strips and one 17-pin strip. - At what angle should the 17-pin strip be inserted?
Insert it at a 90-degree angle between the two 8-pin strips. - Why might you remove the unconnected pin between pins seven and eight?
Removing it makes it easier when counting the pins. - What tool is used to remove an unconnected pin?
Use side cutters to grip the long end and a soldering iron to heat the short end. - What is the risk if solder gets on the Arduino?
A solder bridge may render the Arduino useless.
