
Summary of A DIY ELECTRONIC LOAD FOR DC-DC CONVERTER CHARACTERIZATION
The article describes a DIY electronic load centered on an Atmel ATmega328P (16MHz) controlling an I2C 12-bit DAC (MCP47FEB21A1) and LTC2992 power monitor, with USB via MCP2221A and a 16×2 LCD. Analog front end uses 10mΩ and 0.2Ω shunts, two W9NK90Z N-channel MOSFETs, MCP6H02 op amp for current regulation, 10k NTC, and a 12V/200mA fan on a salvaged GPU heatsink. Layout was done in Eagle; PCB files and Gerbers were produced and fabricated by JLCPCB. Several bi-color status LEDs provide user feedback.
Parts used in the DIY ELECTRONIC LOAD FOR DC-DC CONVERTER CHARACTERIZATION:
- Atmel ATmega328P microcontroller (16MHz)
- MCP47FEB21A1 I2C 12-bit DAC
- LTC2992 dual power monitor
- MCP2221A USB serial bridge
- 16×2 LCD display
- 10 mΩ shunt resistor
- 0.2 Ω shunt resistor
- W9NK90Z N-channel power MOSFET (two units)
- MCP6H02 operational amplifier
- 10k NTC thermistor
- 12V 200mA fan (80mm)
- Heatsink salvaged from a graphics card
- Bi-color status LEDs (multiple for Load ON/OFF, TX, RX, acquisition blink, power)
- Eagle CAD project and schematic files
The heart of the system is an Atmel ATmega328P AVR microcontroller with 32kB of Flash and 2k of RAM running at a whopping 16MHz. It interfaces an I2C 12bit DAC (the MCP47FEB21A1) and the LTC2992 dual power monitor chip.
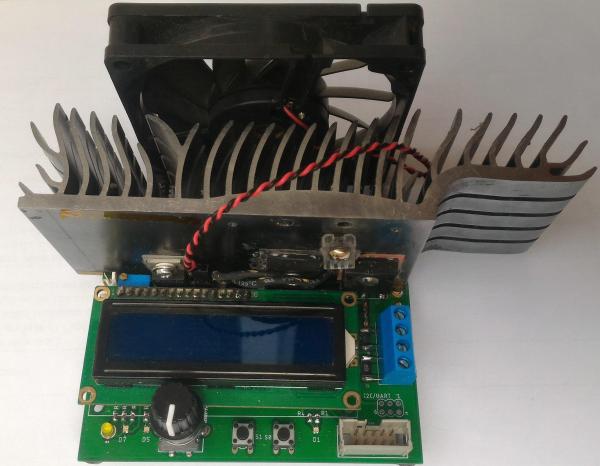
The USB serial interface uses the MCP2221A bridge. The display is a classic 16×2 LCD.
On the analog part, 10mΩ and 0.2Ω shunt resistors are used, coupled with two W9NK90Z N-ch power MOSFETS. The heatsink was salvaged from an old graphics card. Attached are a 10k NTC and a generic fan (12v @ 200mA, 80mm). Current regulation is achieved through the help of a MCP6H02 opamp, and a carefully designed feedback network which guarantees the specified rise time with little to no overshoot.
The layout was done using the Eagle software (v9.5.2). Gerbers, Eagle project files, top and bottom views are available on the pcb folder. PCBs were printed using JLCPCB service. The schematic is available in a pdf and Eagle .sch format as well.
Several user-definable bi-color status LEDs are included, such as Load ON/OFF, TX & RX, acquisition blink, as well as a power LED.
Read more: A DIY ELECTRONIC LOAD FOR DC-DC CONVERTER CHARACTERIZATION
- What microcontroller is used in the project?
The project uses an Atmel ATmega328P running at 16MHz. - Which DAC is interfaced via I2C?
The DAC used is the MCP47FEB21A1, a 12-bit I2C device. - How is USB serial communication implemented?
USB serial uses the MCP2221A bridge. - What device monitors power parameters?
The LTC2992 dual power monitor chip is used for power monitoring. - What components form the analog current path?
10mΩ and 0.2Ω shunt resistors with two W9NK90Z N-channel MOSFETs form the analog current path. - How is current regulation achieved?
Current regulation is achieved using an MCP6H02 op amp and a feedback network designed for the specified rise time and minimal overshoot. - What cooling components are included?
A heatsink salvaged from a graphics card and a 12V 200mA 80mm fan are used for cooling, plus a 10k NTC for temperature sensing. - What CAD and fabrication tools were used for the PCB?
The layout was done with Eagle (v9.5.2), Gerbers and Eagle files are provided, and PCBs were printed using JLCPCB.
