Summary of A laser barrier with Arduino
This article details the construction of a modular laser barrier system compatible with Arduino, designed for applications like object counting, photo hunting, and security alarms. The project splits the circuit into separate emitter and receiver modules to enhance versatility across different infrastructures. It outlines the necessary components and references a specific red laser diode from Wenta Electronics, providing technical specifications such as wavelength and power output for integration.
Parts used in the Laser Barrier Project:
- Stripboard
- Photoresistor
- Red laser LED
- 2-channel screw terminal
- 100Ω resistor
- 10kΩ resistor
- 220Ω resistor
- Male bent connectors strip
- Electric wire
In this post we will see how to make a laser barrier to integrate with an Arduino board.
The applications of a light barrier (laser and infrared) are numerous, especially whenever we want that the passage of a person or of an object through a threshold triggers a certain event. This event may be, for example, a count if what we need is to count the number of objects that cross a threshold (on a conveyor belt for istance). Another example would be taking a photo at the precise moment an animal crosses the space delimited by the laser (photo hunting). Or again, it is the activation of an audible and / or visual alarm to protect a specific area that you want to control access.
If you place two or more laser barriers in sequence you can measure the elapsed time between the two thresholds, and then measure in some way the speed of an object or a person.
Browsing around the net i wanted to find a starting point from which to begin. So i found an article written by M.Ribble www.glacialwanderer.com/hobbyrobotics. In this article a laser barrier for photo hunting is presented.
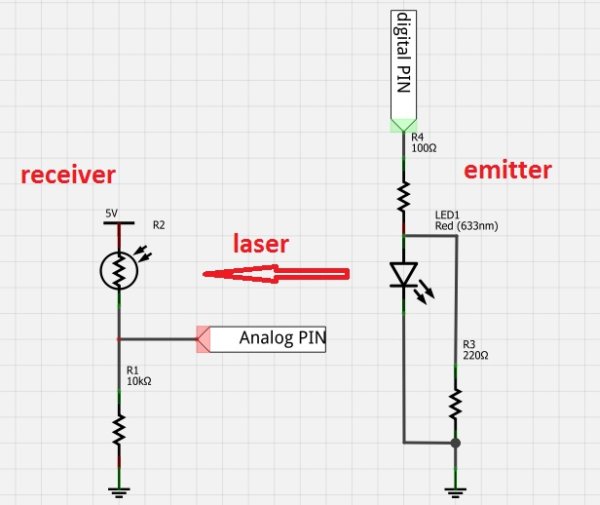
Since my needs are different and i want to especially develop something which is the more general possible, i make some changes to the laser barrier discussed in that article. In fact, i need to split the circuit in two separate parts: an emitter (the LED laser) and a receiver (photoresistor). These two modules will be connected to the Arduino board and managed separately. Making two separate modules, independent of each other, expands the application possibilities. So we can include them in any project and mount on any infrastructure, adapting them to different situations each time.
Fig.1 shows the circuit diagram of the two modules.
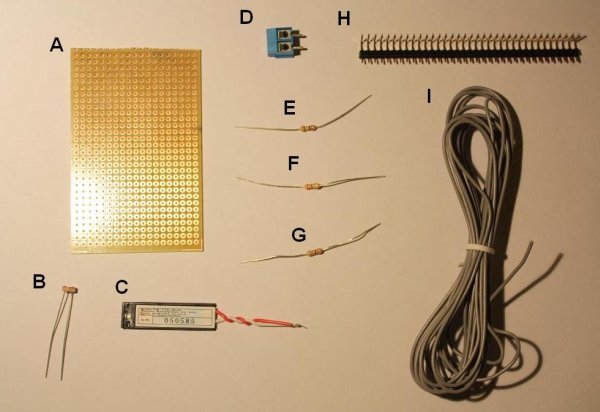
First, the following is a list of all the necessary shown to make our barrier laser in Fig.2
- A) a stripboard
- B) a photoresistor
- C) a red laser LED
- D) a 2-channel screw terminal
- E) a 100Ω resistor
- F) a 10kΩ resistor
- G) a 220Ω resistor
- H) a male bent connectors strip
- I) an electric wire
While the rest of the material is easily purchased at any electronics store, as regards the laser led, I found this product on the Sparkfun site:
Maker: Wenta Electronics co., LTD, China
Wavelength: 650nm (645-660nm)
Output power: 0.45 to 0.80mW
Input power source: 3.1V+/-10%
Consumption current: 35mA (max 40mA)
Laser spot: circle
Laser life: 3000 hours
In Fig. 3 the receiver board is shown. You can notice that I bent the photoresistor so that it laterally faces toward the opposite side with respect to the three pins.
For more detail: A laser barrier with Arduino
- What are the primary applications of this light barrier?
Applications include counting objects on a conveyor belt, triggering photos when animals cross a threshold, and activating alarms to control access. - How can you measure the speed of an object using this setup?
You can place two or more barriers in sequence to measure the elapsed time between the thresholds. - Why did the author split the circuit into two separate parts?
Splitting the circuit into independent emitter and receiver modules expands application possibilities and allows mounting on any infrastructure. - What is the wavelength of the recommended laser LED?
The recommended laser LED has a wavelength of 650nm (specifically 645-660nm). - What is the maximum consumption current for the laser diode?
The maximum consumption current is 40mA. - Where can the specific laser LED mentioned in the article be purchased?
The author found this product on the Sparkfun site. - How was the photoresistor positioned on the receiver board?
The photoresistor was bent so that it laterally faces toward the opposite side with respect to the three pins. - What is the expected laser life of the specified component?
The laser life is stated to be 3000 hours.