Summary of Creating an Animatronic Eye with Arduino Using 3D Printing
Summary: An Arduino-based animatronic eye built from 3D-printed parts and six SG90 servos. The project uses an Arduino Uno and Servo.h library to control eyelids and eyeball X/Y movement. Assembly involves sanding printed parts, mounting servos to printed blocks, linking eyelids and arms with screws, and troubleshooting friction and joint tightness. Code provides preset positions, random movements, and blink routines. The build omits the PCA9685 driver, using six Arduino PWM pins directly.
Parts used in the 3D Printed Animatronic Eye:
- Six SG90 Servo Motor
- Screws M2
- Screws M3
- Screws M4
- Arduino UNO
- Jumper Cables
- Breadboard
- Pinheader
- PLA Filament
- 3D Printer
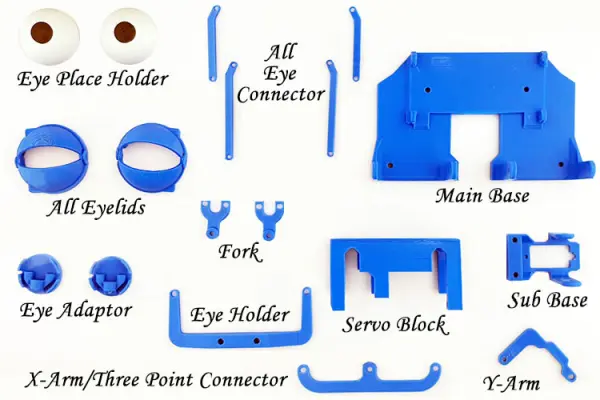
- 3D printed components: Servo_Block
- 3D printed components: Main_Base
- 3D printed components: Sub_Base
- 3D printed components: Eye-Adaptor
- 3D printed components: Fork
- 3D printed components: Eye-Holder
- 3D printed components: Three-point Connector
- 3D printed components: Place Holder Eye
- 3D printed components: X-Arm
- 3D printed components: Y-Arm
- 3D printed components: Eyelid Connectors
Introduction
In this endeavor, we’re embarking on the construction of an Arduino-based animatronic eye. The inspiration for this project was born during my online quest for innovative project ideas, and this concept instantly captivated my interest. Firstly, its aesthetic appeal combined with a straightforward mechanism made it an intriguing choice. Moreover, the project provided a substantial learning opportunity in the realm of mechatronics.
I’d like to extend my appreciation to Will Cogley, who not only crafted the 3D model but also generously shared all source files with the maker community. In his own words, his intention was to design it with accessibility in mind for fellow enthusiasts. It’s worth noting that there are two versions of this animatronic eye design available: a basic version and an advanced one. For this particular project, we’ve opted to construct the basic version. Throughout our journey, we’ll be sharing our firsthand experience, including any challenges we encountered along the way.
Essential Components for Crafting the 3D Printed Animatronic Eye
The bill of materials (BOM) for this project is quite minimal, as the 3D printer handles most of the labor, and we primarily require a few screws and bolts, many of which are readily available at your local hobby store. A complete list of BOM is given below.
- Six SG90 Servo Motor
- Screws M2, M3, and M4
- Arduino UNO
- Jumper Cables
- Breadboard
- Pinheadder
- PLA Filament and 3D Printer
Processing and Assembly After Production – Animatronic Eye Mechanism
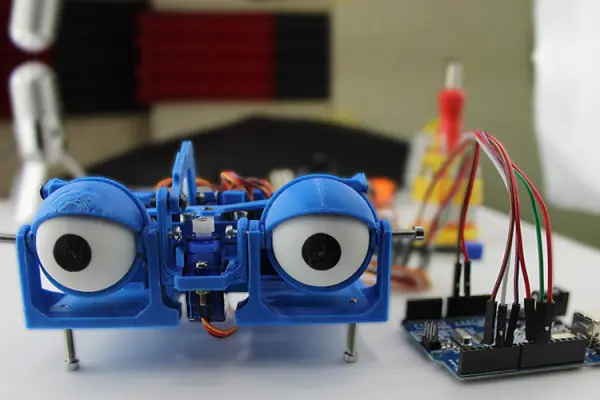
After completing the 3D printing of all the components, the next step involves sanding the eye and certain other essential parts to ensure seamless assembly. Once these components have been properly sanded, we can proceed with the assembly process. If every part has been printed accurately, your final product should closely resemble the image depicted below.
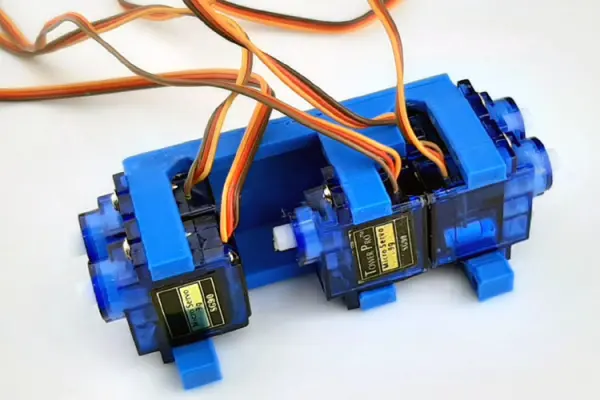
Our construction process commences with the attachment of 5 out of 6 servo motors to the Servo_Block module, as illustrated in the image below. I’ve utilized a black background for the image capture, as it enhances the image’s level of detail.
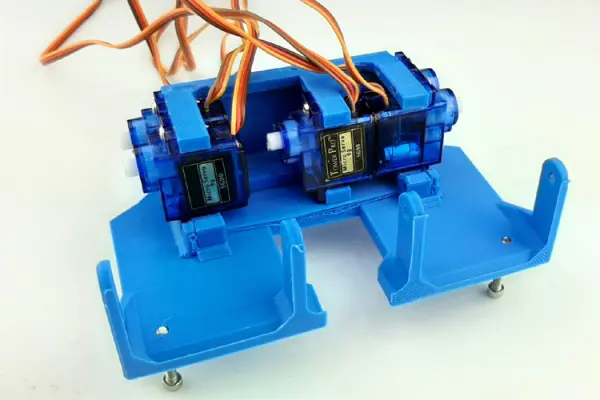
Next, we’ll establish a connection between the Servo_Block and the Main_Base, resulting in a configuration resembling the image displayed below. Additionally, we’ve employed four 12mm M3 Allen screws to reinforce the device’s legs.
Following that, we will proceed to link the Eye-Adaptor with the Fork for each eye. After completing this step, we will attach the Eye-Holder to the Eye-Adaptor and the Three-point Connector to the Fork. Once all these steps are completed, the assembly will closely resemble the depicted image below.

Upon completing the aforementioned steps, we will proceed to link the sixth and final servo to the Sub_Base. Subsequently, we will connect the Sub_Base to the Main_Base using screws. Following this, we will insert the Place Holder Eye into the eye adaptor. Additionally, we have fastened the X-Arm and Y-Arm with screws.
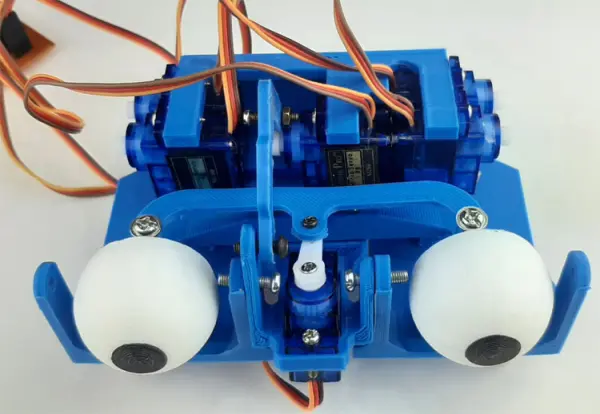
Next, we will attach the Eyelid Connectors to the Eyelids, securing them in position with M3 screws from both sides.
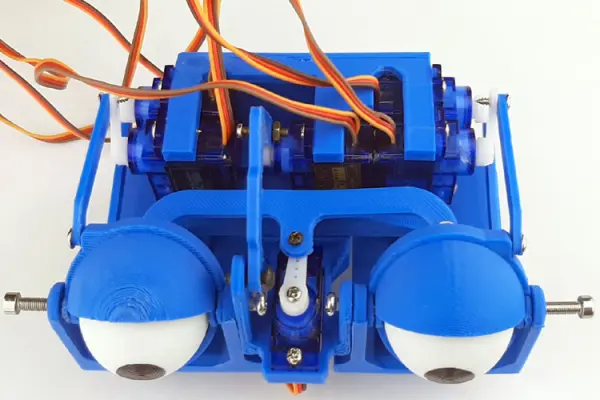
If you’ve executed all the steps accurately, the image will resemble the one displayed above. In it, you can observe that we’ve successfully linked all the eyelids to the eyelid connectors and secured them to the servo motor arms using screws. With this assembly complete, we can proceed to the coding phase.
Circuit Diagram for the Animatronic Eye Created with 3D Printing
Below, you’ll find the schematic diagram for the self-made 3D printed animatronic eye, which is both straightforward and user-friendly. While the project’s creator and author originally included the PCA9685 IC, a 16-channel 12-bit PWM servo motor driver, in the schematic diagram, we won’t be utilizing it for this project. This is because the Arduino’s Servo Library can efficiently manage the operation of all six servos without the need for the PCA9685 IC.
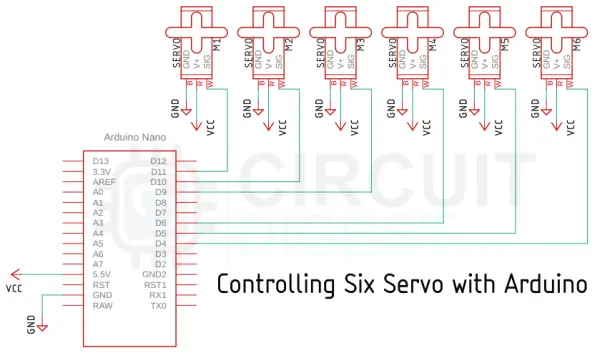
As previously mentioned, the hardware setup is quite uncomplicated. We employ six of the Arduino’s pins to manage the six servo motors. A brief examination of the Arduino’s specifications reveals that it offers six PWM pins, and we utilize all of these pins to govern our entire set of six servo motors.
Code for Operating the Animatronic Eye with Arduino
The Arduino code for the animatronic eye is straightforward and highly comprehensible. To enable this code’s functionality, we will utilize Arduino’s Servo.h library.
Our code commences by incorporating the essential libraries and establishing instances necessary for the management of all six servo motors.
#include <Servo.h>
Servo top_left_eyelid;
Servo bottom_left_eyelid;
Servo top_right_eyelid;
Servo bottom_right_eyelid;
Servo Yarm;
Servo Xarm;
Following that, we delve into our setup() function. Within this function, we have clearly specified the correlation between each part of the eye and its corresponding Arduino pin. This setup proves valuable, as it allows us to easily disconnect and reconnect the components precisely as they were initially configured.
top_left_eyelid.attach(10);
  bottom_left_eyelid.attach(11);
  top_right_eyelid.attach(5);
  bottom_right_eyelid.attach(6);
  Yarm.attach(9);
  Xarm.attach(3);
Subsequently, we initiate serial communication for debugging purposes and invoke specific functions to maintain the eye’s position at its center while keeping it open. Additionally, we incorporate deliberate delays to enhance stability.
  Serial.begin(9600);
  open_eye();
  eye_ball_centert();
  delay(2000);
Following that, we move on to the loop() function. However, before delving into the loop function itself, it’s crucial to elucidate some essential functions that serve as the foundation for comprehending the loop’s contents. These functions are pivotal, as they play a central role in controlling the system’s eye movements.
The foremost among these is the “open_eye()” function. When examining the hardware setup, you’ll observe the need to rotate one servo clockwise while simultaneously turning another servo counterclockwise. This same action is replicated for both the right and left eyelids.
void open_eye() {
  top_left_eyelid.write(55);
  bottom_left_eyelid.write(36);
  top_right_eyelid.write(2);
  bottom_right_eyelid.write(160);
}
Moving forward, we encounter the “close_eye()” function. Within the close_eye function, we replicate precisely the reverse of the actions performed in the open_eye function.
void close_eye() {
  top_left_eyelid.write(2);
  bottom_left_eyelid.write(120);
  top_right_eyelid.write(46);
  bottom_right_eyelid.write(55);
}
Continuing, we arrive at the “look_up()” and “look_down()” functions. When examining the hardware configuration, it becomes evident that adjusting the Y-arm of the device corresponds to the vertical movement of the eyeball, either upward or downward.
void look_up() {
  Yarm.write(132);
}
void look_down() {
  Yarm.write(45);
}
Subsequently, we come to the “eye_ball_left()” and “eye_ball_right()” functions, which mirror the functionality of the up and down functions. The only distinction lies in the angles at which the device operates.
void eye_ball_left() {
  Xarm.write(50);
}
void eye_ball_right() {
  Xarm.write(130);
}
Moving on, we encounter the “eye_ball_center()” function. Within this function, we configure the X-arm and Y-arm to be positioned at 90 degrees, allowing us to precisely align the eye to the central position.
void eye_ball_centert() {
  Xarm.write(90);
  Yarm.write(90);
}
We now introduce a series of additional functions that I’ve designed to simplify our operations. Among these functions, the first is “synchronous_close().” Invoking this function will initiate one complete cycle of closing and opening the eye.
void synchronous_close() {
  close_eye();
  delay(420);
  open_eye();
  delay(222);
}
Following that, we have the “random_close()” function, which will randomly toggle between opening and closing the eye. This adds a captivating and dynamic effect to the display.
void random_close() {
  close_eye();
  delay(random(220, 880));
  open_eye();
  delay(random(220, 880));
}
Moving forward, we introduce the “random_movement()” function. Within this function, we’ve incorporated the Arduino’s “random()” function within the delay function to achieve random eye movements.
void random_movement() {
  Xarm.write(60);
  delay(random(250, 340));
  Yarm.write(80);
  delay(random(250, 340));
  Xarm.write(120);
  delay(random(250, 340));
  Yarm.write(140);
  Xarm.write(60);
  delay(random(250, 340));
  Yarm.write(80);
  delay(random(250, 340));
  Xarm.write(120);
  delay(random(250, 340));
  Yarm.write(140);
  eye_ball_centert();
  delay(300);
  synchronous_close();
  random_close();
}
Let’s now delve into the core of our Arduino program, the “void loop” function. Within this pivotal function, we orchestrate a sequence of eye movements, including left, right, and center adjustments, followed by vertical movements of up and down. Additionally, we incorporate eye blinking actions into the loop. This entire sequence is repeated several times, introducing an element of randomness to the eye’s motion. Towards the conclusion of the function, we incorporate two “for” loops, serving as illustrative examples of how to attain smooth and controlled eyeball motions.
void loop() {
  eye_ball_left();
  delay(680);
  eye_ball_right();
  delay(680);
  eye_ball_centert();
  delay(450);
  synchronous_close();
  eye_ball_centert();
  delay(450);
  look_up();
  delay(400);
  look_down();
  delay(400);
  eye_ball_centert();
  delay(300);
  random_close();
  delay(450);
  look_up();
  delay(400);
  look_down();
  delay(400);
  random_movement();
  delay(400);
  eye_ball_centert();
  delay(300);
  top_left_eyelid.write(2);
  bottom_left_eyelid.write(120);
  delay(200);
  top_left_eyelid.write(55);
  bottom_left_eyelid.write(36);
  delay(200);
  open_eye();
  delay(500);
  for (int i = 60; i < 120; i++)
  {
    Xarm.write(i);
    Yarm.write(i - 5);
    delay(10);
  }
  eye_ball_centert();
  delay(400);
  synchronous_close();
  for (int i = 120; i > 60; i--)  {
    Xarm.write(i);
    Yarm.write(i - 5);
    delay(10);
  }
}
With the completion of the code section, we can now proceed to the subsequent section of the article.
Testing and Troubleshooting the 3D Printed Animatronic Eye
Due to the demanding nature of the mechanical aspect of this project, we encountered several initial challenges. In this section, I will address these issues.
Our initial hurdle involved the eye placeholders, which were not moving seamlessly due to excessive friction between them and the eyelids.
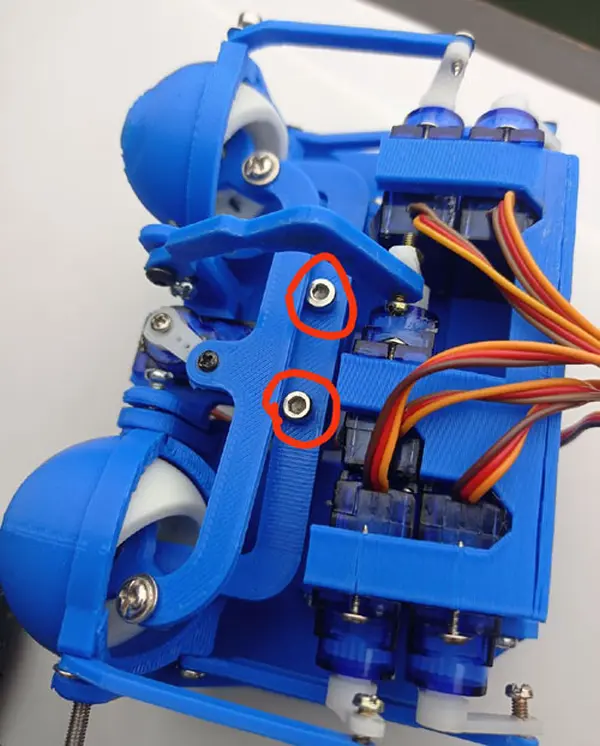
To address this issue, we resolved it by loosening the screw that secures the Eye-Holder to the sub-base of the device, which are the marked screws depicted above.
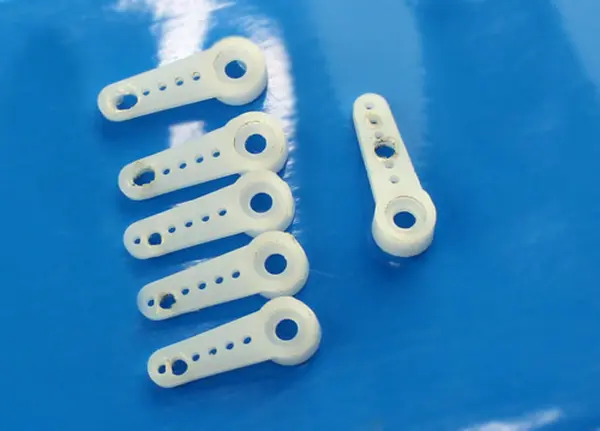
Subsequently, we encountered another challenge related to connecting the servo arms to the eyelid arms, as well as the X-arm and Y-arm. This presented a significant issue, as the absence of proper joints would impede the device’s smooth operation. In the image below, you can observe images of all the servo arms.
Code
#include <Servo.h>

Servo top_left_eyelid;

Servo bottom_left_eyelid;

Servo top_right_eyelid;

Servo bottom_right_eyelid;

Servo Yarm;

Servo Xarm;

void setup() {

  top_left_eyelid.attach(10);

  bottom_left_eyelid.attach(11);

  top_right_eyelid.attach(5);

  bottom_right_eyelid.attach(6);

  Yarm.attach(9);

  Xarm.attach(3);

  Serial.begin(9600);

  open_eye();

  eye_ball_centert();

  delay(2000);

}

void loop() {

  eye_ball_left();

  delay(680);

  eye_ball_right();

  delay(680);

  eye_ball_centert();

  delay(450);

  synchronous_close();

  //synchronous_close();

  eye_ball_centert();

  delay(450);

  look_up();

  delay(400);

  look_down();

  delay(400);

  eye_ball_centert();

  delay(300);

  random_close();

  delay(450);

  look_up();

  delay(400);

  look_down();

  delay(400);

  random_movement();

  delay(400);

  eye_ball_centert();

  delay(300);

  top_left_eyelid.write(2);

  bottom_left_eyelid.write(120);

  delay(200);

  top_left_eyelid.write(55);

  bottom_left_eyelid.write(36);

  delay(200);

  open_eye();

  delay(500);

  for (int i = 60; i < 120; i++)

  {

    Xarm.write(i);

    Yarm.write(i - 5);

    delay(10);

  }

  eye_ball_centert();

  delay(400);

  synchronous_close();

  for (int i = 120; i > 60; i--)  {

    Xarm.write(i);

    Yarm.write(i - 5);

    delay(10);

  }

}

void random_movement() {

  Xarm.write(60);

  delay(random(250, 340));

  Yarm.write(80);

  delay(random(250, 340));

  Xarm.write(120);

  delay(random(250, 340));

  Yarm.write(140);

  Xarm.write(60);

  delay(random(250, 340));

  Yarm.write(80);

  delay(random(250, 340));

  Xarm.write(120);

  delay(random(250, 340));

  Yarm.write(140);

  eye_ball_centert();

  delay(300);

  synchronous_close();

  random_close();

}

void random_close() {

  close_eye();

  delay(random(220, 880));

  open_eye();

  delay(random(220, 880));

}

void synchronous_close() {

  close_eye();

  delay(420);

  open_eye();

  delay(222);

}

void eye_ball_left() {

  Xarm.write(50);

}

void eye_ball_right() {

  Xarm.write(130);

}

void eye_ball_centert() {

  Xarm.write(90);

  Yarm.write(90);

}

void look_up() {

  Yarm.write(132);

}

void look_down() {

  Yarm.write(45);

}

void close_eye() {

  top_left_eyelid.write(2);

  bottom_left_eyelid.write(120);

  top_right_eyelid.write(46);

  bottom_right_eyelid.write(55);

}

void open_eye() {

  top_left_eyelid.write(55);

  bottom_left_eyelid.write(36);

  top_right_eyelid.write(2);

  bottom_right_eyelid.write(160);

}
- What microcontroller is used to control the animatronic eye?
The project uses an Arduino UNO to control the servos. - How many servos are required for the animatronic eye?
Six SG90 servo motors are used. - Can the Arduino control all six servos without a PCA9685?
Yes, the project omits the PCA9685 and uses the Arduino Servo Library on six Arduino PWM pins. - What library is used in the Arduino code?
The Arduino Servo.h library is used to manage the servos. - What materials are 3D printed for this project?
Multiple PLA printed parts are used, including Servo_Block, Main_Base, Sub_Base, Eye-Adaptor, Fork, Eye-Holder, Three-point Connector, X-Arm, Y-Arm, Eyelid Connectors, and Place Holder Eye. - How is excessive friction between eye components resolved?
The article says to loosen the screw securing the Eye-Holder to the sub-base to reduce friction. - What screws are used to reinforce the device legs?
Four 12mm M3 Allen screws are used to reinforce the legs. - How are eyelids attached to the servos?
Eyelid Connectors are attached to the eyelids and secured with M3 screws to connect them to the servo arms. - Does the project include random eye movement and blinking?
Yes, the code includes random_movement, random_close, and synchronous_close functions for varied movement and blinking. - What troubleshooting was needed for servo arm connections?
The article notes initial difficulty connecting servo arms to eyelid arms and X/Y arms and emphasizes ensuring proper joints and mounting for smooth operation.