When we learn a new programming language in computer science (say C, PHP or Java), we begin the learning curve with the classic “Hello World” program. We learn some essential keywords used in the programming language, then we learn the structure of the language and finally we begin to play with the language by making it display the two words “hello world” in our computer screen. So that’s how we begin to learn a programming language used to build computer applications. Our world of embedded systems is a little different. We create software to control hardware. In our world, we begin our learning curve by saying “hello world” using an LED. Our way of “hello world” is blinking an LED using the micro controller under study.
In this article, we are going to blink an LED using our arduino board. I will be using an Arduino Uno board to demonstrate the whole process. Before going deep, if you are very new to arduino, I suggest you read the following articles.
1. What is Arduino – for Beginners – is a great article to begin with. It explains arduino to a naive person. You will learn the basics needed from this article.
2. The Arduino Hardware and Software – explains the different arduino boards, different micro controllers used in them, tells in detail about the software IDE and a little bit about programming language as well.
3. The History and Story behind Arduino– If you are interested in knowing about the history behind development of Arduino board.
Now lets begin playing with our LED adventure. You need an arduino board, an LED, a resistor and a breadboard. Once you have these components in hand, you need to install the Arduino IDE (Integrated Development Environment) on your computer. In addition, you need to setup and configure your Arduino board in your computer (by installing the device driver).
Blink LED with Arduino
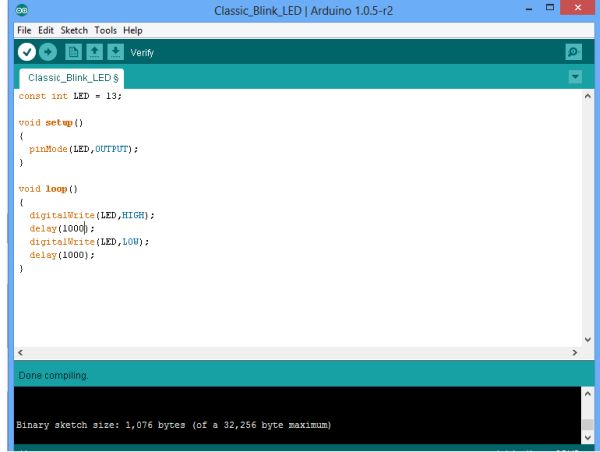
Open the arduino IDE and write the following program to blink an LED. I have written the classic LED blinking example provided in the book Getting Started with Arduino. You may see the screenshot below. After writing the program you may save it with a file name of your choice (find File–>Save on menu bar of IDE) Now we have to load the program from the PC to our arduino board. To do this perfectly, you have to ensure the following steps.
STEP 1 – Selecting the board
You have to select the arduino board type in your IDE. I am using an Arduino Uno board. To choose the board, find Tools on menu bar. Choose the option “Board” – and select your correct arduino board. I have chosen arduino uno. See the screenshot.
STEP 2 – Select the right port
The port number is assigned while installing the hardware driver of board. You may refer the tutorial onInstalling Arduino on Windows to know how to find the port number of board. You can find the port number by accessing device manager on Windows. See the section Port (COM & LPT) and look for an open port named “Arduino Uno (COMxx)“. If you are using a different board, you will find a name accordingly. What matters is the xx in COMxx part. In my case, its COM5. So my port number is 5. To select the right port, go to Tools–> Serial Port and select the port number. Refer screenshot below
For more detail: Blink LED with Arduino – say Hello World