This is the second version of my E260 modification. It uses an ATtiny13 MCU to control the timing of the printer and make it possible to print double sided PCBs at home.
As an electronic hobbyist and inventor I often need to make printed circuit boards (PCBs) in single or small quantities. Usually these are relatively simple circuits, an MCU, some input conditioning circuitry, some output circuitry, and usually they are single sided or perhaps double sided, with just a few vias. And usually I want them right now!
Toner Transfer (TT) has become the method of choice for most hobbyists. A laser printer is used to print an image of the PCB on special “transfer paper” which is then placed on the bare copperclad board and either ironed on or run through a modified laminator to transfer the image to the copper. When the PCB is etched, the toner acts as a resist, preserving the copper below it while the rest of the copper surface is etched away.
While TT works, it does have some problems. The process involves several steps, all of which are critical to success. Often there is pitting of large planes, and in many cases parts of the image don’t transfer, leaving gaps that have to be hand edited or completely redone. Trace widths under 10 mil, while achievable, are unreliable.
Since we know that laser printer toner is a great resist for making printed circuit boards, I have long wondered why we use Toner Transfer, rather than printing directly on PCBs with a laser printer. After all, if the boards produced by transferring toner first to paper and then to PCBs works well, then putting the toner directly on the PCB should be even better!
The main arguments against the viability of the process, aside from the mechanics of getting a thick board through a paper-thin path, seem to be (a) the drum is too fragile and will quickly be damaged by the boards, and (b) the copper will dissipate the static electricity charge needed to transfer the toner to the board.
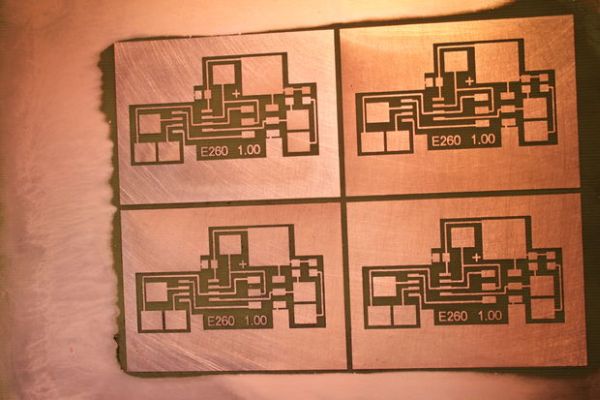
Over the last four years I have been experimenting with Direct Laser Printing (DLP), and it works! I have run hundreds of boards through my modified Lexmark E260 printer, and not only can I print on copperclad boards, I can print on aluminum sheets and other metals as well. Using Muriatic Acid/Hydrogen Peroxide etchant I can now make a PCB in under 15 minutes!
I am still experimenting with the process, but trace widths down to 4-5 mil (.004-.005) seem to be readily accomplished. Mechanical registration of the PCBs seems adequate to make simple double sided boards, though I have not made a serious effort to investigate this.
After trying several brands and models of laser printer, the printer I have settled on is the Lexmark E260. I use it because:
1 – It has an excellent Local Printer Utility that allows almost every printing parameter to be adjusted.
2 – It is readily and reasonably available on Ebay or Craig’s List. I paid $45 for each of the last two I bought on Ebay, including shipping.
3 – The drum is separate from the toner cartridge and is relatively inexpensive (<$30), so it can be replaced if it does become damaged.
4 – The printer has a manual feed slot in front so the paper path can be “flattened” with reasonable effort to pass PCBs.
5 – The charge on the drum seems to provide for essentially perfect transfer of toner to grounded metal sheets.
Step 1: Parts and Tools
Parts
E260 Laser Printer – This can be a E260, E260d, E260dn. Ebay
1 x 4mm Stainless Steel Rod x 12″ (1272T34)
6 x 4mm Shaft Collar (57485K64)
2 x 10mm OD x 4mm ID x 16mm long Aluminum Spacer (94669A814)
1 x 20″ Extension Spring .187″ OD .026″ Wire (9665K15)
2x Adjustable Aluminum Spacer, .335ODx.260IDx.5 long (93441A215)
1x1x.062 Aluminum Angle x 12 inches (8982K39)
6″x24″x.016 Aluminum Sheet (89015K115)
Copper Tape with Conductive Adhesive .250″ x 18′ (76555A711)
Other Parts
2.7K ohm resistor various sources
MCU Board see text
Tools
E260 Service Manual
.9 mm hex key (McMaster 7289A32)
Nibbling Tool (optional) see photo
Dremel or similar rotary tool (optional)
Shop vacuum
Standard workshop tools – screwdrivers, wire cutters, small saw, soldering iron, etc.
The table above has a parts and tool list for this project. Most of the parts are available at McMaster-Carr, but many can also be found at local hardware stores.
You will need the E260 Service Manual for this conversion. For convenience, I have appended it below.
For more detail: Modification of the Lexmark E260 for Direct Laser Printing of Printed Circuit Boards