Description
Mystick is an innovative hiking stick that promote exploration and allows you to share your hiking experiences and special findings with other users. When picked up by a user, the Mystick already has a predetermined location to which it directs using a compass and GPS to direct LED lights in the direction of the location. With the simple push of a button, the users progress to the chosen location can be sign through a proportional lighting display of the LEDs embedded along the length of the stick. Once the user arrives to the location, the Mystick glows in a full-length light show and a recording is played. Next, it is up to the user to continue exploring, and once they find a location they enjoy, they press the same button to save the spot as the new destination of the stick, and record a simple audio clip for the subsequent user.
Motivation
We wanted to develop a transportation device that would incorporate artistic and exploratory facets with a distant socially interactive design. We chose to design a hiking stick to allow for an exploration of how technology can be utilized in the most natural of settings, a combination not often explored.
Step by Step Instructions
Exterior development:
– Purchase 4 foot wooden dowel, 1.125 inches in diameter for interior of hiking stick, as well as two two foot clear vinyl pipes, 1.875 inches in diameter exterior, 1.5 diameter hollow interior. Wanted to use acrylic pole initially, but the cost benefit ratio was not rational for an initial prototype.
– Use clamp to hold wooden pole in place, and use hand saw to saw 5 inches off of the end of the wooden dowel to allow for space in the stick at the top to encase the electronics and circuit boards of the design.
– In making the vinyl tubes opaque and less translucent, use 220 grain sandpaper to sand the poles, and use black buffer block to smooth off the exterior of the tubes. Initially wanted to use glass froster or stained glass paint on the tubing, but the paint wouldn’t hold to the material.
Extra Pieces:
– Using Adobe Photoshop, develop a logo for Mystick, entailing a clear but playful, and natural typeface and adding a mystical, exploratory flair with a north-star over the I. Print vinyl decals using the decal cutter, although not used for the final product.
– Using Adobe Illustrator, design bottom cap for the stick as well as stabilizer pieces to hold the wooden stick in place. We used a soft grain wood and cut one circular piece 1.875 inches in diameter, along with two rings with a 1.5 inch exterior and 1.125 inch interior diameter. Using hot glue, we glued the two rings on top of each other and then glued them to the middle of the bottom cap. This allows for the cap to be placed on the bottom of the stick, fitting snuggly but also allowing for a fit enclosure for the stick so that it would not move around inside the tubing. 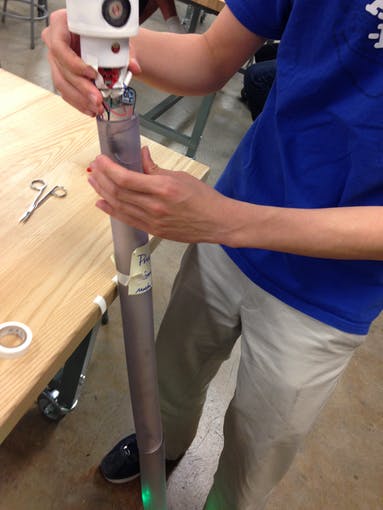
– Using Adobe Illustrator, develop a soft wooden cover for the LEDs. Cut eight identical holes in even spacing in a circular fashion to allow the LEDs to be placed in the negative space.
– Using Adobe Illustrator, design a button for the hiking stick. We used a white sheet of acrylic, and rastered the MYSTICK logo into the center of it, utilizing a circular shape with a diameter 2mm smaller than that of the interior diameter of the LED enclosure in order to allow for easy pressing of the button without being too small.
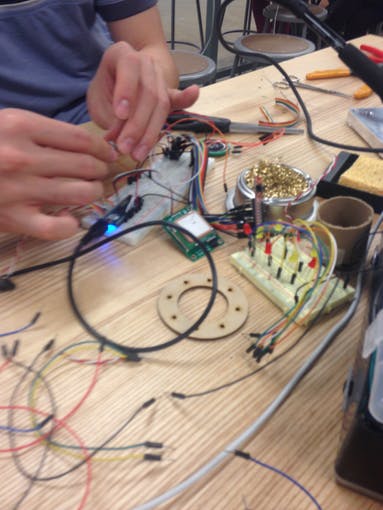
– Using Autodesk 123D, develop 3D modules for a two piece container to encapsulate the battery, some wiring, and the Arduino board. Measure out a hole fitting the size of the speaker, and another the size of the microphone in order to allow for a fitted outlet for the pieces.
– Using hot glue, glue the wooden LED encasement to the top portion of the 3D printed encasement.
Upload the code provided onto the Arduino micro.
Solder together the electronics based off the circuit diagram.
– You have to be efficient with space. Large breadboards or prototype boards will not fit in the container.
– Follow good practice and put electrical tape or heat shrink over exposed joints.
– The wire connecting the compass should be fairly long. At least as long as the stick.
– The wire connecting the LED strip should be somewhat long, a couple of inches longer than the container’s total height.
Hot glue the 8 green LEDs into the 8 holes in the container lid.
Hot glue the speaker in the speaker hole.
Place the button on top of the GPS module. Glue or tape it in place. Do not have it directly over the GPS antenna.
Place the GPS module under the LED circle, with the antenna pointing up.
Place the Arduino micro under the GPS module.
Place the recorder module under the Arduino with the microphone facing the microphone hole of the container. Part of the recorder module will stick out of the container (and eventually will fit inside the stick).
Glue or tape the container pieces together.
Wrap the LED strip coiling around the wooden stick (not too tightly though or you may damage the strip).
Slowly slide the frosted pieces over the wooden stick + LED strip. It should be a snug fit but not crush the strip.
Place the bottom cap over the bottom of the stick. The wooden stick should rest on this cap. There should be some space at the top of the stick to put the battery inside the stick.
Cover the wire for the compass with nature-themed tubing, so it looks like a vine).
Wrap the tubing to coil around the outside of the stick.
Glue or tape the compass in place near the bottom of the stick (top is facing up). Test out the code and make sure the compass is oriented so that it correctly detects north. The compass must be placed far away from the electronics (particularly the speaker) to avoid interference.
When you are ready to turn on the device, plug the battery in, slip it into the stick, and glue or tape the container onto the top of the stick.
Read More: Mystick