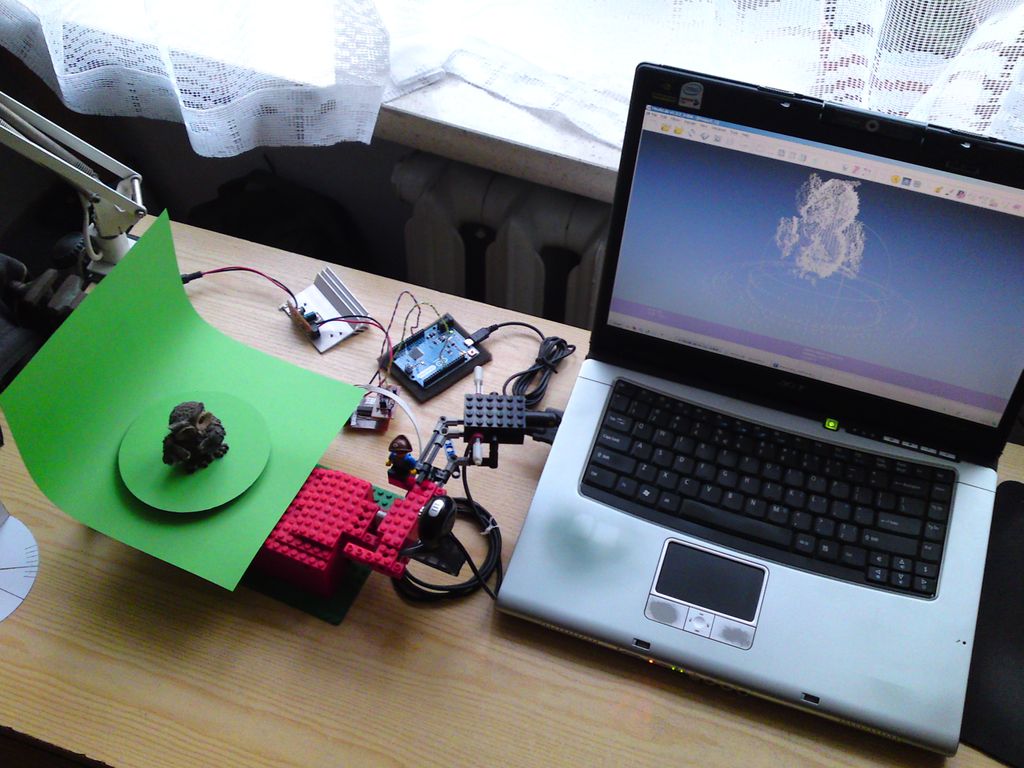
First of all, sorry for my English skills. It is not my native language, I have learned it at school, but don’t have many occasions to use it, except of reading articles in English. But i hope it would be good enough to understand.
Step 1: Ingredients
-one Processing IDE
-a lot of LEGO (best toy ever!)
-one stepper motor
-one Stepper motor driver and power supply
-one linear laser
-one webcam
– one working Meshlab
and Some help 🙂
First, you need to get all parts and think about overall look and working method.
And it depends the most of type of stepper motor you can get. I got my stepper from old OKI printer, which has attached gear set. It was very useful, because i could attach Lego pulley, without destroying it permanently. In a fact, i hadn’t destroyed any Lego blocks during build of rotating platform. I hate destroying things.
Code is primitive, i know it. It has major mistakes, not all needed algorithms are applied. But it generates point clouds, which are very similar to real things and that was goal of this alpha version of scanner.
So let’s prepare parts.
Step 2: Principle of operation
We have to found Cartesian coordinates (in some space) of points which belongs to scanned object.
Basically, we are looking for distance, between rotation axle and a point marked red by laser (“ro” on the picture). To found this, we have to measure how many pixels are between optical axle of camera and laser-marked point. On picture, this distance is marked as “b”. When we get that information, we have to convert it into millimeter (how many pixels are in one millimeter). Angle between laser and camera axle is constant and equals “alpha”. Using simple trigonometry, we can calculate “ro”:
sinus(alpha) = b / ro, which means that ro = b / sinus(alpha)
This operation repeats every layer, in my case it is 480times. Then rotating platforms move by some angle and whole operation repeats.
Let’s move to second picture.
Previous operations gave us coordinates in polar coordinates system. In polar system, every point look something like that:
P = (distance from Z axis, angle between point and X axis, Z) which is P = (ro, fi, z).
Ro is our distance, measured in previous operation. Fi is an angle of rotating platform. It grows an constant amount, every time platform rotate. This constant amount in equal 360 degree / number of operation
I.e. for 120 profiles around object, platform moves about 360deg / 120 = 3 deg. So after first move, fi = 3, after second fi = 6, after third fi = 9 etc.
Z value is the same value as Z in Cartesian system.
Conversion from polar to Cartesian is very simple:
x = ro * cosinus( fi )
y = ro * sinus( fi )
z = z
Step 3: Motor
I soldered 4 wires to connectors of stepper motor. To another ends of wires i have soldered single gold pin. Now it is very easy to connect it with driver.
I attached Lego pulley to the integrated gear. I took it out and drill 6 holes. Holes has same size and arrangement as holes on Lego pulley. Pulley and gear are joined together with „3-long” shafts.
Step 4: Motor driver and power supply
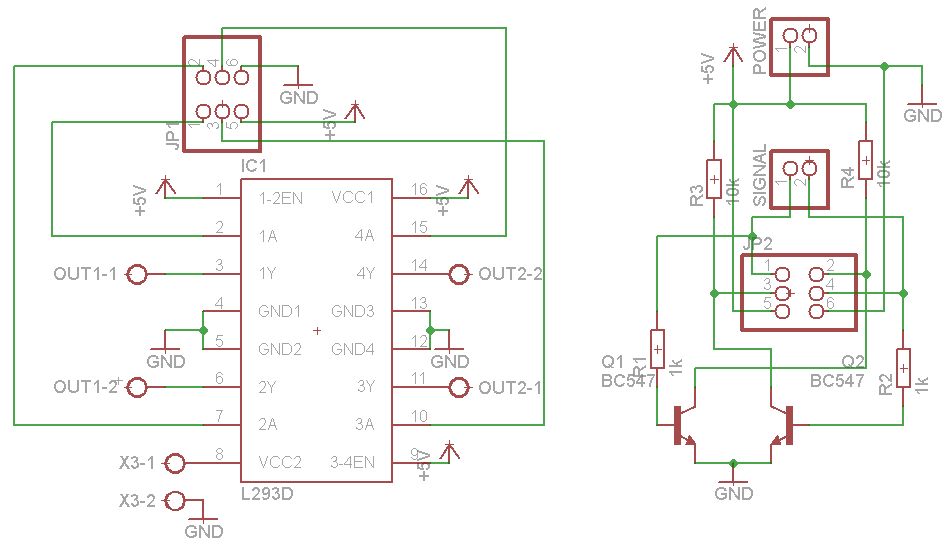
Bipolar stepper is driven by h-bridge. Because of low power consumption of stepper, L293D is more than enough. In simplest variant, h-bridge uses 4 digital output pins from Arduino, +5V and GND. For reducing output pins to 2, You can use small, additional board.
More info can be found in Arduino reference and on Tom’s Igoe page: http://www.tigoe.com/pcomp/code/circuits/motors/stepper-motors/
Ready to termotransfer boards and schematics are attached below.
Parts:
Part Value Package Library Position (mil) Orientation
IC1 L293D DIL16 st-microelectronics (700 750) R270
JP1 2X03 pinhead (700 1350) R0
JP2 2X03 pinhead (700 1875) R0
OUT1 AK500/2-H con-ptr500 (300 150) R0
OUT2 AK500/2-H con-ptr500 (1100 150) R0
POWER 1X02 pinhead (950 1875) R90
Q1 BC547 TO92 transistor-npn (275 2175) R180
Q2 BC547 TO92 transistor-npn (1125 2175) R180
R1 1k 0207/10 rcl (425 1700) R0
R2 1k 0207/10 rcl (750 2175) R180
R3 10k 0207/10 rcl (975 1700) R0
R4 10k 0207/10 rcl (800 2050) R0
SIGNAL 1X02 pinhead (450 1875) R90
X3 AK500/2-H con-ptr500 (700 150) R0
Power supply:
Power supply for stepper is super-simple LM317 application. Schematic can be found on datasheet. Using potentiometer, i can set voltage to needed level (3,7V in my case).
Parts:
Part Value Package Library Position (mm) Orientation
C1 100uF E5-8,5 rcl (24.13 5.08) R270
C2 100nF C050-030X075 rcl (10.16 13.335) R270
IC1 317TS v-reg (20.32 16.51) R0
R1 240R 0207/10 rcl (17.78 10.16) R0
R2 5k CA6V pot (13.97 4.445) R180
X1 AK500/2 con-ptr500 (3.81 13.335) R270
X2 AK500/2 con-ptr500 (33.02 13.335) R90
Step 5: Rotating platform
Pic is worth more than thousand words?
Step 6: Webcam
Step 7: Linear laser
Step 8: Arduino + IDE
It has simple code, which causes rotate stepper when got command from Procesing. Commands are sent by Serial.
I chose 4 steps per phase, which means i got 120 photos and 120 profiles around object, every 12 degree. Less steps causes mistakes because of elasticity of rubber band.
It is using arduino’s standard stepper library.

code:
#include <Stepper.h>
Stepper oki(48,8,9); //see stepper tutorial in arduino.cc for info about that
const int ledPin = 13; // the pin that the LED is attached to
int incomingByte; // a variable to read incoming serial data into
void setup() {
// initialize serial communication:
Serial.begin(9600);
// initialize the LED pin as an output:
pinMode(ledPin, OUTPUT);
oki.setSpeed(60);
}
void loop() {
// see if there’s incoming serial data:
if (Serial.available() > 0) {
// read the oldest byte in the serial buffer:
incomingByte = Serial.read();
// if it’s a capital H (ASCII 72), turn on the LED:
if (incomingByte == ‘S’) {
digitalWrite(ledPin, HIGH);
oki.step(4);
}
// if it’s an L (ASCII 76) turn off the LED:
if (incomingByte == ‘K’) {
digitalWrite(ledPin, LOW);
}
}
}
Step 9: Processing
Why Processing? Because it is easy to use, with big reference and tutorial base. Also it is very similar to arduino. That means the probability of mistake during code writing decrease. Libraries are well documented also.
For more detail: Let’s cook: 3D scanner based on Arduino and Processing

