This instructable explains how to pinpoint the location of an object using an Arduino, two ultrasonic sensors, and Heron’s formula for triangles. There are no moving parts.
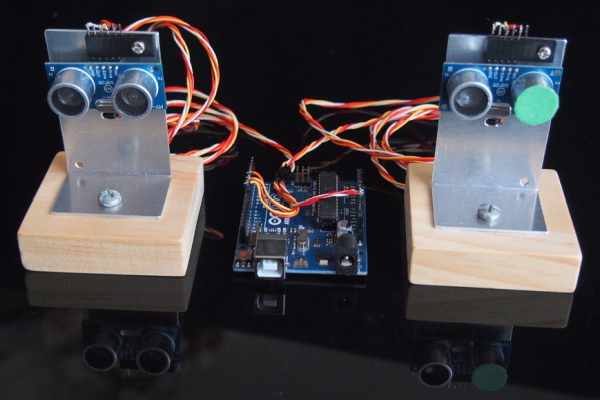
Heron’s formula allows you to calculate the area of any triangle for which all sides are known. Once you know the area of a triangle, you are then able to calculate the position of a single object (relative to a known baseline) using trigonometry and Pythagoras.
The accuracy is excellent. Large detection areas are possible using commonly available HC-SR04, or HY-SRF05, ultrasonic sensors.
Construction is simple … all you require is a sharp knife, two drills, a soldering iron, and a wood saw.
Images
- The video clip shows the unit in operation.
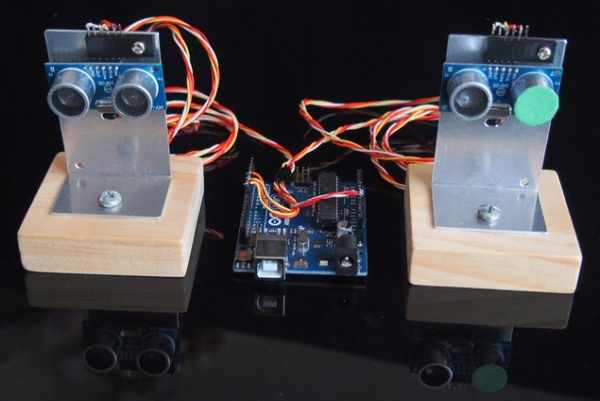
- Photo 1 shows the assembled “echo locator”
- Photo 2 shows a typical display. The object is the red (flashing) dot.
- Photo 3 shows the video test setup. It was necessary to position the two HY-SRF05 ultrasonic sensors 50cm below the baseline to completely “illuminate” the detection area with sound.
Step 1: Wiring Diagram
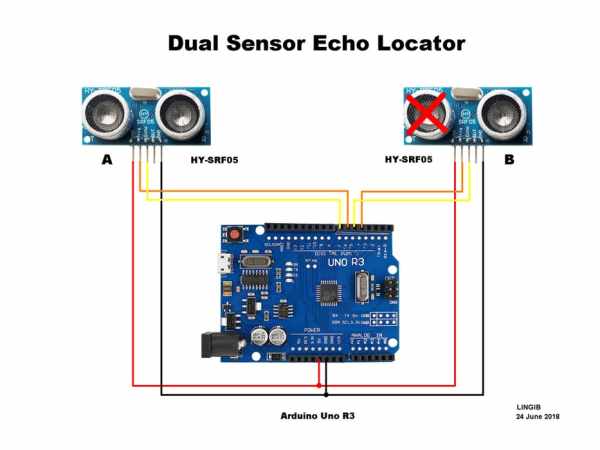
Photo 1 shows the wiring diagram for the “dual sensor echo locator”.
Sensor B is rendered “passive” by placing several layers of masking tape over the transmit (T) transducer. This tape blocks the ultrasonic sound that would otherwise be emitted.
Step 2: Parts List
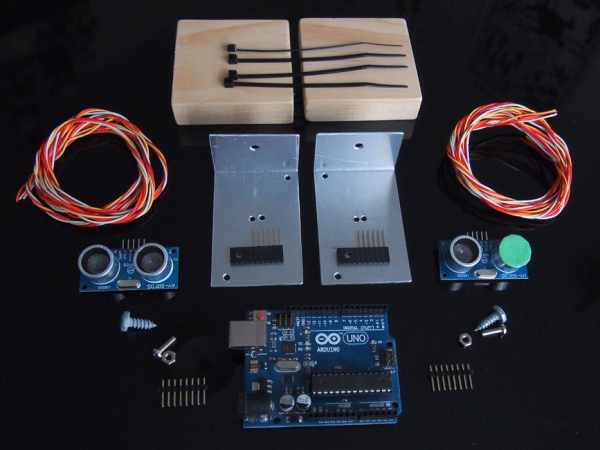
As shown in photo1, very few parts are required to complete this project:
The following parts were obtained from https://www.aliexpress.com/ :
- 1 only Arduino Uno R3 complete with USB cable
- 2 only HY-SRF05, or HC-SR04, ultrasonic transducers
The following parts were obtained locally:
- 1 only male arduino header strip
- 2 only female arduino header strips
- 2 only pieces of scrap aluminium
- 2 only small pieces of wood
- 2 only small screws
- 3 only cable ties
- 4 only lengths plastic coated wire (assorted colors) [1]
Note
[1]
The total length of each wire should equal the desired distance between the sensors plus a small amount for soldering. The wires are then twisted together to form a cable.
Step 3: Theory
Beam Patterns
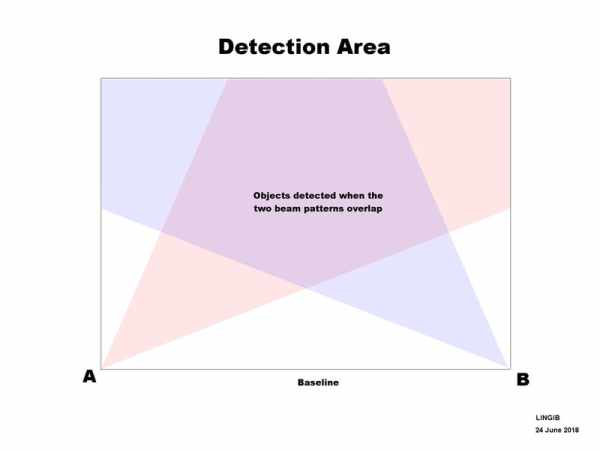
Photo 1 shows the overlapped beam patterns for transducer A and transducer B.
Sensor A will receive an echo from any object in the “red area”.
Sensor B will only receive an echo if the object is in the “mauve area”. Outside this area it is not possible determine the coordinate of a object. [1]
Large “mauve” detection areas are possible if the sensors are widely spaced.
Calculations
With reference to photo 2:
The area of any triangle may be calculated from the formula:
area=base*height/2 ……………………………………………………………………. (1)
Rearranging equation (1) gives us the height (Y-coordinate):
height=area*2/base ……………………………………………………………………. (2)
So far so good … but how do we calculate the area?
The answer is to space two ultrasonic transducers a known distance apart (baseline) and measure the distance each sensor is from the object using ultrasound.
Photo 2 shows how this is possible.
Transducer A sends a pulse which bounces off the object in all directions. This pulse is heard by both transducer A and transducer B. No pulse is sent from transducer B … it only listens.
The return path to transducer A is shown in red. When divided by two and the speed of sound is factored in, we can calculate distance “d1” from the formula: [2]
d1 (cm) = time (microseconds)/59 ………………………………………………(3)
The path to transducer B is shown in blue. If we subtract distance “d1” from this path length we get distance “d2”. The formula for calculating “d2” is: [3]
d2 (cm) = time(microseconds/29.5 – d1 …………………………………….. (4)
We now have the length of all three sides of the triangle ABC … enter “Heron”
Heron’s formula
Heron’s formula uses something called a “semi-perimeter” in which you add each of the three sides of a triangle and divide the result by two:
s=(a+b+c)/2 ……………………………………………………………………………. (5)
The area may now be calculated using the following formula:
area=sqrt(s*(s-a)*(s-b)*(s-c)) ……………………………………………………. (6)
Once we know the area we can calculate the height (Y-coordinate) from equation (2) above.
Pythagoras
The X-coordinate may now be calculated by dropping a perpendicular from the triangle vertex to the baseline to create a right-angled triangle. The X-coordinate may now be calculated using Pythagoras:
c1 = sqrt(b2 – h2) …………………………………………………………………….. (7)
Notes
[1]
The target area can be completely “illuminated” with sound by positioning the sensors below the baseline.
[2]
The value of 59 for the constant is derived as follows:
The speed of sound is approximately 340m/S which is 0.034cm/uS (centimeters/microsceond).
The reciprocal of 0.034cm/uS is 29.412uS/cm which, when multiplied by 2 to allow for the return path, equals 58.824 or 59 when rounded.
This value may be adjusted up/down to account for air temperature, humidity, and pressure.
[3]
The value of 29.5 for the constant is derived as follows:
There is no return path so we use 29.5 which is half the value used in [2] above.
Step 4: Construction
Mounting brackets
Two mounting brackets were made from 20 gauge aluminium sheet using the method described in my instructable https://www.instructables.com/id/How-to-Cut-Fold-…
The dimensions for my brackets are shown in photo 1.
The two holes marked “baseline” are for attaching a string to each sensor. Simply tie the string off at the required spacing for easy setup.
Sensor sockets
The sensor sockets (photo 2) have been fashioned from standard Arduino header sockets.
All unwanted pins have been pulled out and a 3mm hole drilled through the plastic.
When soldering the connections take care not to short the wires to the aluminium bracket.
Strain reliefs
A small piece of heat-shrink tubing at each end of the cable prevents the wires from unravelling.
Cable ties have been used to prevent unwanted cable movement.
Source: Dual Sensor Echo Locator
