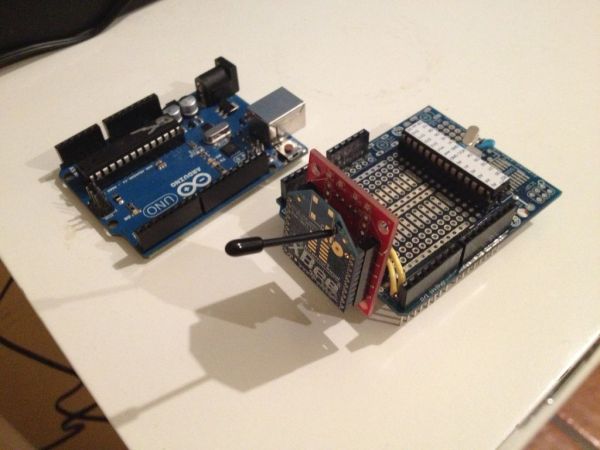
Hi. This Instructable will guide you through the process of wirelessly programming your Arduino using two XBees. I just finished designing a wireless EEG system with the XBee modules, so I’ve become quite fluent in their programming and have just now been able to accomplish this. It still amazes me how difficult it has been to try to wirelessly program the Arduino. On top of that no one has been able to do this with the series 2 XBees (that I know of… and I’ve looked hard). However I do not see why this method cannot be extended past the series 1 or 2 and used for the 900MHz series as well. You just need to make sure that the XBee is capable of acting as a transparent serial link.
Being able to wirlessly program your Arduino can come in immensly handy. This means you can set up your Arduino in a remote location that is hard to access and still be able to program it. For example, if you want to measure climate data in a harsh enviroment. This would require you to seal your device, and make it combursome to program. However, with this rig not only can you still program the Arduino inside from over 90m away, but also recieve data from your sensor wirelessly too.
Its my first Instructable so any feedback would be much appreciated!
In order for you to accomplish this you will need to:
1) Have two XBees. They can be any series I believe, but they have to be a pair of the same series
2) Have an appropriate method of connecting one XBee to your computer, and another to a circuit.
3) Build a small circuit that incorporates a Arduino. Can be a standard board such as the UNO or solely the microcontroller with accompanying crystal and capacitors.
4) Have an another Arduino bootloaded with the Duemilanove bootloader. This will be the Arduino that is programmed wirelessly.
For example, I used:
1) Two series 2 modules.
https://www.sparkfun.com/products/10414
https://www.sparkfun.com/products/10420
2) A USB explorer for connecting to my laptop, and a explorer regulated for connecting to my circuit.
https://www.sparkfun.com/products/8687
https://www.sparkfun.com/products/9132
3) A ATMEGA328p-pu microcontroller that was soldered onto a shield.
http://www.digikey.com/product-detail/en/ATMEGA328P-PU/ATMEGA328P-PU-ND/1914589
http://www.adafruit.com/products/51
4) A Arduino UNO board, but I re-burned the chip to have the Duemilanove bootloader instead.
https://www.sparkfun.com/products/11021
Step 1: Programming The XBees
Here we are going to program our XBees to the right communication settings for the project. I was using series 2 modules so as far as I know these steps work for series 2, but should be able to be adapted for any module. The end goal here is to setup a wirless transparent serial link operating at 57,600 buad.
1) Connect the XBee that is going to connect to your destination Arduino that is going to be wirelessly programmed, to your USB explorer and open up the XCTU program to program the XBee.
2) Program your XBee according to the “reciever” settings file I uploaded. Just load the file and click write. If you cannot access the file, then just program it as a Router in AT mode, and change the serial interface baud rate to 57,600. Remember to change your destination address accordingly. You want your detination address to be all zeros, indicating that you are transmitting to the cordinator.
3) Now connect your XBee that is going to stay connected to your computer to your USB explorer and open up XCTU again. This program can be found on the sparkfun link to the XBees I attached on the previous step.
4) Program your XBee according to the “transmitter” settings file I uploaded. Just load the file and click write. If you cannot access the file, then just program it as a Coordinator in AT mode, and change the serial interface baud rate to 57,600. Remember to change your destination address accordingly. You want your destination adddress to be the address of your reciever.
Now pop back your “reciever” XBee into your explorer regulated and wait for the next step to plug it into the circuit.
Step 2: Circuit And Code
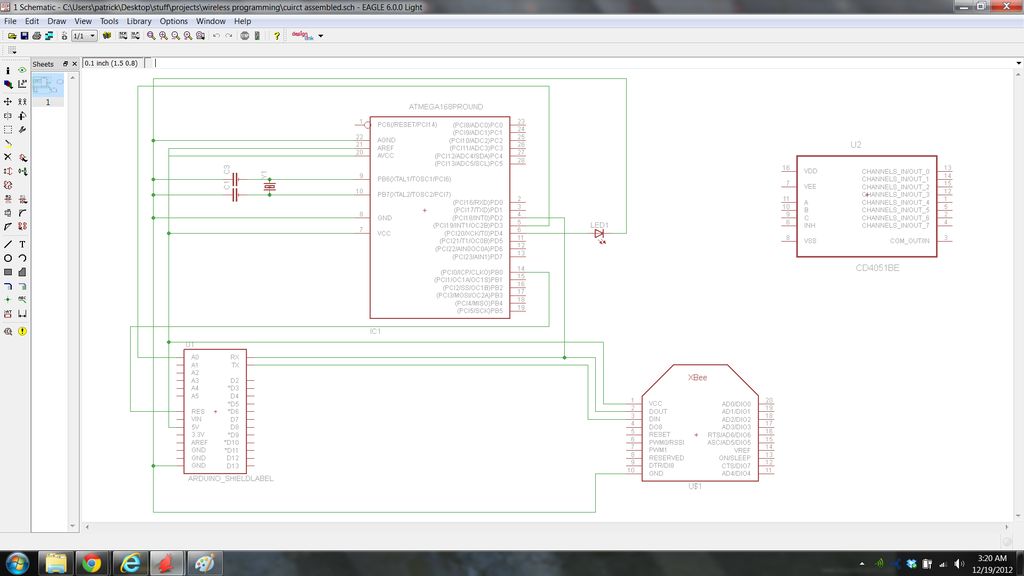
This is the circuit that will handel the programming of the Arduino Duemilanove. Funny enough, its based on an Arduino microcontroller itself. I attached a picture of the schematic in case you cannot open the eagle file.
A background on the circuit:
The most unique thing about this circuit is probably the fact that it uses an interrupt on digital pin 2 that is connected to the RX pin of the destination Arduino (the Arduino that is destined to be programmed). This is to detect the first low bit of serial data, which will be the IDE trying to reset the arduino for a sketch upload. However, the IDE cannot reset the destination Arduino directly, but that is why I included the intermediary Arduino (The Arduino that will reset the destination Arduino). Once a interrupt is triggered a timer, really a delay function, will start that triggers a low to high pulse on D8. In turn, D8 is connected to the destination Arduino’s reset line and will cause it to reset.
1) Two series 2 modules.
https://www.sparkfun.com/products/10414
https://www.sparkfun.com/products/10420
2) A USB explorer for connecting to my laptop, and a explorer regulated for connecting to my circuit.
https://www.sparkfun.com/products/8687
https://www.sparkfun.com/products/9132
For more detail: Arduino Wireless Programming with XBee Series 1 or 2


