Since runners often need to track not only their total mileage, but also the distance run on each pair of shoes (in order to know when to replace them), this project seeks a solution to the problem of how to keep track of these numbers. This is a basic prototype of a shoe-mounted distance tracker – because of time constraints it is a bit bulky and the distance must be entered manually via a button input. A future, more marketable version would need to be more compact, battery-powered, and perhaps use bluetooth to connect to a GPS watch in order to obtain the distance automatically. In any case, this is a great way to get started with using Arduino to control a graphics output.
Step 1: Materials
For this project, I used the following components:
– Arduino Nano
– 4-pin OLED LCD screen (backlit)
– 10K Ohm resistor
– 4-pin pushbutton
– Wire
– 3D-printer
Step 2: Setup of OLED Screen
I started by making sure that the screen worked and could be controlled well with the Arduino – I started by using a regular-size model and eventually shrunk down to using an Arduino Nano in hopes of a more compact design.
As is visible in the image, the screen’s four pins should be connected to the Arduino as follows:
VCC –> 5V Power
GND –> GND
SCL –> A5
SDA –> A4
The screen can then be controlled using the chip. Some basic starter code can be found at https://randomnerdtutorials.com/guide-for-oled-display-with-arduino/ . The Adafruit GFX and SSD1306 libraries are required, and contain much of the heavy lifting of getting the screen to work, so that in the Arduino IDE implementing simple built-in patterns or text display is relatively simple.
Step 3: Adding a Button
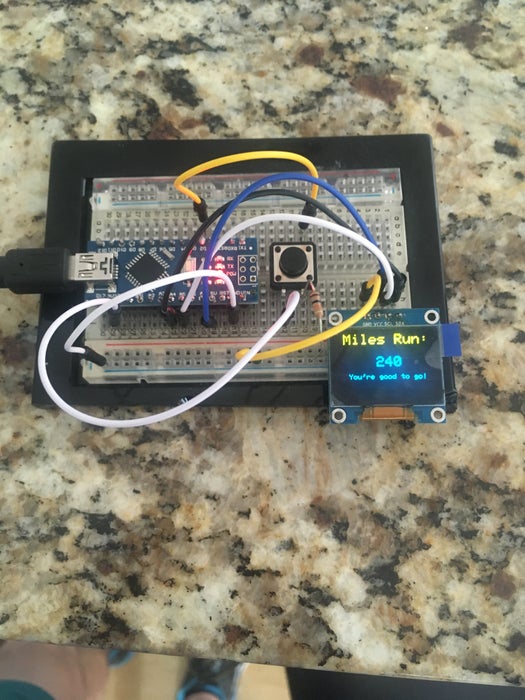
I want this device to be interactive, so I added a single pushbutton to its setup. This is pretty simple, we just connect one pin on the pushbutton to the Arduino’s 3.3V power supply, and the other side to its 2nd digital input. The pushbutton is also grounded in series with a 10K Ohm resistor.
Once this is in place, the Arduino can receive input from the button and display results on the screen.
Step 4: Programming
I have pasted the code for the device below. It just includes a couple of if-loops and defines a mileage variable that increases and displays on the screen when the button is pressed. I also have included a delay, so that if the button is held down it increases more quickly.
#include <Wire.h>
#include <Adafruit_SSD1306.h>
#include <Adafruit_GFX.h>
// OLED display TWI address #define OLED_ADDR 0x3C
Adafruit_SSD1306 display(-1);
#if (SSD1306_LCDHEIGHT != 64) #error(“Height incorrect, please fix Adafruit_SSD1306.h!”); #endif
// constants won’t change. They’re used here to set pin numbers: const int buttonPin = 2; // the number of the pushbutton pin const int ledPin = 13; // the number of the LED pin
// variables will change: int buttonState = 0; // variable for reading the pushbutton status int miles = 240; // counts miles run
void setup() { // initialize the LED pin as an output: pinMode(ledPin, OUTPUT); // initialize the pushbutton pin as an input: pinMode(buttonPin, INPUT);
// initialize and clear display display.begin(SSD1306_SWITCHCAPVCC, OLED_ADDR); display.clearDisplay(); display.display(); Serial.begin(9600); // update display with all of the above graphics display.display(); }
void loop() { // read the state of the pushbutton value: buttonState = digitalRead(buttonPin);
// check if the pushbutton is pressed. If it is, the buttonState is HIGH: if (buttonState == HIGH) { // turn LED on: digitalWrite(ledPin, HIGH); // increment miles variable display.clearDisplay(); miles += 1; delay(100); } else { // turn LED off: digitalWrite(ledPin, LOW); }
// Check if shoes are too old (exceeding 250 miles) if (miles > 250) { display.setTextSize(1); display.setTextColor(WHITE); display.setCursor(0,55); display.print(” Time for a new pair!”); } else { display.setTextSize(1); display.setTextColor(WHITE); display.setCursor(0,55); display.print(” You’re good to go!”); } // display Field Values // display Headers display.setTextSize(2); display.setTextColor(WHITE); display.setCursor(5,0); display.print(“Miles Run:”);
display.setTextSize(2); display.setTextColor(WHITE); display.setCursor(15,30); display.print(” “); display.print(miles); // display Message display.display(); Serial.print(miles); }
Step 5: Housing the Device
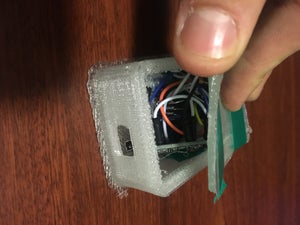
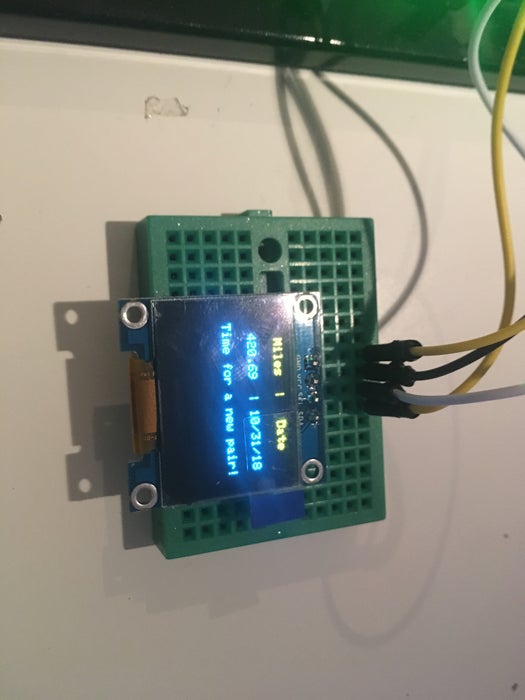
In order to make the device smaller, I switched to an Arduino Nano. None of the code needs to be changed for this, but Arduino recently changed their bootloader, so if you buy a cheap Nano with a CH34X chip from China, you may need to download some drivers and use the old bootloader (which is an option in the IDE). I soldered the components directly to the chip, and then 3D-printed a small case that can be found here. I cut a hole in the front for the screen, and then two small holes on the sides for the charging cable and the button. Because this is just a prototype and focused on the electronic functions, I used some electrical tape to hold it all together and safety pins to attach to a shoe. I attempted to switch over to battery-power (with a 9V) to make the device more portable, by connecting the battery’s positive lead to the Vin on the Arduino and the negative lead to ground. I included a toggle switch in series with the positive lead to control power supply. This worked at first, however for some reason the other switch would not work and the screen would glitch out occasionally. I think that the toggle switch I found may have been faulty, but in the interest of time I decided to abandon the battery idea for now.
Source: Shoe-Mounted Running Distance Tracker