This sketch uses the Serial.parseInt() function to locate values separated by a non-alphanumeric character.

Often people use a comma to indicate different pieces of information (this format is commonly referred to as comma-separated-values), but other characters like a space or a period will work too. The values are parsed into ints and used to determine the color of a RGB LED. You’ll use the serial monitor to send strings like “5,220,70” to the Arduino to change the lights.
Circuit
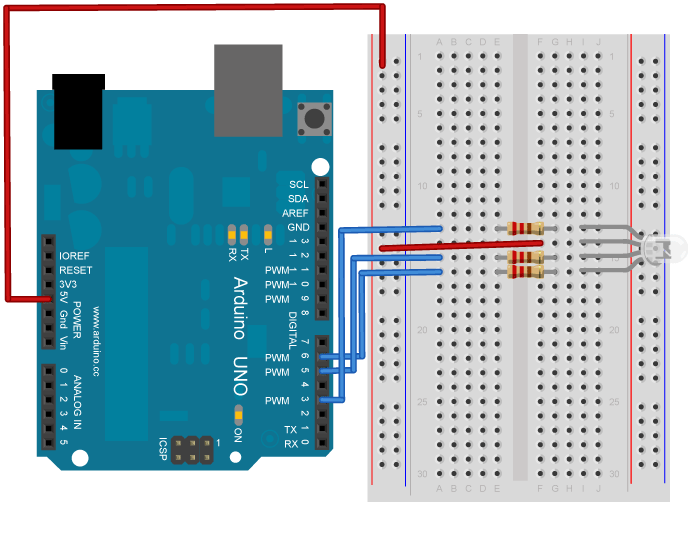
image developed using Fritzing. For more circuit examples, see the Fritzing project page
You’ll need five wires to make the circuit above. Connect a red wire to one of the long vertical rows on your breadboard. Connect the other end to the 5V pin on your Arduino.
Place an RGB LED on your breadboard. Check the datasheet for your specific LED to verify the pins. Connect the power rail you just created to the common anode on the LED.
With your remaining wires, connect your red cathode to pin 3, green cathode to pin 5, and blue cathode to pin 6 in series with the resistors.
RGB LEDs with a common anode share a common power pin. Instead of turning a pin HIGH to illuminate the LED, you need to turn the pin LOW, to create a voltage difference across the diode. So sending 255 via analogWrite() turns the LED off, while a value of 0 turns it on at full brightness. In the code below, you’ll use a little bit of math on the Arduino side, so you can send values which correspond to the expected brightness. Essentially, instead of using analogWrite(pin, brightness), you’ll be calling analogWrite(pin, 255-brightness).
Code
You’ll first set up some global variables for the pins your LED will connect to. This will make it easier to differentiate which one is red, green, and blue in the main part of your program:
const int redPin = 3;
const int greenPin = 5;
const int bluePin = 6;
In your setup(), begin serial communication at 9600 bits of data per second between Arduino and your computer with the line:
Numéro de série.begin(9600);
Also in the setup, you’ll want to configure the pins as outputs:
pinMode(redPin, OUTPUT);\\ pinMode(greenPin, OUTPUT);
pinMode(bluePin, OUTPUT);
Hardware Required
- Arduino Board
- Breadboard
- Hookup wire
- Common anode RGB LED
- Three 220-ohm resistors
For more detail: Lire la Chaîne de caractères ASCII à l'aide d'Arduino

