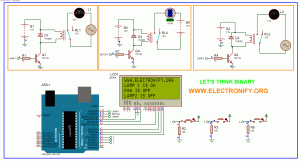
Hello every one welcome back . In this project tutorial I will show you how to make arduino based home automation , this means you can control all of your home appliences and devices using a single microcontroller . This Tutorial is divided into two part . In second part of this tutorial I will use RF communication module for wireless home automation . Let us first upload this program to the circuit above and observe the result . The circuit with code can be download from this link wireless home automation . And description is shown below the code .
Make Arduino Based Home Automation Part-1 Using ARDUINO UNO R3 (Code)
/*created by Prasant Bhatt

www.facebook.com/elefy

you can do whatever you want with this code

*/

#include `

LiquidCrystal lcd(10, 9, 8, 7, 6, 5);

// constants won't change. They're used here to

// set pin numbers:

const int buttonPin1 = 2;     // the number of the pushbutton pin

const int buttonPin2 = 3;

const int buttonPin3 = 4;

const int relayPin1 = 13;      // the number of the relay pin

const int relayPin2 = 12 ;

const int relayPin3 = 11;

// variables will change:

int buttonState1 = 0;         // variable for reading the pushbutton status

int buttonState2 = 0;

int buttonState3 = 0;

void setup() {

// initialize the relay pins as an output:

pinMode(relayPin1, OUTPUT);

pinMode(relayPin2,OUTPUT);

pinMode(relayPin3,OUTPUT);

// initialize the pushbutton pin as an input:

pinMode(buttonPin1, INPUT);

pinMode(buttonPin2, INPUT);

pinMode(buttonPin3, INPUT);

lcd.begin (20, 4);

lcd.clear ();

lcd.setCursor (0, 0);

lcd.print ("WWW.ELECTRONIFY.ORG");

}

void loop(){

// read the state of the pushbutton value:

buttonState1 = digitalRead(buttonPin1);

buttonState2=digitalRead(buttonPin2);

buttonState3=digitalRead(buttonPin3);

// check if the pushbutton is pressed.

// if it is, the buttonState is HIGH:

if (buttonState1 == HIGH) {

// turn Lamp on:

digitalWrite(relayPin1, HIGH);

lcd.setCursor (0, 1);

lcd.print ("LAMP 1 IS ON ");

}

else {

// turn Lamp off:

digitalWrite(relayPin1, LOW);

lcd.setCursor (0, 1);

lcd.print ("LAMP 1 IS OFF ");

}

if(buttonState2==HIGH){

digitalWrite(relayPin2,HIGH);

lcd.setCursor (0, 2);

lcd.print ("FAN IS ON ");

}

else{

digitalWrite(relayPin2,LOW);

lcd.setCursor (0, 2);

lcd.print ("FAN IS OFF ");

}

if(buttonState3==HIGH){

digitalWrite(relayPin3,HIGH);

lcd.setCursor (0, 3);

lcd.print ("LAMP 2 IS ON  ");

}

else{

digitalWrite(relayPin3,LOW);

lcd.setCursor (0, 3);

lcd.print ("LAMP2 IS OFF ");

}

}
Make Arduino Based Home Automation Part-1 Using ARDUINO UNO R3 (Schematic Diagram)
Description
The code is very simple to understand , the step by step algorithm is shown below
- first include liquidCrystal header file and initialize LCD using
- after that define pins for buttons and relay
- initialize button state 0 initially
- inside the setup define the button pin as input (because we are taking input from buttons ) and relay pins for output
- display ELECTRONIFY.ORG on first line of liquid crystal display
- inside infinite loop , determine whether button are pressed or not using digitalRead function
- if 1st button is pressed then 1st lamp is on and that condition is displayed on liquid crystal display
- similarly if second button goes high ( ie pressed ) then motor is on and that condition is displayed
- similar condition for third button and 2nd lamp
that’s it . In second part we will discuss about how to make wireless arduino based home automation , Keep sharing and stay tuned . If you have any question about this project please comment below .

