Bring Touch Control to the Arduino. Use interesting touch sensors like Carrots or Beets to make a “Beetbox”.
In this instructable you will learn:
* How to use the Cap Sense library to make Arduino responsive to touch
* How adding a Wave Shield (and some root vegetables), you can make a “Beetbox”
Step 1: You Will Need
For the Touch Sensor part you will need:
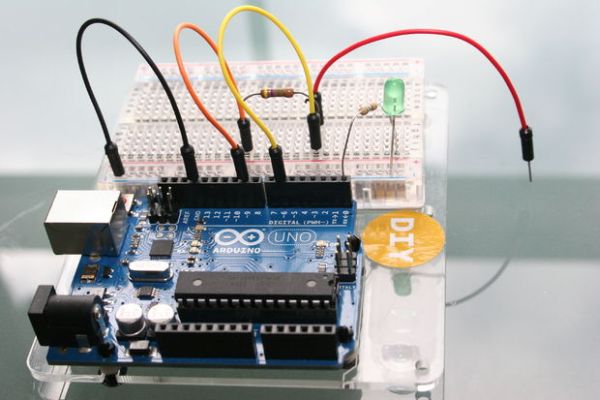
* Arduino UNO
* A 4.7M Ohm resistor (or a value similar to that) (one for each sense channel)
* Breadboard for wiring up e.g. (http://goo.gl/1E1iI)
* Some Wires
For an initial experiment to show how touch sensing works:
* An LED
* a 560 Ohm resistor
For the “Beetbox” part:
* Some Root Vegetables (such as a Beet)
* An Adafruit Wave Shield as shown http://goo.gl/KUUZz
* The WaveHC library for Arduino (http://www.ladyada.net/make/waveshield/download.html)
Step 2: The Principles of Capacitive Touch Sensing
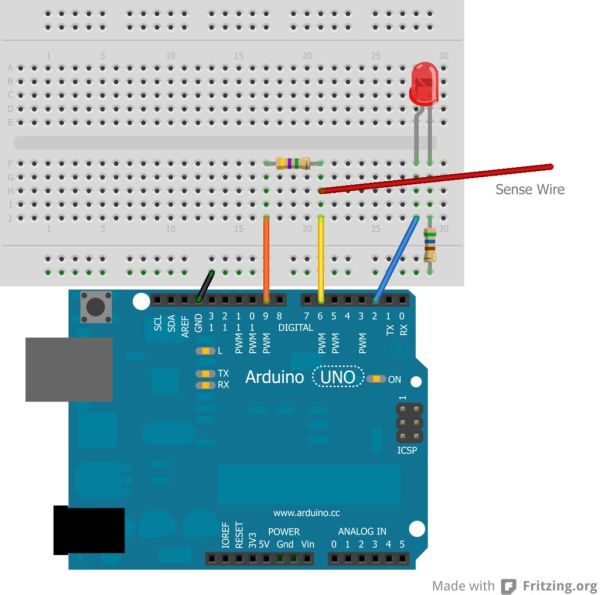
For the Beetbox we use three sense channels.
To start we’ll implement one touch sense channel and activate an LED when Arduino senses touch.
Wire up the circuit as shown in the Fritzing diagrams and photo’s.
Get and Install the Capacitive Sense library for Arduino from here: http://goo.gl/EpSX0
Step 3: Here’s How the Capacitor Sense Works
The Cap Sense circuit is made by the resistor between Arduino pins 6 and 9, and also the capacitance to ground on the Touch Sensor. When the CapacitiveSensor arduino library is asked to read the sensor value, pulses are Output on Pin 9 and Input into pin 6. The library routine measures the delay between when the pulses are transmitted and when they are received.
The measured delay is proportional to the Resistor value R and the Capacitance C. i.e. Delay = R*C
(strictly speaking there’s a scaling factor too depending on the voltage level you’re measuring from, but that’s just a detail for us).
The Capacitance on the sensor varies as you bring your finger close to the sensor and as you touch it. Touching the sensor gives you the largest capacitance and the longest delay. In order to make the delay large enough to be detected by Arduino you need a large resistor e.g. 4.7Meg Ohms.
Step 4: Arduino Code: Key Concepts
There are a couple of Key Concepts in the Arduino code.
1. Activate an LED when the sensor is touched.
To do that we need to measure the delay (total1) and compare it to a Threshold value e.g.
=============
void setup()
{
….some setup stuff….
}
void loop()
{
total1 = cs_9_6.capacitiveSensor(30); // Measure the Cap Sense Value from the Sensor
if (total1 > THRESHOLD) {
digitalWrite(LedPin, HIGH);
}
else {
digitalWrite(LedPin,LOW);
}
}
=======
That’s pretty straightforward. But what should the THRESHOLD value be?
L' total1 value of delay we read back varies from day to day because it’s very sensitive to capacitance (which is the whole idea), but it means we can’t just put in any fixed THRESHOLD value because it will be different under different conditions.
To make sure we have an appropriate THRESHOLD value, we need to measure the THRESHOLD value during a calibration sequence at the start of the code.
We do this as follows. We initialise i=0 during setup() and calibrate for the first 50 iterations of loop(). The LED flashes during calibration and we need to touch the sensor to determine the appropriate THRESHOLD value.
=======
* A 4.7M Ohm resistor
* Breadboard for wiring up
For more detail: Juste Veggin avec un Arduino Beetbox