To all other teens (I’m 16) who have begun to pick up an intrest in robotics and electronics the following project will give you a great user-system to get started with. This is not for complete beginers, but after only 6 months of teaching myself to code and develop robotics I have developed T.A.B.U.
What did I make?
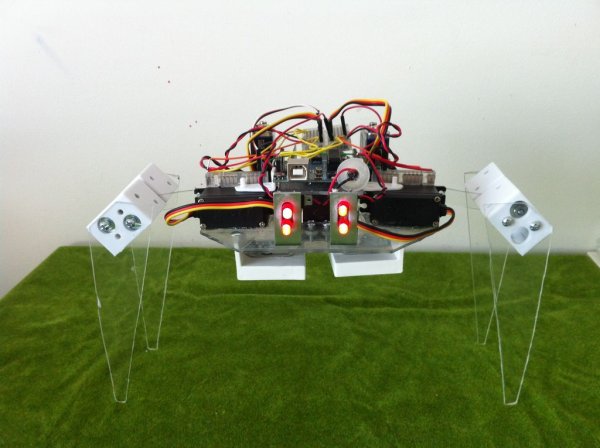
T.A.B.U. is a crab like robot that runs on the arduino uno micrcontroller. T.A.B.U. stands for “Testable Arduino Based User-system”. I developed this robot so that I could continue to learn how to code robotics with a phisical test subject.
How did I make it?
T.A.B.U. runs off of three 9v smoke detector batteries, one for the board and base servo, one for the left claw, one for the right claw. It is a very simple robot to make and is a great entry level project. When you are finished you will have an opensource robot that you can program and add to to suit your needs.
Where did I make this?
I worked in my room. I have a personal workdesk and I have spent countless hours working in there.
What did you learn?
This project really helped me understand how robotics function in a safe and testable enviorment. I want others to have the ability to use my robot to enhance their skills with electronics and robotics.
I recomend that if you have an intrest in Arduino programming you pick up a copy of the “Arduino Cookbook” by Michael Margolis. This is a key to debugging and learning the system.
Well enough of that, let’s get started!
Step 1: Materials…
Outils
– soldering iron/gun
– solder
– drimmel
– drill bit for drimmel
– cutting blade for drimmel
– screwdriver
– needlenose pliers.
– super glue
Step 2: Creating the bases and legs
Before we get started I want to point out that this project is opensource, meaning that if you want to change the shape or size of a part you can do so.
Once you have aquired the plexiglass or polycarbonate board you need to grab a sharpie and a measuring tape. You will need to cut an octagon with 3.5″ sides, If you would rather you could also cut a circle with a 7″ diameter.
Next you will need to cut four 6x5x2″ triangles out for the legs. Be carefull when cutting the board because the plastic shards will shoot right up into your face. I recomend using goggles.
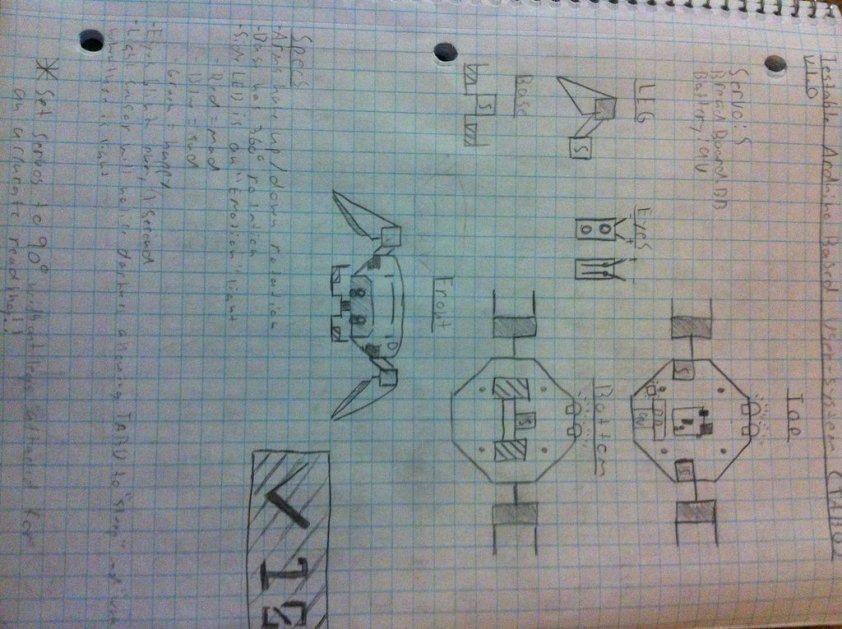
Next cut out two 3×1″ rods for the legs.
Finally you need to cut out the platform for the Arduino witch is a 1×3″ rectangle.
Finished? Congratulations, the hardest part is over!
– 2 by 3 foot sheet of plexiglass or poycarbonate board
– one small breadboard with 2 power rails (+/-)
– 3 9v batteries
– 3 9v battery holders
– jumper wire
– two (L) brackets
– one (V) bracket
– set of four window blind bracket (can be replaced with plastic cube of any kind)
– set of 6-32 x 1/2 bolts, nuts, and washers.
– 3 parallax 180 degree servos (larger model)
– one round battery plug that will work with your model of microcontroller
– three LED’s
– Perf board
And finally, last but not least, an Arduino compatible microcontroller.
I was able to create this robot using around $120, However I owned all the tools and allready had an arduino board.
For more detail: Introduction: T. A. B. U. Un Robot à l'aide d'Arduino