The Christmas light show with Arduino is a project that controls a number of lights according to a song in sync with the music. It can be used to control stage lights and fog machines (that don’t have DMX) with a computer to achieve wonderful synchronization for performances on stage, which is not always possible with manual lighting control consoles.
During last year’s holidays, I was watching videos of Christmas songs on Youtube and the video above of Christmas lights flashing according to the music caught my eye. So I wanted to make my own Christmas light show with Arduino. I was wondering how I would sync the lights according to a song and how I would send data in sync with a song. I got the idea to use MIDI signals when I was working with a song using sound editing software. I hacked the MIDI signals from the software (which was in sync with a song) and turned them into light control data.
Required Materials
- An Arduino Uno
- 74HC595 IC (3 nos) (1 for each 8 channels)
- 8 channel relay board (3 nos) (1 for each 8 channels)
- 1μF capacitor
How does it work?
Controlling Lights in Sync with a Song
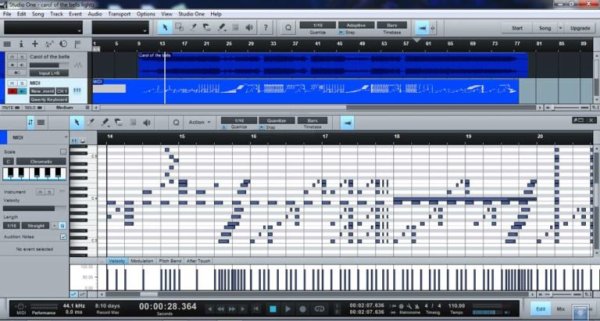
Above is a screenshot of Studio One software (Digital Audio Workstation software) that I used for this project. The MIDI track in the DAW software is in sync with a song. I turned the notes from C3 to E6 (excluding sharp notes) on and off in the MIDI track to control the lights. I used ‘Hairless MIDI to serial bridge’ to send the MIDI signals to the Arduino and programmed it to turn specific relays on and off according to the notes received. Now the DAW software actually controls the lights according to the song’s rhythm.
I did not use sharp notes (the black keys) because, if you have a real MIDI keyboard, you can program the lights with it. You can play a Glissando and control all the lights!
Block Diagram: Christmas Light Show with Arduino
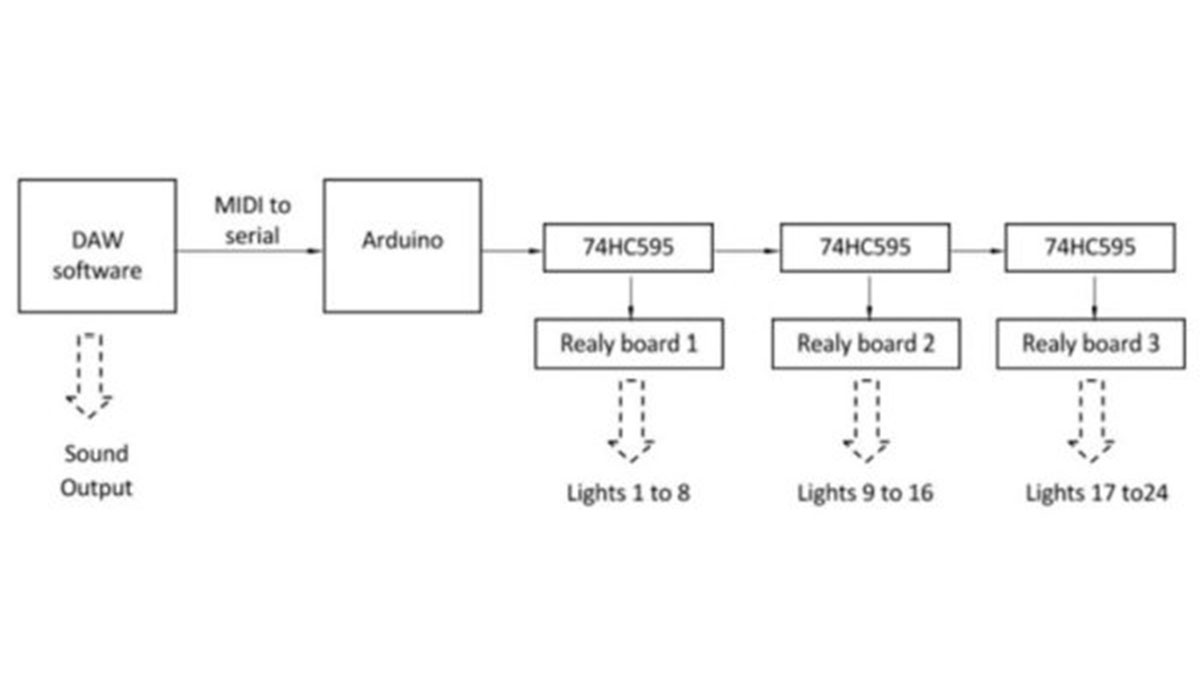
The lights are connected to the relays on the relay boards. The three 74HC595’s are used to control the relays. Three bytes are used to store the light states in the program (on/off). The music software sends out the MIDI data which is received by the Arduino and sets the corresponding bit of one of the three bytes to 0 or 1. The three bytes are shifted out of the registers and then are latched on so the relays turn on/off. After all the bytes are sent and the process is finished, they are latched, which prevents the relays from turning on/off while shifting the data. Now get ready to build your own Christmas light show with Arduino!
Read More: Créer un Noël Spectacle de Lumière avec Arduino