Sure you can use LDR’s, potentiometers and buttons to generate sounds, but what about strings?
When I began thinking about an Arduino string instrument, I realized what I wanted to create was a soft potentiometer. I found my inspiration from Hannah Perner-Wilson’s Fabric Potentiometer http://www.kobakant.at/DIY/?p=543.
Step 1: Parts
- Arduino Microcontroller
- 3.3Ω resistor (1 per string)
- Conductive thread Lame Lifesaver Lamé Lifesaver
- Nickel/Copper/Cobalt Fabric Tape http://www.lessemf.com/fabric.html
- 8Ω speaker (1 per string)
- Solderless breadboard
- 22-AWG hookup wire
- 30-AWG wire (optional)
- Wooden Dowel
- Metal nails or small screw eyes
- Drill
- Saw
- Needle
- Scissors
- Wire Stripper
- Pencil or marker
- Box.
Step 2: How it Works
Each string is basically a potentiometer that controls the sound of a speaker.
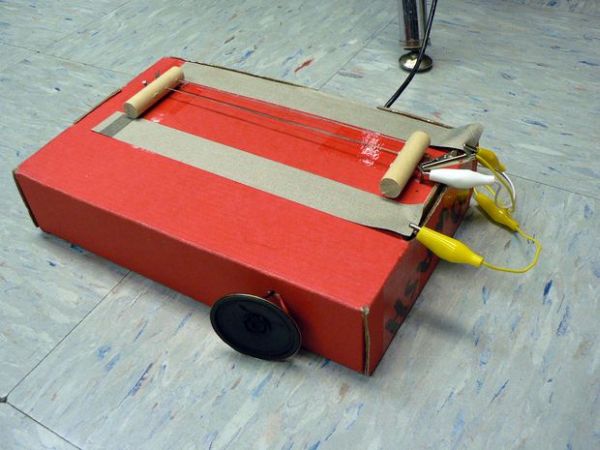
Step 3: Building the instrument

1. Cut two pieces of a wooden dowel. Your length is determined by how long you want your bridge to be. The dowels purpose here is to keep the strings away from your GND.
2.Mark where you want to drill holes on your dowels. Remember, you want to keep the strings off your GND. You should drill holes so that when you string the instrument the strings are parallel to each other.
3.Using a glue gun, fix your dowel onto your box.
4. Either drill holes for nails or screws on the outer side of your dowels or solder 30 AWG wire to eye screws and thread them through the dowels. If you are doing the the eye screws, one side goes to the analog pins, the other goes to power through a 3.3Ω resistor. I used red wires on one side to go to power and yellow wires to go to the analog pins. For the demo version the alligator clips attach to one nail connecting together an analog input and power through a resistor.
Step 4: Making Connections
1. You’ll have to figure out a way to connect the tape to GND on the Arduino. One option is to use alligator clips. Another is to use brads and solder them together on the inside.
2. Using the conductive thread on a needle, attach the conductive thread to the screws or nails. Tightly string the threads across. Weave the thread across at least twice. Use one string to attach all the nails or screws.
3. Connect one nail or screw to power through the 3.3Ω resistor .
4. Connect one nail or screw to an analog pin.
4. Attach at least one 8Ω speaker through a 100Ω resistor to a digital pin.
5. Create a pick or bow. It can be anything as long as it is conductive.
For more detail: Arduino Instrument À Cordes