Hello All,
I work part-time (more of a hobby) in the lighting industry and use DMX since it is the industry standard for communicating or controlling devices (lighting fixtures, controllers, consoles, etc..) I have seen commercial DMX testers on the market but I wanted to create my own.
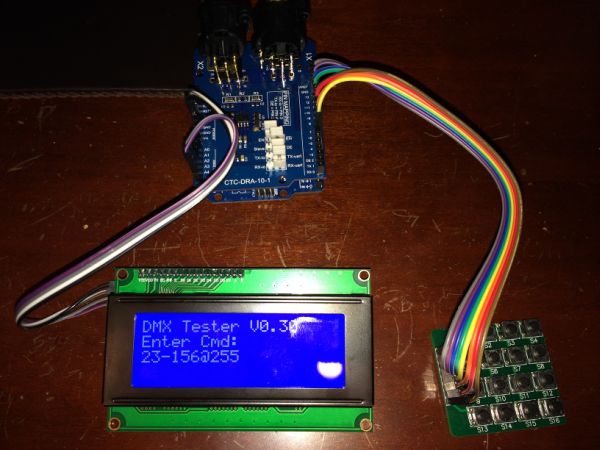
I have been working on an idea to create a low cost (<$50), Arduino based DMX tester.
The tester would provide the following functionality:
- Simple input protocol for entering commands using 4×4, 16 button keypad.
- Support LCD display, 4 line x 20 character
- Output DMX for single channel or a range of channels at a set intensity level.
The Hardware:
I started with the following:
- An Arduino UNO board
- A 4×4, 16 button keypad (button matrix)
- A 4 line by 20 Character LCD display w I2C (Serial) Interface
- A low cost DMX / RDM Shield purchased from EBay (model: CTC-DRA-10-1, low cost, non-isolated)
The Input Commands:
I wanted to use a 4 x 4 (16) button key pad to input all the commands with a simple / easy to remember protocol (format).
Here is the basic command format:
Channel@Intensity
Start Channel-End Channel@ Intensity
Here is the actual input protocol using only a 4 x 4 – 16 button key pad:
Legend:
XXX = 1 to 512 Channel Number
III = 1 to 256 Intensity Level
Alpha-Numeric Key Mappings:
A = @ (at sign)
B = Bump (not implemented)
D = – (dash)
C = Clear
* = Wildcard value: 512 for channel and 256 for Full intensity
# = Execute
Code Development / Testing:
I developed / tested the code in several stages:
- Keypad input – 4 x 4 (16) button key pad (or switch array)
- LCD display – 4 x 20 Character LCD w I2C interface
- Verify/test the input commands (protocol) were working correctly using a state machine
- Add DMX master (sending) code
The Keypad
Hardware:
I had 3 types of key pads that I played with (switches on a PC board, membrane switch, soft-touch) See the pictures below.
Logiciel:
I started with the Keypad library for easy matrix style keypad mapping. See http://playground.arduino.cc/code/Keypad for more information.
I had to play around with the Row and Column mapping to get my Key Pad switch matrix to work. The pin-out in the documentation wasn’t correct on any of the keypads. So once I determined the correct pin-out, the code worked perfectly.
Here is code snippet showing how to use the Keypad library:
(This is for the 16 switches on PC board)
The LCD display
Hardware:
I used a standard 4×20 character display with I2C (serial) interface which can be purchased from Ebay for about $10.00.
For more detail: Arduino DMX Tester – Inexpensive Tester for Sending DMX-512