this is a project which makes an android app, then configure it to use it with android debug bridge or android accessory development kit.
for making the android app we use android mode of processing.
For hardware, I always choose Arduino. Here I have a Freeduino ADK from embedded market. for the communication since ADK is not that well developed for processing yet I am using ADB, which works for android OS as low as 1.6(I think).
for making the android app we use android mode of processing.
For hardware, I always choose Arduino. Here I have a Freeduino ADK from embedded market. for the communication since ADK is not that well developed for processing yet I am using ADB, which works for android OS as low as 1.6(I think).
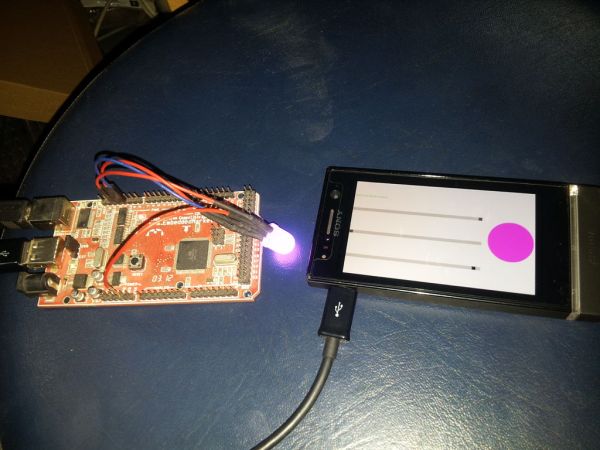
Also , I used a program that is a slider color chooser and then the same color goes to the rgb led.
The hardware can also be an Arduino board with a host shield(I haven’t tried it, I just have a freeduino adk but it should be compatible).
We will start with making an android app on processing, then making it ready for adb, then make a compatible code for hardware and then sit back and enjoy the coffee.
Step 1: APP Making
http://www.processing.org/learning/android/
This site does all the work for me, but keep in mind, the android version of your device and API 10 must be installed otherwise you are gonna have error my friend.
Before, install the latest processing version if you don’t have it. I am using 2.0b7 but 8 should not be a problem.
Make the simple program, run it, then run it on your device and see that it sticks!
Step 2: The processing app
The code is based on three scroll bars and their position in x axis coordinate to an value of color. This color is displayed on the oval window next to them.
Also, start processing in java mode. only then you can see the output in java.
Here is the code:
HScrollbar hs1, hs2,hs3;        //initialise the scrollbar
PFont f;
void setup()
{
size(800, 480);    //describe the size of the window
f = loadFont("ComicSansMS-Bold-48.vlw");    //create font. just for show
noStroke();
int x1=height/4;
hs1 = new HScrollbar(0, x1+30, width-220, 16, 16);
hs2 = new HScrollbar(0, 2*x1+30, width-220, 16, 16);
hs3 = new HScrollbar(0, 3*x1+30, width-220, 16, 16);
}

void draw() {
background(255);
textFont(f);
fill(63,232,34);
text("RGB Color Selector",5,80);
fill(0);
float img1Pos = hs1.getPos();
fill(255,0,0);
float img2Pos = hs2.getPos();
fill(0,255,0);
float img3Pos = hs3.getPos();
fill(0,0,255);
float r=map(img1Pos, 0,width-200,0,255);
float g=map(img2Pos, 0,width-200,0,255);
float b=map(img3Pos, 0,width-200,0,255);
int rr,gg,bb;
rr=int(r);
gg=int(g);
bb=int(b);
hs1.update();    //to get current location
hs2.update();
hs3.update();
hs3.display();
hs1.display();
hs2.display();
fill(rr,gg,bb);
strokeWeight(2);
smooth();
ellipse(700, 250, 190, 190);
stroke(0);
}
For more detail: ANDROID+ARDUINOADK+led RGB