Wrap Beats is an instrument that lets you string together notes in order to create different melodies and visual patterns. I constructed it using the Capacitive sensing library for Arduino and combining that with the music abilities of processing to create a dynamic instrument that can change sounds as you play it.
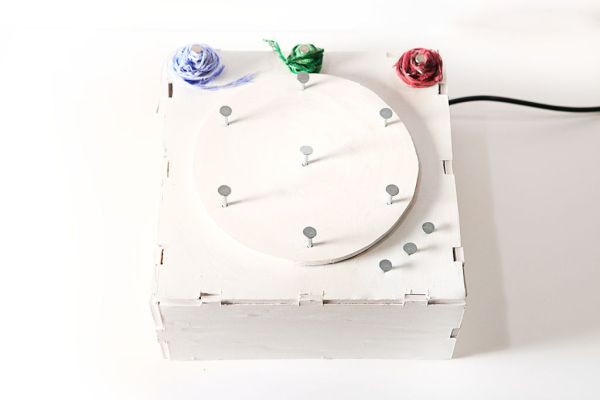 The circular design of the object as well as the notes is completely a personal choice you could put this together in many different ways and I would love to see different creations people come up with!!
Step 1: Materials
[box color=”#985D00″ bg=”#FFF8CB” font=”verdana” fontsize=”14 ” radius=”20 ” border=”#985D12″ float=”right” head=”Major Components in Project” headbg=”#FFEB70″ headcolor=”#985D00″]
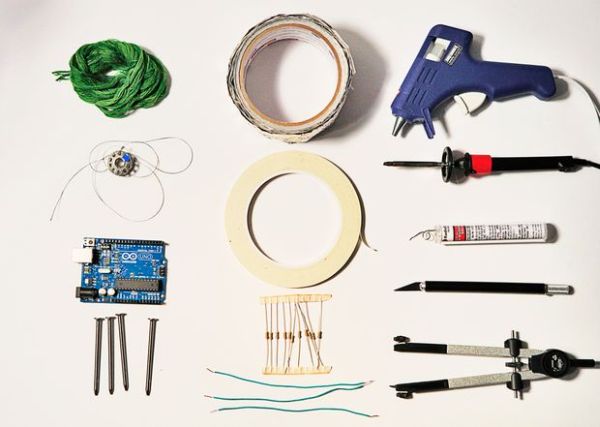
Technical Materials
- Arduino
- Resistors
Anything between 1 MΩ – 4.7 MΩ is usable.
You will require a resistor for each note you plan on having I have 7 notes and 3 optional keys that allow you to change the instrument, but you could have anywhere between 1 – 11 notes when using an Arduino Uno, If you have another model you can create as many notes as the digital pins will allow! - Copper Tape / Wires
- Conductive Thread
- Nails
Or anything conductive that is in a similar shape that you will be able to wrap the thread around - Soldering Iron + Solder
Optional Materials
(These are materials I used to create how the instrument looks, but not necessary for the outcome of the technical side working)
- Hot glue gun
- Form Core Board
- X-acto Knife
- Compass
- Masking Tape (very useful when soldering and putting together the circuit with copper tape)
- Different coloured threads
[/box]
Step 2: Creating the Casing / Box
- Using the Form Core measure out the size of the box you wish to create.
For example:
The top of my casing is 25cm x25cm and then I cut the four sides being 25cm x 15cm - Cut out these 5 shapes with the X-acto knife as precise as you can manage
- Now measure the thickness of the Foam Core, ie. mine was 2.5cm. Then measure 2.5cm out from the edge of each edge of the top piece of the box and 3 out of four edges of each of the side pieces of the box (Leaving a “bottom” edge). This is so you know how deep to cut each of the “jigsaw” like groves in order to join the sides of the box.
- Now draw 3 or 4 rectangles as deep as the markings you just drew on each edge of the top side of the box. Then cut these out with the X-acto Knife.
- Then use these groves as a guide to draw out where you will need the negative of the grove to appear on each of the side pieces of board. Then cut these out in the opposite fashion so they connect easily. repeat this for each of the edges that run along the top edge of the side pieces of board. (It will make it a lot easier if you mark out which side board goes with which edge of the top piece as each will be slightly different)
- To connect all the side pieces together I did the same steps with attaching the top to the sides, draw out the thickness and create a rectangle that will be your groove and then make it correspond to another side board that is the opposite of the groove and can fit together nicely.
- To create the disc like affect on the top of the box cut a circle out of another piece of foam core, measure out the same sized circle on the top of the box as well, marking on both where you want each note/nail to sit.
- Then cut a hole where each of the nails is going to come through on the top of the box.
- Then push a nail through each of the points you marked out on the top of your circular disk. You should now be able to place this on top of the box and it should fit nicely.
For more detail: Wrap Beats – Capsense Arduino Instrument