Well, It had to happen.
I first published my WordClock project in September 2009. It was a Microchip PIC based clock, using a PIC16F877A microprocessor. In the last year and a half, I have been constantly improving it, and have adapted it to the Arduino, and even designed an updated controller board for it.
Well, It got better. I have discovered how to cut Vinyl stencils, and have been experimenting with Perspex, so I thought it was time to share what I have been playing with.
The beauty of using cut vinyl as a stencil, is that you can create a clock that is up to 45cm x 45cm (or larger if you have the vinyl). My previous PCB based stencils were limited to 150mm x 150mm.
As with all of my clock designs, this is completely open. I encourage everybody to make one either using the details from this site. It is much simpler than it looks.

If you want, I can provide parts, complete kits, or even complete clocks from my web site at http://www.dougswordclock.com. 🙂
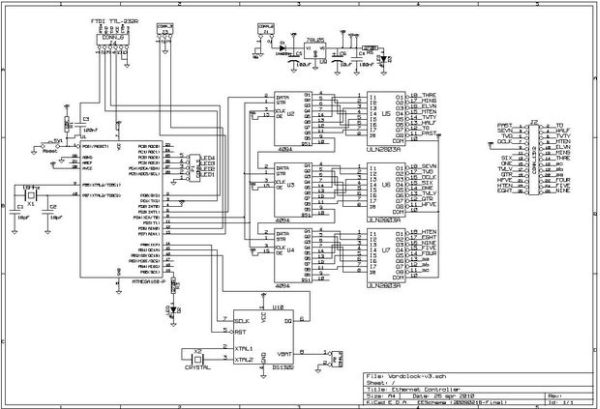
This clock uses an updated Arduino controller PCB. It has a DS1302 RTC onboard, to ensure that the timing is accurate, and an automatic dimming function kicks in between 7pm, and 7am, so you can still sleep if the clock is installed in your bedroom.
It is powered from a 12V DC, 400mA power supply. I have considered battery power, but LED clocks don’t run for very long on batteries, so that is not an ecologically sensible idea. My old clocks used to run from an AC source, but i moved to DC when I implemented the RTC chip.
I hope you enjoy building one of these clocks, and that it inspires your own projects.
My Epilog Challenge thoughts:
I have entered this project into the Epilog Challenge – The things I could do with a laser cutter…. wow…. I could cut intricate shapes that would allow me to morph this project into a full flowing – 3D – word clock, that has a clock face that has depth, real depth, with curves…. It could be a combination of shape and texture that I see with the Dali style melting clock (http://www.instructables.com/id/How-to-Make-a-Dali-Style-Melting-Clock/), and using a laser cutter, I could make the intricate baffles necessary to make that real as a word clock.
Megs will never see me again – I will have to simply live in my garage! 🙂
Step 1: Creating The Stencil
Start assembly by making the stencil. You can either get a stencil cut by a local sign writer to your own design, or use a pre-cut vinyl stencil from my web site.
I have always felt that the clock looks more majestic if there is a border around the letters (I normally use about a 30mm border), but you can use whatever size you would like.
Vinyl by itself is floppy, so it needs to be attached to a clear acrylic (Perspex) backing sheet to provide rigidity. Make sure that the acrylic sheet is the size you want the final clock to be.
Before you start, mix up a couple of drops of dish washing liquid with a cup of water, and load that into a spray bottle. We will use this to make applying the vinyl lots easier.
The vinyl stencil as supplied will typically be larger than required. This is so as to provide extra material for variations in face sizes. We need to cut the vinyl stencil to the final size of your acrylic sheet, allowing an extra 10mm allowance around the edges.
Lay the acrylic backing on top of the stencil , and mark out a cut line, then using a straight edge and a sharp hobby knife (or scalpel), cut the sheet to size.
Next, ensure that your working environment is clean – vacuum your table if necessary – or work inside the house, instead of the garage. Lock up your Golden Retriever dog and your cats. If you get small particles between the vinyl and the Perspex, you will have enormous trouble making the surface look flat.
Spend some time ‘weeding’ the stencil, by removing the letters that you don’t want there on the final stencil. The removed letters will provide space for the light to shine through. Once you have removed all of the letters (being careful to leave the centres of letters such as ‘A’ and ‘P’ behind), apply some masking tape along each row so that when we remove the backing sheet, the centres of the letters stay in the correct spot on the stencil.
Remove the protective cover from the clear perspex, and lay the Perspex to one side, ready for covering.
Turn the vinyl sheet over so that the front is against your working surface, and remove the backing sheet from the vinyl stencil, being very careful to ensure that the vinyl does not stick to itself. Be very gentle so that you don’t tear the vinyl.
Be gentle when you remove the backing to ensure that the bottoms of the letters are not stretched. You may find, for example, that the bottom of the letter R and W stays on the backing. Gently use a sharp instrument to detach them from the backing. This photo shows the base of an ‘R’ character being loosened. The base of the ‘W’ has to be loosened as well.
Spray the vinyl sheet with a liberal amount of the water/soap solution – Don’t panic – we will be squeeging this out later – it simply allows us heaps of extra time and movement to get the vinyl applied easily. In fact it makes application Sooooooooooo easy.
DON’T DO THE APPLICATION DRY (Unless you are a professional sign writer) – YOU WILL GO QUITE MAD.
Lie the Perspex on the top of the vinyl at an angle, starting with the bottom edge – carefully align the edge so that it is straight, Hold the top of the vinyl sheet taunt (you can have an assistant help you), then, and using a folding, or rolling motion lay the sheet on the vinyl. The folding or rolling motion will help to ensure so that most of the air and soapy water is expelled.
(In the photo, I didn’t use tension – I have subsequently determined that tension helps : )
Turn the Perspex over and make sure that the alignment of the stencil is where you want it. Don’t worry if the stencil is in the wrong spot, because you used water and soap (you did – didn’t you?) you have tons of time to get it right. Then, using a squeegee, credit card, or your hand, gently flatten the stencil out to remove the excess water / soap mix. Use some paper towel to clean and dry the stencil as you expel liquid. As you expel the liquid, you will notice that the stencil locks onto the acrylic sheet. We want this gluing action to happen. Do not rub the front hard, as you will damage the surface.
Then remove each of the tape strips – one at a time. Again – be gentle – use a tissue to blot up the excess water/soap mix as you go. If you find that a letter is staying attached to the masking tape, simply use a sharp tool to detach it.
Once you have expelled all of the water/soap mix, and things are looking very flat, marvel at your work, and leave it to adhere for an hour or so.
Cut the vinyl sheet to the final size on the perspex – I love the look of making the stencil 3 – 5mm smaller than the acrylic, allowing a small clear bit to frame the black vinyl. You may prefer to cut the vinyl even with the edge.
That completes the stencil assembly.
Enjoy looking at it, and then cover it with paper, attached with tape to ensure it doesn’t get damaged and put it away somewhere safe where it won’t get damaged.
For more detail: The Wordclock Grew Up!