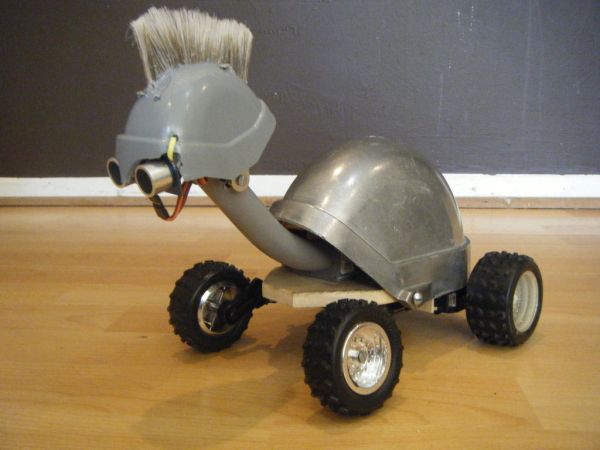
Hello, in this instructable I’ll be showing you step by step how to build the TurtleDuino, an object avoidance robot, with an Arduino UNO microcrontroller on board. I designed the TurtleDuino using material from the hardware store (Home Depot) and all the electronics from sparkfun.com and jameco.com.
Shopping List:
- Arduino UNO (Sparkfun.com)
- Ultrasonic Ping))) Sensor (jameco.com)
- 2 Larg Servo motors continuous rotation (sparkfun ROB-09347)
- 1 Medium Servo Motor 180 Degrees rotation (sparkfun ROB-10333)
- Breadboard (sparkfun PRD-09567)
- Jumper Wires (sparkfun PRD-11026)
- SPST toggle switch (sparkfun COM-09276)
- 22 AWG hookup wire (sparkfun PRD-08023)
- Servo Motor Extensions (sparkfun ROB-08738)
- 9v battery plug jack for Arduino (sparkfun PRY-09518)
- 9v battery holder (optional)
- 9v battery
- 4 AA batteries
- Breakaway headers-long (sparkfun PRT-10158)
- An old R/C car’s wheels
- 2 Large servo mounts
Home depot:
- 1/2″ in. 45 degrees pvc pipe (Turrtle”s neck) (in electrical)
- 1/2″ in. pvc one hole conduit snap strap or a conduit clamp (to support the turtle”s neck) (in electrical)
- 2″ in. Service Entrance Cap (turtle”s shell) (in electrical)
- 1″ in. Service Entrance Cap (turtle”s head) (in electrical)
- Liquid electrical tape (in electrical)
- Hot glue gun kit (in tools)
- Solder kit (in tools)
Hardware section
- 3/8″x6x24″ Craft Board (to make the base of the turtle)
- #6-32×1″ machine screws (about 20)
- #6 flatwashers (small bag)
- #6×1/2″ sheet metal screws (to attach neck bracket, front wheels, and shell to the base)
- #4×1/2″ sheet metal screws (to attach servos and arduino to the base) (small bag)
- #6 nuts (small bag) , 4 #6-32×2″ long bolts (to attach head to neck and the ping servo to head)
- 90 degrees angle corner plate
- 2″ painting brush (for the cool mohawk) (in paint)
Step 1: Cutting the base
In this step were are going to cut the base, install the rear servo motors, front and rear wheels, and the 4 AA battery holder.
Remove and discard the bottom piece of the turtles shell, then place the shell on the 1/2″x6x4′ poplar wood and trace the inside diameter of the shell with a 3″ pencil (3″ pencil because is a tight space). Leave about 2″ of the base in front of the shell then cut the traced area. (see pictures) Now lets use the two servo mounts or make your own and attach the rear servo motors using the #4 sheet metal screws (make sure they are the continuous rotation ones) to the back of the base near the outside edges so that the only thing sticking out of the side is just the shaft of the servo motor. Drill a 1/4″ in. hole on the base in between the 2 servos, we are using this opening to run the motor wires and the 4 AA batt. holder’s “+” and “-” leads to the breadboard. Attach the front wheels I used 2 small lego pieces and screwed the into the base using the #6×1/2″ sheet metal screws. I used hot glue to attach the rear wheels to the large round servo horn and then screw them to the servo shaft. And last screw in the 4 AA battery holder.(don’t forget to run the wires through the 1/4″ hole.
Step 2: The Turtle’s Neck
Now we are going to attach the neck to the base. Grab the 1/2″ 45 degrees pvc pipe and cut off the wide end of the pipe. screw in the pvc pipe bracket in the center of the front part of the base so the bracket is about two inches from the front edge. Cut the other end of the pipe in an angle see pictures, and drill through a 3/16″ hole at the end of the upper side of the pipe see picture ( these holes will be use to mount the 90 degrees angle plate to the neck and support the turtles head. The holes have to be level, align and drill. from the left side of the neck to the right side of the neck.
[box color=”#985D00″ bg=”#FFF8CB” font=”verdana” fontsize=”14 ” radius=”20 ” border=”#985D12″ float=”right” head=”Major Components in Project” headbg=”#FFEB70″ headcolor=”#985D00″]
- Arduino UNO (Sparkfun.com)
- Ultrasonic Ping))) Sensor (jameco.com)
- 2 Larg Servo motors continuous rotation (sparkfun ROB-09347)
- 1 Medium Servo Motor 180 Degrees rotation (sparkfun ROB-10333)
- Breadboard (sparkfun PRD-09567)
- Jumper Wires (sparkfun PRD-11026)
- SPST toggle switch (sparkfun COM-09276)
- 22 AWG hookup wire (sparkfun PRD-08023)
- Servo Motor Extensions (sparkfun ROB-08738)
- 9v battery plug jack for Arduino (sparkfun PRY-09518)
- 9v battery holder (optional)
- 9v battery
- 4 AA batteries
- Breakaway headers-long (sparkfun PRT-10158)
- An old R/C car’s wheels
- 2 Large servo mounts
[/box]
For more detail: TurtleDuino Object Avoidance Robot using Arduino