This project and future projects can be found at my website http://revoltlab.com/ where you can also find my blog.
UPDATE LOG:
NOW SUPER SIMPLE TO REPROGRAM!
Easy FTDI USB interface hardware explained in step 10
Easy FTDI USB interface programming explained in step 13
NEW code uploaded works perfectly with speaker output! see step 13
For those not familiar with geocaching, it is a wonderful treasure hunt/ adventure game for grownups and kids! Traditionally one finds a set of coordinates and cryptic clues on a website that hosts geocache locations. Using a hand held GPS device, one simply tromps off into the wilderness (or busy city intersection) and uses the power of observation and clue solving to find a hidden box usually with a prize inside! This is loads of fun and free! http://www.geocaching.com/
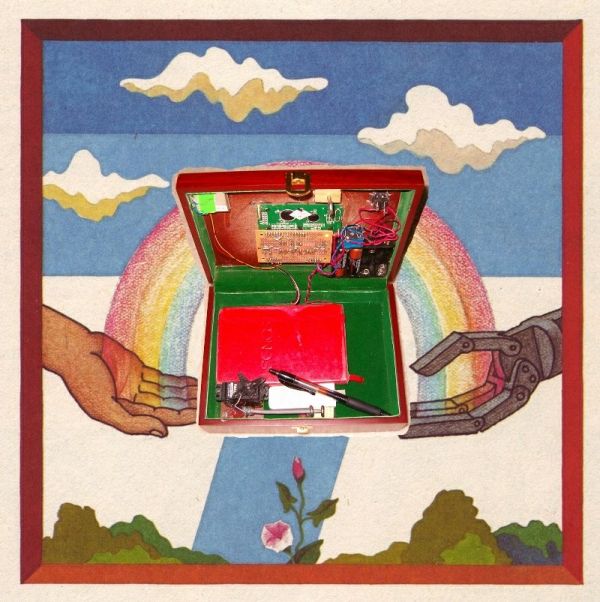
The Traveling Geocache still requires the user to get to a specific set of GPS coordinates but the hand held device is replaced by the Traveling Geocache itself. It is a locked box with an LCD display and one button. Upon pressing the button an intro screen welcomes the user to the Traveling Geocache and then displays the distance in kilometers from the target location. If the distance is larger than the programmed margin of error radius, the LCD informs you that access is denied. The box will not unlock until it is brought to the correct location! This is a great way to give a present to a friend or loved one. You can put tickets inside and set the magic location to the museum, aquarium, stadium, train station (DO NOT set a location that requires plane travel! Unopenable homemade electronic boxes are not welcome at airport security!). Any prize will do. Because the box is intended for a specific person, the prize can be far more special than in a traditional geocache.
Apart from the prize, the box also contains a log book where recipients can sign their names and write messages. There is also a usb drive with information on all of the electronics and software. This enables the recipient to reprogram the box, change the destination, customize the LCD messages, replace the prize, and re-gift the box to another friend, loved one, or trustworthy stranger. You can even leave a url somewhere inside the box where users can enter their names and destination locations enabling every user to track the life of the box!
This was my first time using GPS and LCD modules as well as my first time working with relays. Don’t worry about the learning curve if you can already make a light blink on the arduino.
Thanks to sparkfun and instructables for holding the microcontroller contest. It really motivated me to document and post my first ever instructable! If you like it, please rate and vote for this project!
Please leave comments! =)
Step 1: Private Property Rights are Upheld by Police with Guns
Despite our dreams of open source communism, capitalism is still a reality. With that in mind here is some info on intellectual property involved in this project.
This project was inspired by Mikal Hart’s “Reverse Geocache Puzzle Box” He has been wonderful about providing information on his design. Please note: “Reverse Geocache” and “Reverse Geocache Puzzle Box” are trademarked intellectual property of Mikal Hart. If you think that is uncool, he DOES have all the wiring diagrams and software available for free as long as you are not profiting off of them. He did after all write several arduino libraries for the program.
http://www.youtube.com/watch?v=Lu7IysgaZf8&feature=player_embedded
The original reverse geocache:
http://arduiniana.org/projects/the-reverse-geo-cache-puzzle/
Build instructions for the original Reverse Geocache:
http://arduiniana.org/projects/the-reverse-geo-cache-puzzle/building/
Other Acknowledgements:
Thanks to lady ada for all her super helpful tutorials!
Thanks to sparkfun for keeping up the Free Day tradition. I got my very first atmega328 with my 10 free day dollars (YES, I actually made it onto their site on free day!)
Thank you as well to RickP on the arduino forums for help with the relay switch design.
http://www.arduino.cc/cgi-bin/yabb2/YaBB.pl?num=1293755082
Step 2: Materials + Tools
Sparkfun Electronics is a good place to get most of what you need http://www.sparkfun.com/
List of Tools:
Soldering Iron
Wire cutters + strippers
Hot Glue gun
epoxy
dremel
List of Materials:
Cool looking box
Solder
Breadboard http://www.sparkfun.com/products/9567
Arduinohttp://www.sparkfun.com/products/9950 (you need to get one with a through hole chip. The surface mount SMD version of the arduino UNO will not work)
atmega328 chip http://www.sparkfun.com/products/9061 or http://www.sparkfun.com/products/9217
28 pin dip socket (for atmega328) http://www.sparkfun.com/products/7942
perf board http://www.sparkfun.com/products/8812
LED http://www.sparkfun.com/products/9592
1N4004 or any 1N400X diode (you can get these at radioshack)
Momentary switch
330Ohm resistor http://www.sparkfun.com/products/8377
10KOhm resistor http://www.sparkfun.com/products/8374
10k Ohm trim pot http://www.sparkfun.com/products/9806
22pf Capacitors (2) http://www.sparkfun.com/products/8571
16MHz crystal http://www.sparkfun.com/products/536
22 gauge solid core wire (multiple colors help a lot) http://www.sparkfun.com/products/8022
standard servo http://www.sparkfun.com/products/9065
gps module http://www.sparkfun.com/categories/4
LCD (I used a 16X2) http://www.sparkfun.com/products/790
5 volt relay
4 AA battery holder
4 AA batteries
female headers http://www.sparkfun.com/products/115
male headers http://www.sparkfun.com/products/116
scrap wood
large nail or metal bar
eye hooks (3)
usb stick
notebook
pen
Step 3: Cutting the Box
This picture is of the first box I attempted to cut. This is the correct pattern but I cut the LCD hole too large! Always cut a smaller hole than you think you will need and work from there. I found it easiest to use a dremel but use whatever you like.
Now is also a good time to set four screws into the bottom of your box to act as legs. Later on, we will use two of these for a secret back door entrance into the box!
[box color=”#985D00″ bg=”#FFF8CB” font=”verdana” fontsize=”14 ” radius=”20 ” border=”#985D12″ float=”right” head=”Major Components in Project” headbg=”#FFEB70″ headcolor=”#985D00″]Cool looking box
Solder
Breadboard
Arduino
atmega328[/box]
For more detail: The Traveling Geocache using Arduino