Adding sounds or music to our project will always make it looks cool and sounds much more attractive. Especially if you are using an Arduino and you have lots of pins free, you can easily add sound effects to your project by just investing in an extra SD card module and a normal speaker. In this article I will show you how easy it is to Play music/add sound effects using your Arduino Board. Thanks to the Arduino community who have developed some libraries to build this in a fast and easy way. We have also used IC LM386 here for amplification and noise cancelation purpose.
Hardware Required:
- Arduino UNO
- SD Card Reader module
- SD card
- LM386 Audio Amplifier
- 10uf Capacitor (2 Nos)
- 100uf Capacitor (2 Nos)
- 1K,10K Resistor
- Push buttons (2 Nos)
- Breadboard
- Connecting Wires
Getting ready with your WAV audio files:
For playing sounds from SD Card using Arduino, we need audio files in .wav format because Arduino Board can play an audio file in a specific format that is wav format. To make an arduino mp3 player, there are a lot of mp3 shields are available which you can use with arduino. Or else to play mp3 files in arduino, there are websites which you can be used to convert any audio file on your computer into that specific WAV file.
So to convert any audio file into wav format, follow the below steps:
Step 1: Click on “Online Wav Converter” to enter into the website.
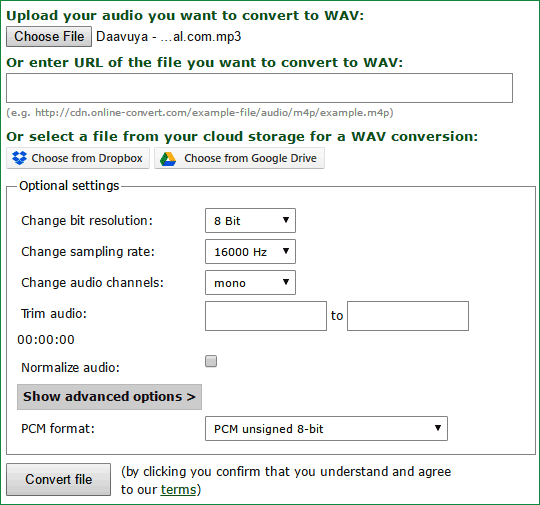
Step 2: Arduino can play a wav file in the following format. You can toy around with the settings later, but these settings were experiment to be the best in quality.
|
Bit Resolution |
8 Bit |
|
Sampling Rate |
16000 Hz |
|
Audio Channel |
Mono |
|
PCM format |
PCM unsigned 8-bit |
Step 3: In the website click on “choose file” and select the file you want to convert. Then feed in the above settings. Once done it should look something like this in the below image
Step 4: Now, click on “Convert File” and your Audio file will be converter to .Wav file format. It will also be downloaded once the conversion is done.
Step 5: Finally format your SD card and save your .wav audio file into it. Make sure you format it before you add this file. Also remember the name of your audio file. Similarly you can select any of your four audios and save them with names 1, 2, 3 and 4(Names should not be changed). I have converted four songs and have saved them as 1.wav, 2.wav, 3.wav and 4.wav like shown below.
Circuit and Hardware:
Circuit Diagram for this Arduino Audio File Player is simple. The complete circuit diagram is shown in the Image below.
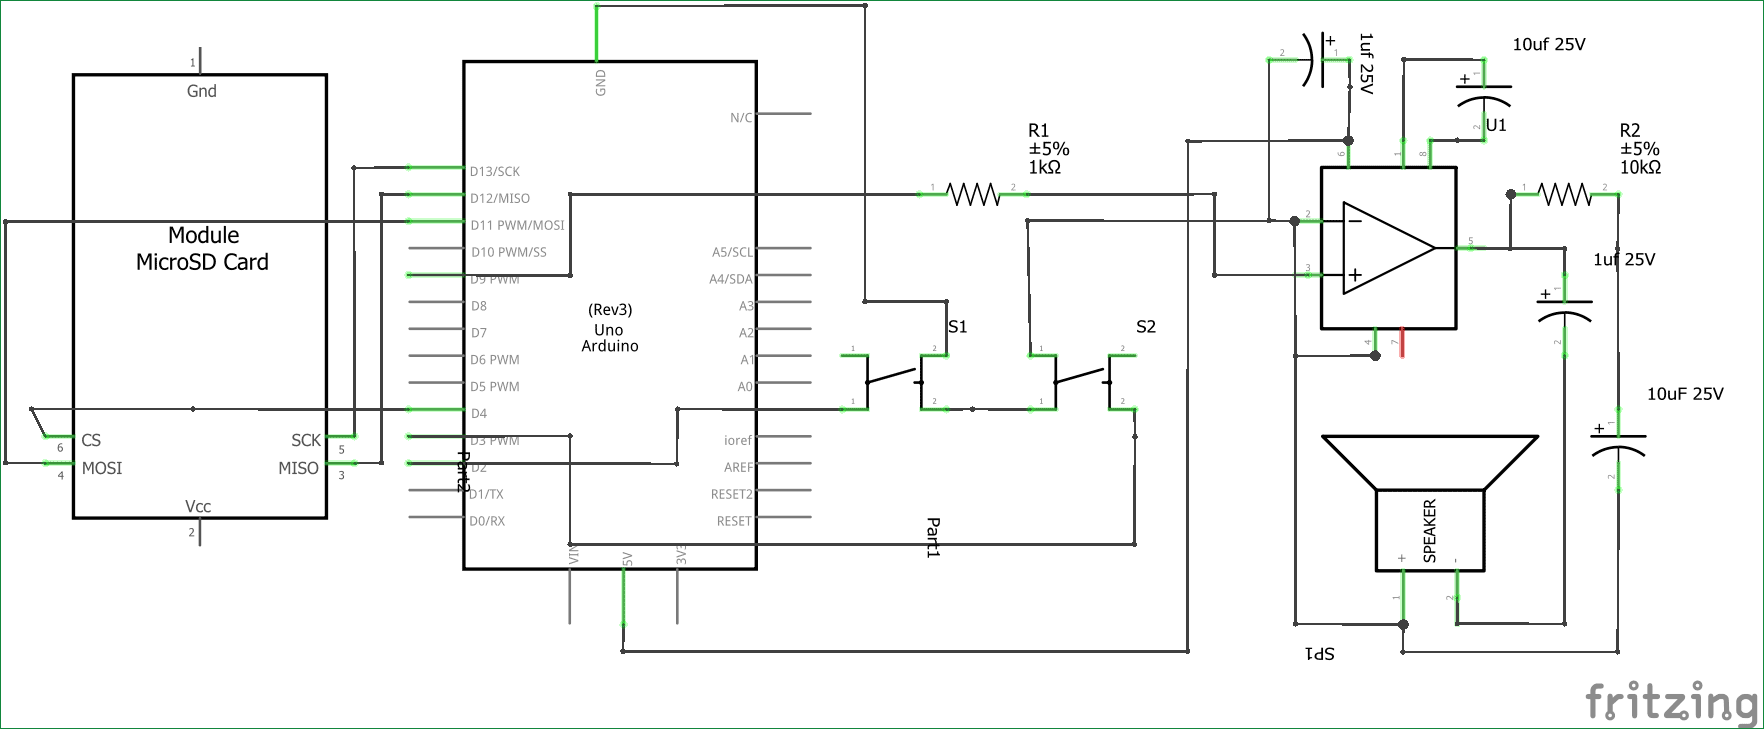
As we know our audio files are saved into the SD card, hence we interface a SD card reader module with our Arduino. The Arduino and SD card communicate using the SPI communication protocol. Hence the Module is interfaced with the SPI pins of the Arduino as shown above in the diagram. It is further listed in the table below.
|
Arduino |
SD card module |
|
+5V |
Vcc |
|
Gnd |
Gnd |
|
Pin 12 |
MISO (Master In Slave out) |
|
Pin 11 |
MOSI (Master Out Slave In) |
|
Pin 13 |
SCK (Synchronous Clock) |
|
Pin 4 |
CS (Chip Select) |
Now the Arduino will be able to read the music file from the SD card and play it on the pin number 9. But the audio signals produced by the Arduino on pin 9 will not be audible much. Hence we amplify it by using the LM386 Low voltage Audio amplifier IC.
The amplifier shown above is designed for a Gain of 200 and the Vdd (pin 6) is powered by the 5V pin of the Arduino. If you want to increase/decrease the sound you can increase/decrease the voltage provided to this pin. It can withstand a maximum of 15V. Learn more about this 200 gain amplification configuration for LM386 here.
We also have two push buttons connected to the pin 2 and 3 of the Arduino. These switches are used to play the next track of the song and play/pause the music respectively. I have used these buttons just to demonstrate its abilities; you can play the song whenever required. Check the Demo Video at the end.
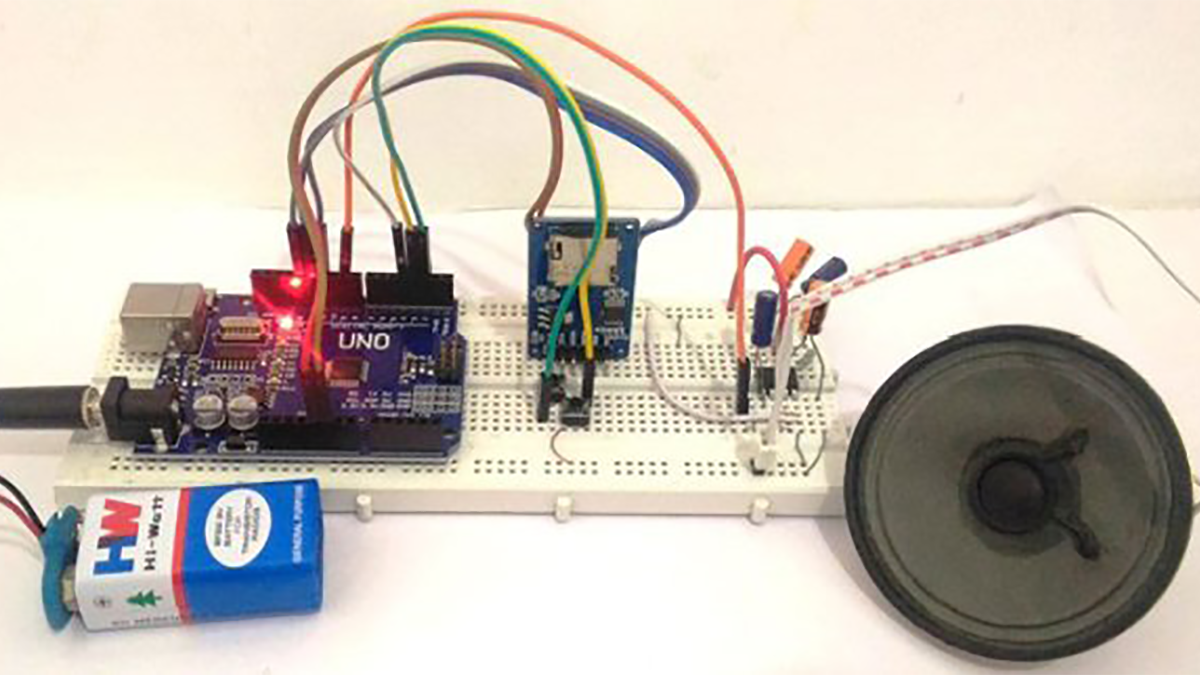
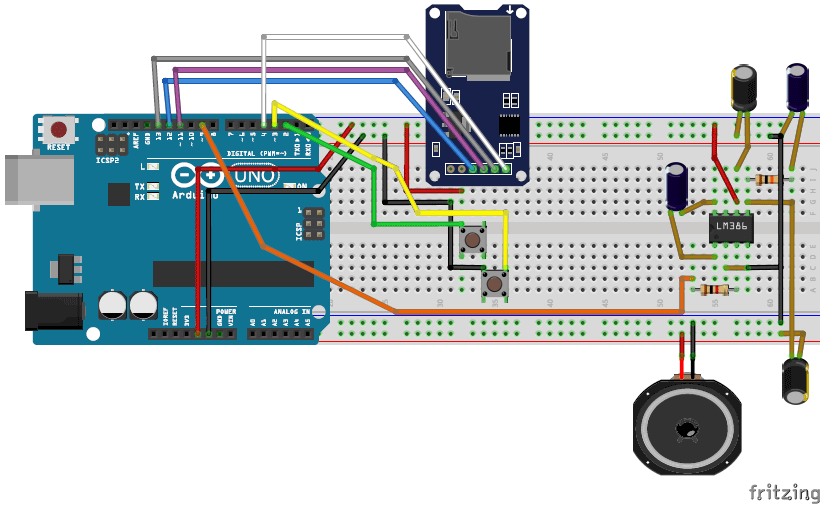
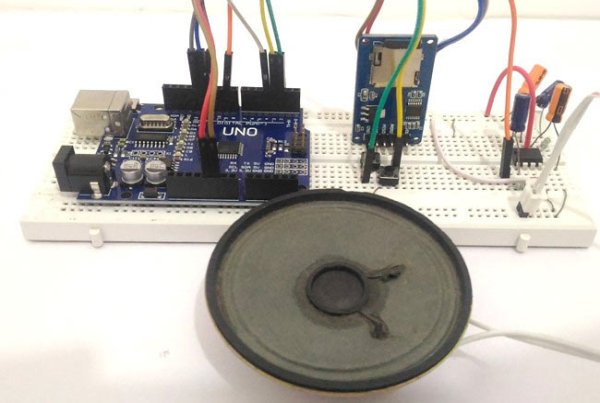
You can assemble this circuit completely over a Breadboard as shown in the picture below
Programming your Arduino:
Once we are ready with the Hardware and the SD card, we are just one step away playing those songs. Insert the card into your SD card module and follow the steps below.
Step 1: As said earlier we will be using a library to make this project work. The link for the library is given below. Click on it and select “Clone or download” and choose download as ZIP.
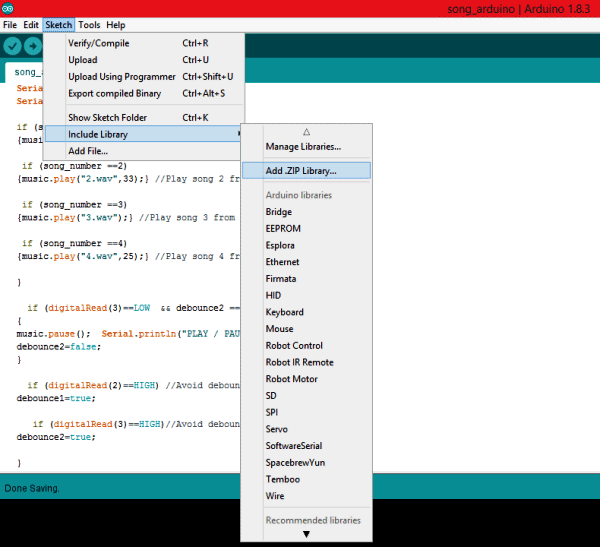
Step 2: Add this Zip file into your Arduino IDE by selecting Sketch->Include Library -> Add .ZIP Library as shown below and select the ZIP file that we just downloaded.
Step 3: The complete program of the arduino music player project is given at the end of this article, simply copy it and paste it in the Arduino Program. Now, click on Upload and get ready to play your audio files.
The program is self explanatory since they have the comment lines. But, I have also explained the ability of the TMRpcm library below.
Playing an audio file:
You can play any audio that is stored in Wav format inside the SD card module by using the line below.
music.play(“3.wav”);
//object name.play (“FileName.wav”);
You can use this line at places where you want to trigger the Audio
Pause an audio File:
To pause an Audio file, you can simply call the line below.
music.pause();
//objectname.pause();
Forwarding/Rewinding an Audio:
There are not direct ways to forward or rewind an Audio file, but you can use the line below to play a song at a particular time. This can be used to forward/rewind with some additional programming.
music.play(“2.wav”,33); //Plays the song from 33rd second
//objectname.play(“Filename.wav”,time in second);
Setting the quality of the audio:
The library gives us two qualities to play the music, one is to play as normal mode the other to play with 2X oversampling.
music.quality(0); //Normal Mode
music.quality(1); //2X over sampling mode
Setting the Volume of the audio:
Yes, you can control the volume of the audio through software. You can simply set the volume by using the line below. Higher music volumes tend to affect the quality of the audio, hence use hardware control when possible.

music.setVolume(5); //Plays the song at volume 5
//objectname.setVolume(Volume level);
Working of this Arduino Music Player:
After programming your Arduino simply press the button connected to pin 2 and your Arduino will play the first song (saved as 1.wav) for you. Now you can press the button again to change your track to the next song that is to play 2.wav. Likewise you can navigate to all four songs.
You can also play/Pause the song by pressing the button connected to pin 3. Press it once to pause the song and press it again to play it from where it stopped. Watch the video below for complete working (or maybe to relax yourself with some songs).
Hope you enjoyed the project. Now it is up to your creativity to use them in your projects. You can make a speaking clock, voice assistant, talking robot, voice alert security system and much more. Let me know how you are planning to use it through the comment section and also if you have any problems in getting this thing work you can reach me through the forums or the comment section below.