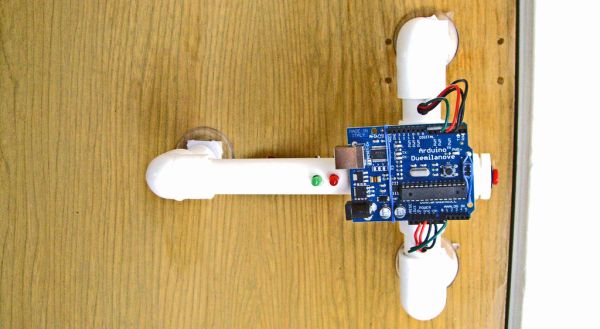
Protect your secret hideout from intruders with a lock that will only open when it hears the secret knock.
This started out as a bit of a joke project, but turned out to be surprisingly accurate at judging knocks. If the precision is turned all the way up it can even detect people apart, even if they give the same knock! (Though this does trigger a lot of false negatives, which is no fun if you’re in a hurry.)
It’s also programmable. Press the programming button and knock a new knock and it will now only open with your new knock. By default the knock is “Shave and a Haircut” but you can program it with anything, up to 20 knocks long. Use your favorite song, Morse code, whatever.
Important Notes:
(I hate to even have to say this, but since someone’s going to say it, I’ll say it first:)
1) This is for entertainment purposes only. Really. This decreases the security of your door by adding another way to unlock it, and it makes your unlock code known to anyone who can hear. If you put this on your door, be sure to carry your key too. The batteries might die, the suction cups might fail or you might forget your knock. Don’t complain to me if someone imitates your knock and steals all your stuff, you’ve been warned.
For obvious improvements to safety, security and whatever, see the final page of the Instructable.
2) This is not a project for a beginner! Read through it carefully and be sure you understand it before you start! I will not take time to answer questions that are already in the instructions or from people who have gotten in over their head.
(If you think this project is too complex you might go here and sign up for the kit mailing list. The kits will be much more simple than this.)
Sorry about that. Now that that’s out of the way, lets get to work.
Step 1: Tools, Supplies, And Skills
(If this all looks too challenging, you might consider signing up to the kit mailing list which, when available, will be much easier and a lot more simple.)
Time:
This project will take several hours to complete.
Skills:
To complete this project you should be able to do the following:
These are important! If you’re not sure if you have these skills, read through the entire Instructable and make sure you understand it before starting anything!
- Basic soldering.
- Read a basic schematic.
- Basic knowledge of microcontrollers (I’ll be using the Arduino.) This means you know what one is, how to upload data to it, and how to make minor changes to code.
- Improvisation. There are many ways to do this project, and you will have to make changes based on how your door and lock works.
Tools:
- Drill (ideally a drill press) and an assortment of drill bits.
- Saw capable of cutting PVC pipe. (ie: Pretty mcuh any saw.)
- Soldering iron and solder.
- Pliers.
- Screw drivers.
- Heat-shrink tubing and/or electrical tape.
- Wire stripper.
- Vice.
- Safety glasses.
- Gloves.
Other things you might find handy: a ruler/tape measure, a multimeter, a breadboard, some tape, a magic marker, sand paper, files, hot glue. And if you’re like me a well stocked first aid kit.
Materials:
(The links are for example only, I don’t necessarily recommend or have experience with any of these vendors. Feel free to suggest other sources in the comments.)
Electronics:
- 1 Arduino Duemilanove (Or compatible. Or really any microcontroller with at least 1 analog input and 3 digital outputs.) Buy from here, here, or here. And other places.
- 1 5v Gear reduction motor. The higher torque the better. Here’s a good one. (14-16mm diameter is ideal because it fits inside of 1/2″ PVC pipe.) I recommend one with at least 15oz/in (11 N-cm) of torque at 5v to turn a basic lock. 1
- 1 Piezo speaker. (30mm) similar to this. You can use larger or smaller ones, smaller will be less sensitive.
- 1 SPST momentary pushbutton. (normally “off”)
- 1 Red LED
- 1 Green LED
- 1 NPN Transistor P2N2222A like these or these (or similar).
- 1 Rectifier Diode (1N4001 or similar) this or this will do.
- 1 2.2k ohm resistor (1/4 watt)
- 1 10k ohm resistor (1/4 watt)
- 1 1M ohm resistor (1/4 watt)
- 2 560 ohm resistor (Or whatever will run your red and green LED’s at 5v. How to tell.)
- 1 small piece of perf board. 5×15 holes or longer. (example)
- 1 9 volt battery clip and 9v battery. (Or any other way you can think of to get 7-12v to the Arduino. A wall adapter like this is a great option so you don’t have to worry about batteries running out. 6 AA’s would be another option for longer lasting power, but it will bring down the suction cups.)
- Connector wire. 20 gauge or narrower flexible wire in a number of colors for connecting the electronics together.
Case:
(These items are to make the project as pictured. Feel free to build a completely different and more functional case.)
- 20″ PVC Pipe 1/2″.
- 3 right angle 1/2″ PVC connectors.
- 1 5-way 1/2″ PVC connector. (example)
- 2 1/2″ PVC end plug.
- 3 1 1/2″ suction cups. (Available at hardware stores and craft centers.) NOTE: If your door is unsuitable for suction cups then replace these with three end caps and you can use adhesive strips or screws to mount the lock.
- 6″ of 1/2″ wide by 1/64″ thick metal strip (steel, tin, copper, etc.) (available at hardware, craft, and art supply stores.)
- 4.5″ of 1″ wide metal sheet, 1/32″ thick (steel, tin, copper, etc.) (available at hardware, craft, and art supply stores.)
- 2 3/32″ x 3/8″ screws with nuts. (1/8″ will work too if you can’t find the smaller ones.)
- 2 1.6M (metric) 16mm screws. Ideally with countersunk heads if you can find them. (For securing the motor. Check your motor specs to see what screws it needs. One motor I tried used 1.6M, the other 2M. You’ll probably have to buy long ones and cut them to length.)
1 If you have a torque meter or a torque wrench, apply it to your door lock to get an idea of what torque it will take to open your lock. Use a online conversion tool to convert between foot/pounds, N/m, etc.
Step 2: Program The Arduino
#1: Download
Download the file secret_knock_detector.pde at the bottom of this section and copy it to your sketchbook. (Or view the text and cut and paste it into a new sketch.)
(Tip: If the name of the downloaded file is something like “BARS5HS13H8SW.tmp” simply rename it to secret_knock_detector.pde. and you’re good to go.)
#2:
Open the sketch and compile it. It should compile properly the first go, but it’s good to be sure.
#3:
Connect your Arduino and upload the sketch.
If you have any trouble, check the troubleshooting section at the Arduino site.
Code overview:
For the curious, here’s a look at a few bits of code if you’re interested in tinkering:
(If you’re not curious, go to the next section)
about Line 28: const int threshold = 4;
This is the sensitivity of the knock detector. If you get a lot of noise, raise this (up to 1023), if you’re having a hard time hearing knocks you can lower it (as low as 1).
about Line 29: const int rejectValue = 25;
about Line 30: const int averageRejectValue = 15;
Both of these are used to determine how accurately someone has to knock. They are percentages and should be in the range of 0-100. Lowering these means someone must have more precise timing, higher is more forgiving. averageRejectValue should always be lower than rejectValue.
Settings of about 10 and 7 make it hard for two people to knock the same knock even if they know the rhythm. But it also increases the number of false negatives. (ie: You knock correctly and it still doesn’t open.)
about Line 31: const int knockFadeTime = 150;
This is a crude debounce timer for the knock sensor. After it hears a knock it stops listening for this many milliseconds so it doesn’t count the same knock more than once. If you get a single knock counted as two then increase this timer. If it doesn’t register two rapid knocks then decrease it.
about Line 32: const int lockTurnTime = 650;
This is now many milliseconds we run the motor to unlock the door. How long this should be depends on the design of your motor and your lock. It’s okay if it runs a little bit long since I’ve designed a simple slip clutch into the design, but it’s better for all the parts if it doesn’t run too much.
about Line 34: const int maximumKnocks = 20;
How many knocks we record. 20 is a lot. You can increase this if your secret hideout is protected by devious drummers with good memories. Increase it too much and you’ll run out of memory.
about Line 35: const int knockComplete = 1200;
Also known as the maximum number of milliseconds it will wait for a knock. If it doesn’t hear a knock for this long it will assume it’s done and check to see if the knock is any good. Increase this if you’re a slow knocker. Decrease it if you’re a fast knocker and are impatient to wait 1.2 seconds for your door to unlock.
about Line 39: int secretCode[maximumKnocks] = {50, 25, 25, 50, 100, 5…..
This is the default knock that it recognizes when you turn it on. This is weird rhythmic notation since every value is a percentage of the longest knock. If you’re having a hard time getting it to recognize “shave and a hair cut” change this to {100,100,100,0,0,0... and a simple sequence of 3 knocks will open it.
Debugging:
about Line 51: Serial.begin(9600);
about Line 52: Serial.println("Program start.");
Uncomment these lines to see some debug info on the serial port. There are a few other lines of debugging code set throughout the rest of code that you can uncomment to see what’s going on internally.
Be sure to set your serial port to the right speed.
The rest of the code is commented so you can see how it works but you probably won’t need to change it if you aren’t changing the design.
 secret_knock_detector.pde
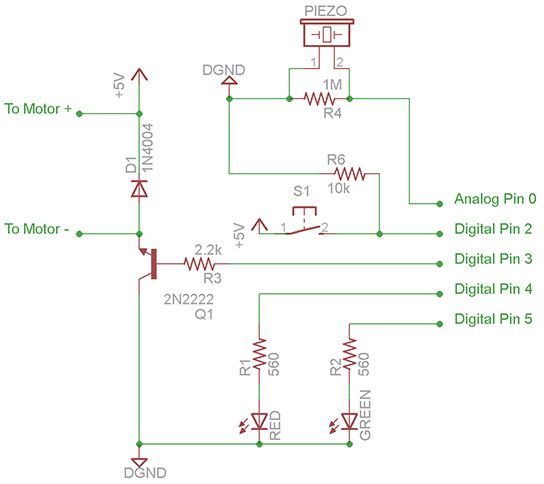
1 Rectifier Diode[/box]
For more detail: Secret Knock Detecting Door Lock using Arduino