Many times, we often use LCD as display equipment, from tiny temperature monitors to large industrial equipment.
![]()
The funny thing in this project is that it combines two Red LED Matrices as display. You don’t need other devices except Arduino to drive it.
This project is build for to counting the shipped with wifi support.
If you are big a fan of pixel art, this project is your type. 🙂
PS: if you want get more infomation about Open Hardware, follow@HardwareWithYou in twitter. 🙂
Update: the LED Matrix has an Arduino library in Github.
Step 1: Preparing stuffs
[box color=”#985D00″ bg=”#FFF8CB” font=”verdana” fontsize=”14 ” radius=”20 ” border=”#985D12″ float=”right” head=”Major Components in Project” headbg=”#FFEB70″ headcolor=”#985D00″]
Just like ingredients for cooking, before starting the project, you must prepare some stuff. All you need is listed below:
1. Arduino Leonardo (x1)
2. Red LED Matrix (x2)
3. Wifi Shield (x1)
4. Acrylic board as shell (optional)
5. Some jumper wire
6. Simple power circuit (optional)
[/box]
Red LED Matrix can be controlled by Arduino directly. With Wifi Shield, we can also update our own display’s data via wifi network. In addition, acrylic board isn’t necessary when you want to make other fancy shells.
To fit the Acrylic board as well as meet the power supply requirement of LED Matrix, we’ve specially etched a simple and compact power module, which can supply power for Arduino LED Matrix simultaneously.
Besides, you should prepare some jumper wires. As you know, this is a hacking project. 🙂
Step 2: The schematic circuit diagram of power circuit (optional)
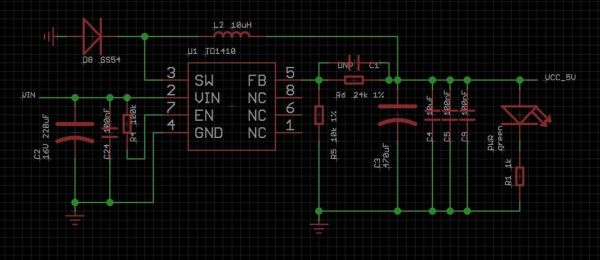
This is the schematic circuit diagram of the power circuit for Arduino and LED Matrix.
However, it’s not necessary in this project if LED Matrix power supply by Arduino Leonadro pin headers.
Step 3: Test the LED Matrix with Arduino
When get LED Matrix, you might be confused on the pin headers in the LED board. Here, we will show you how the LED works, and then write some codes to test it.
Before coding, we must assemble components to provide a code test environment.
Connecting the LED Matrix with Arduino pin headers:
– connect A to digital 2
– connect B to digital 3
– connect C to digital 4
– connect D to digital 5
– connect OE to digital 6
– connect STB to digital 10
– connect R1 to digital 11
– connect CLK to digital 13
– connect GND to GND
In this case, we will draw two characters of “你好” into the LED Matrix. These 2 Chinese characters “你好” mean “Hello” in English. Maybe it’s another way to learn Chinese. 🙂
If you want to know all details about the code, you can get the Demo code here.
Update: the LED Matrix has an Arduino library in Github.
For more detail: Pixel Shipped Counter