Pulse Width Modulation or PWM is a method of Digital to Analog Conversion. It helps in delivering analog average voltage using digital pulses of variable pulse width. By controlling the on time and off time, we can generate an analog average voltage using the digital pulses.
PWM has a wide range of application. It is used in DC motor speed control, Brightness control of LED lamps etc.
Here in this simple experiment to understand the PWM working in ARDUINO, we read an analog input pin, maps the result to set the pulsewidth modulation (PWM) of an output pin. The input read from the analog pins will be in the range 0 to 1023. But the PWM fuction has a the width parameter ranging from 0 to 255, where 0 indicates fully off, and 255 indicates fully on pulses.

For better understanding and easy debugging, printing the results to the serial monitor is always performed.
map() is used to convert the the values ranging from 0-1023 to 0-255, which simplify the code and reduce the mathematical operations.
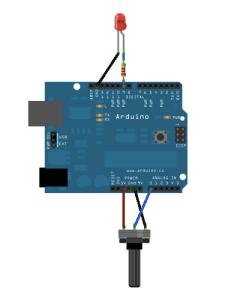
Circuit Diagram
PWM using Arduino Circuit Diagram
- Potentiometer connected to Analog Pin 0
- LED connected from digital pin 9 to ground
Program
const int analogInPin = A0;  // Analog input pin that the potentiometer is attached to
const int analogOutPin = 9; // Analog output pin that the LED is attached to

int sensorValue = 0;        // value read from the pot
int outputValue = 0;        // value output to the PWM (analog out)

void setup() {
  // initialize serial communications at 9600 bps:
  Serial.begin(9600);
}

void loop() {
  // read the analog in value:
  sensorValue = analogRead(analogInPin);
  // map it to the range of the analog out:
  outputValue = map(sensorValue, 0, 1023, 0, 255);
  // change the analog out value:
  analogWrite(analogOutPin, outputValue);

  // print the results to the serial monitor:
  Serial.print("sensor = " );
  Serial.print(sensorValue);
  Serial.print("\t output = ");
  Serial.println(outputValue);

  // wait 2 milliseconds before the next loop
  // for the analog-to-digital converter to settle
  // after the last reading:
  delay(2);
}
For more detail: Pulse Width Modulation : PWM using Arduino