I was strolling down the candy aisle at the supermarket and there it was: the PEZ dispenser, conjuring up sweet (literally) childhood memories served up by my favorite cartoon characters in squarish sugary pellets. Then, all of a sudden, an LED went off in my head. PEZ meets Arduino.
In this age of over-automation, where robots do everything short of scratching nostrils, I figured that my sugar-dispensing childhood toy, The PEZ, also deserves automation.
HOW IT WORKS
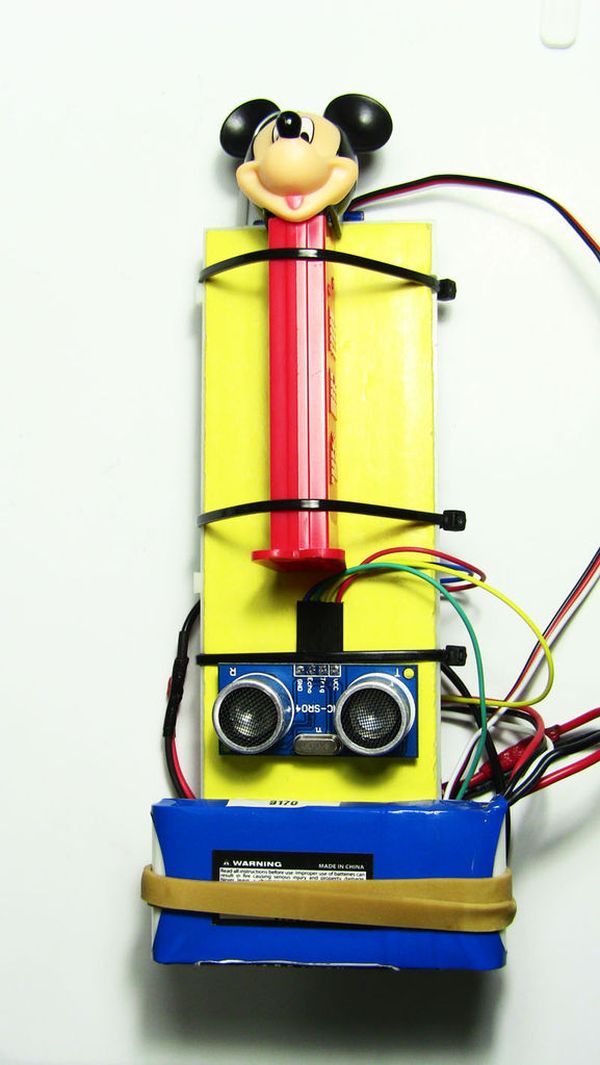
Basically, I am using an ultrasonic distance sensor to decide if someone is within 20 cm from the sensor which is attached next to PEZ. If so, Arduino will turn the servo 180 degrees back pulling with it the ear of Mickey Mouse. When Mickey’s head is pulled back, a PEZ pellet is pushed out of the mouse’s mouth. Yummy.
After a few seconds (5 seconds in my Arduino sketch) the servo returns back to 90 degrees, closing Mickey’s mouth and waiting for the next person in line to serve.
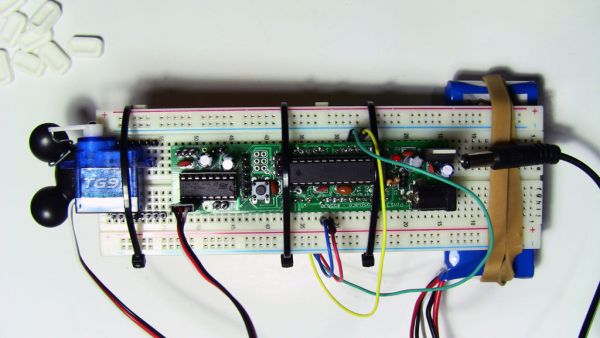
Step 2: Wiring Robo PEZ
SERVO
- Black —> Arduino GND pin
- Red —> Arduino 5V pin
- White/Yellow —> Arduino 9 pin
ULTRASONIC SENSOR
- GND pin —> Arduino GND pin
- VCC pin —> Arduino 5V pin
- TRIG pin —> Arduino 12 pin
- ECHO pin —> Arduino 13 pin
Step 3: Linking the servo to the PEZ
Please take note how I placed the servo against the breadboard and which side is up and which is down. This is important if you wish to use my code as it.
1) Before screwing the horn to the servo, make sure the servo is turned all the way away from the bread board until it can turn no more. You can use the servo horn without a screw to turn the servo. This is BACK position 180 aka BACK/OPEN position (see figure). You can screw the horn now as shown in figure.
2) Now rotate the horn until it’s in the 90 position aka UP/CLOSED (see figure). Using a firm wire, bend one end into a hook and insert into the servo’s horn. Wrap the other end around Mickey Mouse’s ear.
[box color=”#985D00″ bg=”#FFF8CB” font=”verdana” fontsize=”14 ” radius=”20 ” border=”#985D12″ float=”right” head=”Major Components in Project” headbg=”#FFEB70″ headcolor=”#985D00″]
- The PEZ Robo Dispenser. I picked a Mickey Mouse PEZ because big ears are better at holding a noose that will be tied to the rotating servo horn.
- Arduino Uno or clone. I used my GOduino III.
- Ultrasonic Distance Sensor HC-SR04. ($2.50 Ebay)
- RC Servo ($2.50 Ebay)
- Breadboard
- Jumper wires
- Wire fasteners or rubber bands
- Battery (Anything over 7 volts with about 500mAh).
[/box]
For more detail: PEZ Robo Dispenser Using Arduino