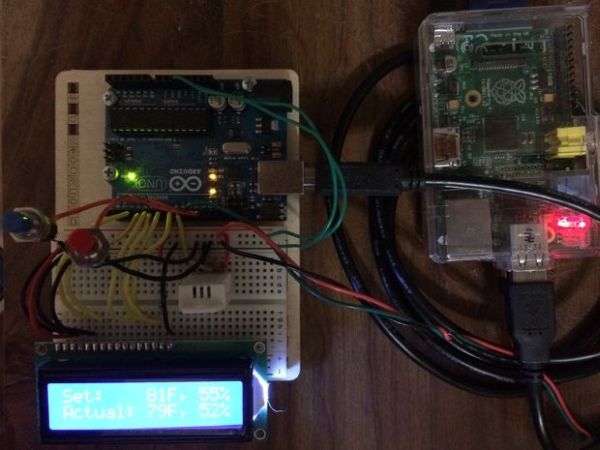
Not everyone lives somewhere with central air, or is willing to pay for a Nest or similar “smart” thermostat. The Climaduino is a DIY Arduino-based thermostat designed to control a wall unit A/C. I incorporated both temperature and humidity sensors in order to optimize comfort and reduce energy usage. I then developed a Raspberry Pi-based web interface to control the Climaduino from my phone.
This is still a work in progress, but is definitely functional. I am posting this instructable so others can both build their own smart thermostats, and hopefully build on this project with their Climaduino improvements.
Here are the features so far:
Climaduino thermostat
- Arduino-based
- temperature and humidity sensors
- Relay to control A/C
- LCD Display
- Buttons to control temperature
- Controls both temperature and humidity
- Settings stored in EEPROM and survive power failures
- Short cycle protection for efficiency and compressor protection
Climaduino Controller
- Raspberry Pi-based
- Wifi-enabled
- Mobile-optimized web interface to control Climaduino settings
- Historical temperature and humidity graphs
- Programmable temperature and humidity changes
Why did I want to build this? Mainly because it was fun to do and I’ve always been very interested in climate control. (I know that sounds weird, but it’s true.) It’s also because humidity is a huge issue in my area, South Florida. I designed the Climaduino Thermostat to take this into account. The A/C will stay on just a little bit longer when it’s humid to wring more moisture out of the air. I also added a humidity control mode. It can save a significant amount of power and prevent coming home to a mold-infested house. Humidity control mode ignores temperature and only runs the A/C when things get too humid. It’s useful when going out of town or when the house is empty (of people and pets).
Obligatory warning
If you perform any of the steps in this instructable, you assume all risk for the outcome. Working with high voltage can be extremely dangerous. Improperly altering your A/C unit could lead it to malfunction or completely break. Please be careful.
Electrical Safety: Safety and Health for Electrical Trades Student Manual
Step 1: Supplies
The following will be needed to complete this project.
Climaduino Thermostat
- 1 x Arduino – I’m using an Arduino Uno
- 1 x Solderless breadboard
- 2 x buttons – momentary on (optional)
- 1 x DHT22 temperature and humidity sensor
- 1 x LCD display (optional) – Not sure of the model, but it is parallel-based and uses the LiquidCrystal library
- Resistors:
1 x 4.7K ohms
1 x 220 ohms (only required if LCD is used) - Wires to connect everything
- The DHT library installed in Arduino/libraries
- Climaduino Thermostat source code
Climaduino Controller
- Raspberry Pi (I have model B) with SD card running the Adafruit Occidentalis distribution (based on Raspian )
- SSH client (Mac users have one built-in, PC users can use Putty)
- SFTP Client (I’m currently using Cyberduck on the Mac. There are lots of options on PC as well.)
- Good power brick – Able to handle power demands of both the Raspberry Pi and the Arduino
- USB WiFi adapter (optional)
- Climaduino Controller source code
Step 2: Thermostat: Building and Installing the Relay
- Look up how much current your A/C draws. If it is more than 20 amps, you’ll have to find a different relay kit.
- Solder parts on the Beefcake Relay PCB except for the output terminals (the PCB is labelled). The Arduino Controlled Relay Box instructable has steps and some tips and tricks.
- Solder wire of an appropriate gauge for the amount of current your AC will draw directly to the larger pads labelled LOAD on the PCB.
- Create a relay-controlled power cord or outlet for the A/C to connect to. The Arduino Controlled Relay Box instructable is a good place to start.
Note: Make sure to use a power cord that can handle the current your A/C draws and has the right plug type.
Another option is to subvert the A/C’s built in controls and install the relay inside the A/C. (Has serious potential to break your A/C, and can be dangerous if not insulated properly from the chassis.)
I originally planned on creating a power cable for the unit with the relay inline. Unfortunately, this unit’s built-in thermostat was cycling it off prematurely. I looked up the unit’s wiring diagram and found a way to wire in the relay so the old built-in thermostat could still be used in the future. I then set the built-in thermostat to its hottest setting giving the Climaduino Thermostat full control.
Step 3: Thermostat: Wiring it all up
- Wire things up as they are in the diagram. The LCD and buttons can be skipped if you don’t want them.
- Connect the relay to the Arduino:
GND to – rail on the breadboard
CTRL to pin 10 on the Arduino
5V to + rail on the breadboard
I recommend orienting the Arduino so pins 0-13 are next to the the breadboard. This makes the wiring for the LCD a lot neater.
The resistor used for the LCD is 220 ohms, and the one used as a pull-up for the DHT22 sensor’s data line is 4.7K ohms.
Step 4: Thermostat: Loading the Code and Testing
- Connect the Arduino to your computer and upload the Climaduino sketch.
If it fails to upload, this may be because you do not have the DHT library installed in your Arduino/libraries folder.
Once uploaded, the LCD should display the current temperature/humidity settings and readings. The temperature setting can be changed using the two buttons on the Thermostat. One button raises the temperature by a degree at a time and the other lowers it. Hold the button down until the setpoint changes to the desired value. It will not be very responsive. Earlier attempts at using interrupts to allow immediate reactions to button presses caused problems.
The thermostat outputs current readings, parameters, and other operational details as JSON over the serial port. To test this, open the serial monitor (right-most button in Arduino IDE). You should see JSON data being sent from the Arduino to your computer. This data includes the operational parameters, the current settings, and readings.
To test changing the settings, open the serial monitor. Click the drop-down menu at the bottom of the window that says Newline and select No line ending. Type the desired temperature followed by an F (case sensitive) and press Send to change the temperature setpoint. 77F and then Send would change the temperature to 77 degrees fahrenheit. Type the desired humidity followed by a % and press Send to change the humidity setpoint. 55% and then Send would change the humidity setpoint to 55 degrees of relative humidity. Finally, the mode can be changed by typing the desired mode number followed by M (case sensitive) and pressing Send.
Valid values for mode are:
- 0 – Cooling/Humidity Control
- 1 – Humidity Control
- 9 – System Off
Step 5: Controller: Installing Pre-requisites
This assumes you already have an Arduino running the Adafruit Occidentalis Distribution (based on Raspbian). It also assumes you have network connectivity either by connecting directly over Ethernet, or by setting up and using a USB WiFi adapter.
Here are some resources to help those new to the Raspberry Pi:
The Occidentalis distribution advertises itself as raspberrypi.local using Avahi (Bonjour). This means that Macs, and iPhones will be able to access the Raspberry Pi using this rather than IP address. If unable to use raspberrypi.local, it may be advisable to configure a static ip. If you decide not to configure a static IP, and can not use raspberrypi.local, you can find the IP address assigned to the device from your router or by logging on to the Raspberry Pi using a monitor and keyboard and typing ifconfig. You will use the account pi to log in. The default password for the pi account is raspberry.
Change the default password (optional)
- Log on to the Raspberry Pi using pi as the username and raspberry as the password.
- can ssh in (ssh [email protected] in the Mac Terminal)
- can log in at the console using a connected keyboard and monitor
- Type passwd and follow the on-screen prompts to change the password
Install Python Setuptools
- wget https://bitbucket.org/pypa/setuptools/raw/bootstrap/ez_setup.py -O – | sudo python
Python Setuptools makes it easier to download, install, and configure Python packages. It provides the easy_install command I’m going to use a lot in these steps.
Update apt-get
- sudo apt-get update
Install rrdtool
- sudo apt-get install libcairo2-dev
- sudo apt-get install rrdtool
Installing Git (optional)
- sudo apt-get install git
Install Python virtualenv (optional)
- sudo easy_install virtualenv
Python virtualenv allows creating a isolated install of Python. The advantage of doing this is that it keeps any modifications you make to Python compartmentalized in that one virtual environment. This is a bit overkill for what we are doing with the Climaduino Controller, but I like to leave things in a good state for future projects. Here is a quote from https://pypi.python.org/pypi/virtualenv that explains it well:
For more detail: Introducing Climaduino – The Arduino-Based Thermostat You Control From Your Phone!