Introduction
Are you looking to get your data gathering project hooked into the “Internet-of-Things”? Then check out data.sparkfun.com! It makes posting data to the web as easy as constructing a URL and POSTing it to a server.
I wanted to create a quick project to test out SparkFun’s data logging service. Combining an Arduino, XBee WiFi module, and a variety of gas, temperature, and light sensors I built an office conditions logger.
My data logger stores the temperature, light, carbon-monoxide, and methane (for science!) conditions of my office on the web (for everyone to see).
Logging data to the web provides many advantages over local storage – most significantly it gives you instant and constant access to logged data. The trade-off for that instant data access is a loss of privacy, but, if you don’t care who knows what the temperature, light, or methane (well…) levels in your office are, then logging data to data.sparkfun.com is an awesomely-easy solution.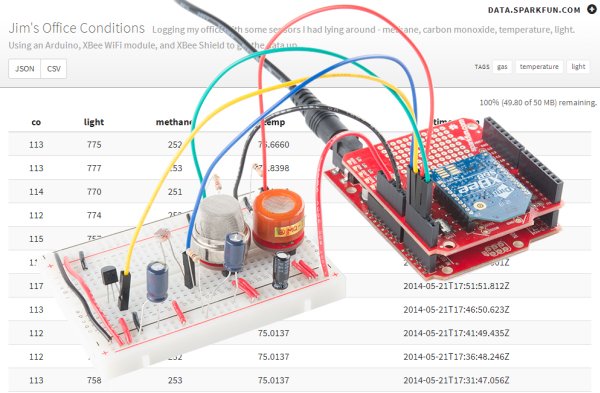
Required Materials
In this tutorial we’ll use a variety of simple analog sensors to create an “Office Conditions Logger”, but the hardware hookup and example code should be easily adaptable to more unique or complex sensors. Here’s a list of stuff I used to make my logger:
Some notes on this wishlisted bill of materials:
- You’ll also need some breadboarding tools – a breadboard and jumper wire.
- To assemble the shield you’ll need soldering tools and headers.
- I didn’t add resistors to that list, but you’ll need a few 10kΩ-22kΩ resistors to complete the circuit. If you don’t already have one, we recommend grabbing an ever-handy resistor kit.
- The XBee Shield can be swapped out for a Regulated Explorer, or even something as simple as an XBee Breakout, with some additional jumper wires (and maybe level shifting).
- I’m using the RedBoard, but any Arduino-compatible board will work, whether it’s an Uno, Leonardo or Mega.
These days Arduino’s have no shortage of routes to the Internet. I’m using the XBee WiFi modules because they’re simple to use, relatively low-cost, and they work with XBee Shields (which you may already have in your electronics toolkit). So, while the code in this tutorial is specific to that module, it should be adaptable to the WiFi Shield, Ethernet Shield, CC3000 Shield, or whatever means your Arduino is using to access the Internet.
Suggested Reading
- XBee WiFi Hookup Guide – This is a good place to start, especially if you need to get your XBee WiFi configured to connect to your WiFi network.
- XBee Shield Hookup Guide – We’ll use the XBee Shield to interface the XBee WiFi with an Arduino. Learn all about the shield in this tutorial.
- Analog-to-Digital Converters (ADCs) – All of our sensors in this example are analog, so we’ll be relying on the Arduino’s ADC to read those analog voltages and turn them into something digital.
- How to Power Your Project – The gas sensors can consume quite a bit of power, check out this tutorial to get some ideas for how to power your project.
Hardware Hookup
On this page we’ll discuss the schematic and wiring of this project. We can divide our circuit up into two sub-systems – the XBee WiFi and the sensors – and wire them separately.
Connect the XBee WiFi
The difficulty-level of this step depends on whether you’re using a Shield (easiest), an XBee Regulated Explorer (easy-ish), or a more general XBee Breakout (easy after you’ve figured out level-shifting). If you’re using a Shield, simply populate your headers and plug stuff in. Make sure the switch is in the DLINE position!
The XBee Shield makes XBee hookup a breeze. Everything is plug-and-play.
If you’re using an XBee Regulated or similar, you’ll need to run four wires between the Arduino and XBee: power, ground, RX (DIN), and TX (DOUT). We’ve wired the XBee’s DIN and DOUT pins as such:
Since we’re using SoftwareSerial, you can move those serial lines to any other Arduino digital pin, just don’t forget to modify the code.
Keep in mind that the XBee is a 3.3V device, it won’t tolerate 5V on either its power or I/O lines. If you’re using something really simple, like the XBee Breakout, you’ll need to power the XBee off the 3.3V rail, and level shift those I/O lines!
Connect Your Sensors
I’m using a collection of analog sensors to monitor carbon monoxide, methane, temperature, and light conditions in the office. Here’s how everything is hooked up:
| Sensor | Arduino Pin | Notes |
|---|---|---|
| Photoresistor (Light) | A0 | Connect a 10kΩ resistor from output to ground. Tie other leg of photocell to 5V. |
| TMP36 (Temperature) | A1 | Power the TMP36 off the 5V rail. The temperature (in °C) is the (read voltage – 0.5V)*100. |
| MQ-4 (Methane) | A2 | Connect a 22kΩ resistor from output to ground. These things suck a lot of power, adding a cap nearby may help to smooth out the voltage supply. |
| MQ-7 (Carbon-Monoxide) | A3 | Connect a 10kΩ resistor from output to ground. These things suck a lot of power, adding a cap nearby may help to smooth out the voltage supply. |
If you just want to try the data logging system out, don’t feel required to connect all of those sensors. Heck, you can even leave all of those analog input pins floating to test everything out.
Adding more complex sensors shouldn’t take too much extra effort. I’ll try to keep the code modular, so you can plug your own sensor-reading functions in.
Configure the XBee WiFi
The example code will attempt to configure your XBee – given an SSID, passkey, and encryption mode – but you can give it a head start by using XCTU to configure your XBee’s network settings.
If you have a USB Explorer or any other means for connecting your XBee to your computer, we recommend following along with the Using XCTU page of our XBee WiFi Hookup Guide to at least configure the module with your WiFi network’s SSID and password.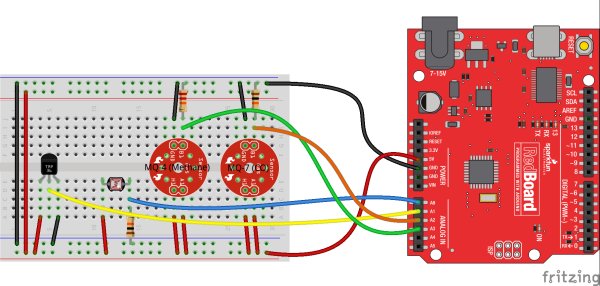
Set Up a Data Stream
If this is your first SparkFun data stream, follow along here as we walk you through the process of creating a feed.
Create a FeedOn the next page, fill in the blanks with your feed’s title and description. Then take extra care to fill in the Fields textbox. This comma-separated list of words defines how you interact with the data stream to post a list of unique values. Make your fields as descriptive and short as you can. I used “methane”, “co”, “temp” and “light” to describe the readings.
A quick overview on the keys:
- Public Key – This is a long hash that is used to identify your stream and provide a unique URL. This key is publicly visible – anyone who visits your stream’s URL will be able to see this hash.
- Private Key – The private key is required in order to post data to the stream. Only you should know this key.
- Delete Key – Normally you’ll want to avoid this key, as it will delete your stream in its entirety. If you messed up – maybe you want to add or modify a field – this key, and the delete URL, may come in handy.
- Fields – Not highlighted in the image above are the four fields we defined when we were creating this stream – “methane”, “co”, “temp” and “light”. Those fields are used to set specific values and create a new log of data. Check out the example under “Logging using query string params” to see how those fields are used.
Now that you’ve created your stream, and have the hardware set up, you have everything you need to start coding. To the next page!
Modify and Upload the Code
Download and Install the Phant Arduino Library
The sensational creators of the SparkFun data stream service have developed an Arduino library to make posting data to a stream as easy as can be. The Phant Arduino library helps to manage keys and fields, and even assembles HTTP POSTs for you to send to a server.
Head over to the phant-arduino GitHub repo to download a copy (click the “Download ZIP” link on the bottom-right side of the page) or click here if you want to avoid a trip to GitHub.
Install the library by extracting it to the libraries folder within your Arduino sketchbook. Check out our Installing an Arduino Library tutorial for help with that.
For more deatil: Internet Datalogging With Arduino and XBee WiFi