This instructable will show you how to create a simple servo leg that can be controlled by buttons on an arduino or via serial.
Here is a video of the leg in action http://www.youtube.com/watch?v=Q8i1nrPIJvo

Leg Materials:
Popsicle sticks-make sure that all of them are flat and not curved, like in the picture
Paper clip
4 3mm screws
Servo motor
weights
Leg tools:
Hot glue gun
wire strippers
needle nose pliers
Drill
3/32 inch drill bit
1/8 inch drill but
Sharpie
Electronics Tools:
Computer
Arduino Environment
Step 1: Making the parts of the leg
In this step, I will show you how to create the parts of the leg.
Materials:
Popsicle sticks
Popsicle sticks
Popsicle sticks
Tools:
Hot Glue gun (and glue)
First, place a dot of glue a bit smaller than a pea on the end of a popsicle stick. Then put another popsicle stick on top of the glue making a double length popsicle stick with about 1/2 inch overlap. On the opposite face and same end of the popsicle stick, place another drop of glue and another popsicle stick. The end result should look like a narrow tuning fork. In between the open end of the “tuning fork” squeeze more glue on and then another popsicle stick. You should now have a triple length popsicle stick in the pattern of overlap “121”. You need to make one more of these for a total of two.
Next, we need to make the base and the top of out leg, which are the same for ease of creation. First, place a dot of glue on one popsicle stick just a little offcenter. place another popsicle stick perpendicular to this one, creating a “T”. At the other end of the “T” glue another popsicle stick offcenter in the same direction forming an “I”. Place a popsicle stick sideways on the side of this closest to the center to cat ad a spacer. Then place two dots of glue in front of the spacer and put another popsicle stick across the span, squeezing towards the spacer. Take the spacer out (this may take some force) and put another glue-free one in.
Now, place a thin line of glue on one of the spanning popsicle sticks. Place another sideways popsicle stick on top of this, squeezing towards the spacer. Place another popsicle stick just like this on the other side, still squeezing towards the spacer. At this time, remove the spacer (some more force) and nut a new one in.
Now, place another thin line of glue on the outside on one of the spanning sticks. Put another popsicle stick on top of it, angled towards one of the sideways sticks. Where the two sticks touch at the top, place another thin line of glue. Do this for the other side.
You also need to make one more of these for a total of two.
Step 2: Assembling the leg
This step is about how to assemble the leg
Materials:
Leg parts (4)
4-3mm screws
Tools:
Drill
3/32 inch drill bit
1/8 inch drill bit
sharpie
Tape Measure
First, take the bases. On each end, measure from the inside and mark on the diagonal part 1/2 inch in. Do this for both sides on both bases. Drill a hole through these marks all the way through the base. First drill with the 3/32 bit, then go through with the 1/8 inch bit. this is because popsicle sticks are very prone to splitting and you need to be careful.
Next, mark a spot on each of the supports about 1/8 inch to 1/4 of an inch in. First, drill a 3/32 inch hole, then a 1/8 inch hole. Be EXTREMELY careful when drilling these holes as these are on the ends and splitting is even more common here! Drill one hole on each end of the supports this way.
To assemble this, line up the holes in one of the supports to one of the holes in the base. Place a screw through these (3mm should slide through fairly easily). Repeat this for each end and base. The end result should be a rectangle with flexible corners.
Finally, on one support, drill a 3/32 inch hole then a 1/8 inch hole about 1/2 inch up from the spot where the two sticks join into one. this is for the paperclip to go through.
Once the whole thing is standing, weigh it down with some sort of weights so it dosen’t topple when moved.
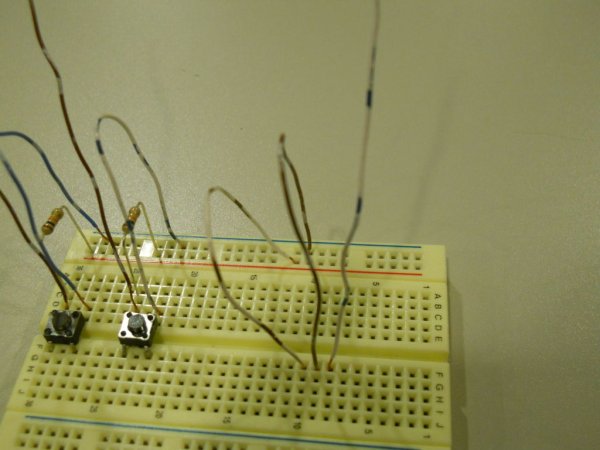
[box color=”#985D00″ bg=”#FFF8CB” font=”verdana” fontsize=”14 ” radius=”20 ” border=”#985D12″ float=”right” head=”Major Components in Project” headbg=”#FFEB70″ headcolor=”#985D00″]Electronics Materials:
Arduino
2 pushbuttons
2 10k ohm resistors
Breadboard
Jumper wires
USB cable to connect arduino and comuputer[/box]
For more detail: How to make a servo leg using Arduino