As you might be able to tell from recent posts, I’ve been doing quite a bit of work with an Arduino. I’ve now got at least one project that I’d like to make a little more permanent, rather than it just being a bunch of components on a breadboard.
The easiest option would probably be to solder the components onto a prototyping shield (for example, these budget models from oomlout). There are two problems with this approach though. Firstly not every component is ideally suited for the form factor of an Arduino shield (for example a 16×2 character LCD takes up most of the prototyping space), and secondly to be any use a shield still needs to be connected to an Arduino. While Arduino’s aren’t extortionately expensive at just over £20 (depending where you buy them from), that’s quite a cost to add to a project.
There are cheaper versions of the Arduino available, such as the Arduino Mini, which would bring the cost down to around £10 and which might be ideal for some projects. If you want to move your project onto a custom PCB though, you probably don’t want to have to solder on a second PCB. The solution is to build the Arduino components directly into your circuit rather than relying on a pre-built solution. This should be cheaper than buying an Arduino and allows you to lay out the components in the most efficient way on a custom PCB.
The problem of course is figuring out how to construct an Arduino from the component parts. I spent quite a while trawling the internet trying to find the answers, but couldn’t find a single page that collected everything you needed to know in one place, so I’m sure you can guess what the rest of this post is going to cover 🙂
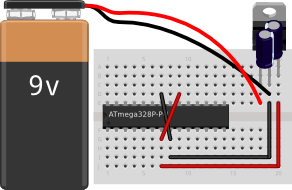
The first decision you have to make is which Arduino compatible microcontroller you are going to base your circuit around. This will depend on the number of input/output pins you need as well as the size of the compiled sketch you intend to use. Given that I’m prototyping my ideas using an Arduino UNO, I decided to stick with the ATmega328P-PU chip the UNO is based around. This is by far the most expensive component you will need to buy, but you can pick them up for around £3. You will find that a number of places sell them with the Arduino bootloader programmed in, for which they charge a premium. Unless you are simply wanting to replace the chip in an existing Arduino UNO you don’t actually need to use the bootloader, so save yourself a few pounds and buy the plain un-programmed chips.
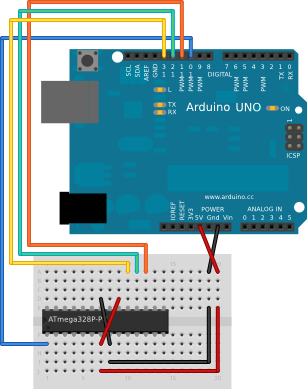
Most of the tutorials on using a ATmega328P-PU expect you to run the chip at 16MHz (the same speed as the UNO) but this requires you to provide an external clock signal using a 16MHz crystal. As components mean costs, I decided I’d be a cheapskate and run the chip just using the internal 8MHz clock. We don’t need any other components in order to programme the chip, but we do need to tell the Arduino software how to work with the chip.
Extra boards/chips are made available through the Arduino software by adding them to the boards.txt file in the hardware/arduino/ folder of the Arduino installation (for full details of the format of this file try this Arduino wiki page). After a fair amount of messing around (starting from this example) I eventually figured out the following definition:
atmega328p8mhz.name=ATmega328P (8 MHz internal clock)atmega328p8mhz.upload.protocol=stk500v1atmega328p8mhz.upload.maximum_size=30720atmega328p8mhz.upload.speed=9600atmega328p8mhz.bootloader.low_fuses=0xE2atmega328p8mhz.bootloader.high_fuses=0xDFatmega328p8mhz.bootloader.extended_fuses=0x07atmega328p8mhz.bootloader.unlock_bits=0x3Fatmega328p8mhz.bootloader.lock_bits=0x0Fatmega328p8mhz.build.mcu=atmega328patmega328p8mhz.build.f_cpu=8000000Latmega328p8mhz.build.core=arduino:arduinoatmega328p8mhz.build.variant=standardI’m sure that to most people (me included) that isn’t self explanatory, so let’s step through it to see what it means.
Firstly, line 1 simply assigns a human readable name to the board definition (this is what will apeartr on the Boards menu). Lines 3-5 state that we will be uploading to the chip using the right protocol to use the Arduino as the ISP (In System Programmer), the maximum sketch size, and the speed at which we will upload to the chip. Unfortunately, at least in version 1.0 of the Arduino software the upload speed seems to be ignored which will come back to bite us later.
[box color=”#985D00″ bg=”#FFF8CB” font=”verdana” fontsize=”14 ” radius=”20 ” border=”#985D12″ float=”right” head=”Major Components in Project” headbg=”#FFEB70″ headcolor=”#985D00″]Arduino[/box]
For more detail: Honey, I Shrunk The Arduino