You don’t have to be in Times Square to enjoy large bright displays of lights. You can create that in the comfort of your own home with some foam board, LEDs, and our little friend Arduino.
My sister-in-law decided to get married on New Year Eve, and the venue she chose stays open until 1am that night, so I started thinking it would be great to have a nice big countdown clock. I ran the idea past her and her fiance and they both loved it, so I went to work.
When I made it I intended it for just one use, but it’s a very impressive display that can be seen across a huge room. This is pretty simplified and what I’m showing you is on a breadboard. Optimizing and taking it beyond prototyping (e.g. replacing the breadboard with some pcb boards) are outside of the scope for this but shouldn’t be too difficult.
Step 1: Gather Materials
Materials for this are as follows:
1 20″x30″ piece of foam board (any desired color – my sister-in-law was even considering one of those holographic ones for a short while), we’re using plain white in this example
1 roll of 12v LED strips (any desired color) (120 LEDs/m recommended but not mandatory)
1 Arduino (I’m using the UNO R3)
1 Breadboard
14 2N3904 NPN Transistors
14 1Kohm Resistors
1 7805 Voltage Regulator
1 12v power source (plug or battery)
1 Soldering iron
Enough wire and solder to connect everything, including jumper wires (I used about 50 the first time)
(optional) 2 seven-segment display modules, if you want to tweak the design before taking it full scale. I’m providing a diagram on how to connect to a typical common cathode display.
(optional) Conductive copper tape
(optional) Liquid electrical tape
Step 2: Arrange the LEDs
The first step is getting the LEDs onto the board. I love working with these LED strips. They require more voltage but they come in convenient rolls so you can arrange them in strips and have the resistors built in which makes things easier.
Outline where you want them to go in two seven-segment arrangements. If you’re using the 120/m LEDs, cut them into 28 sections of 7 three-LED segments each. This will use most of a 5m roll, with only 4 LED segments left over.
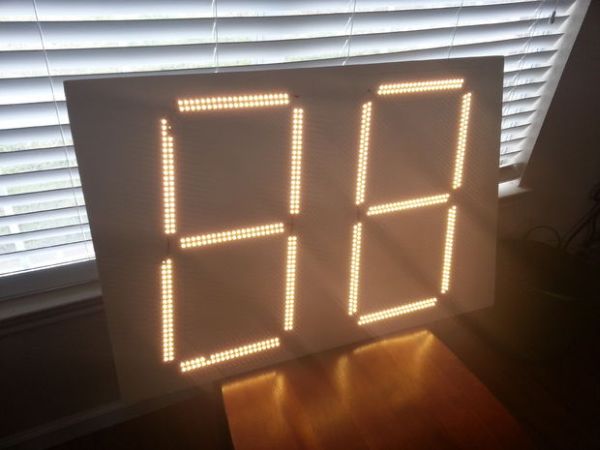
You will be placing two strips of seven on each segment parallel to each other. I recommend turning one of them 180 degrees so that the two innermost and two outermost polarities on the strip match each other. It will make the next step a lot simpler. When you are done, you will have two giant 8s. Perhaps once you’re done with the countdown clock you can reuse the display for your next DeLorean.
Step 3: Connect the Strips
Once you’ve placed the strips on the board, connect the two rows of strips in each segment to each other. Remember when I told you to have the innermost and outermost polarities match each other? This is so you can have two conduits, one for the inner track and one for the outer track, that don’t have to cross each other so it will save you a little frustration. You can use the conductive tape as I did with small bits of wire or just some longer wires to connect the two rows together.
Once you connect them, rig up some test with your power source and make sure they both light up. It’s a thing of beauty. Once you’re happy with that, seal up that corner with some liquid electrical tape. This will hold the connections in place and help blend it into the board (if it’s the same color). Allow that some time to dry and it will look nice.
I just realized that I didn’t put the liquid electrical tape in my list of materials. But through the magic of editing… there, done! Seamless, right? Isn’t technology wonderful?
For more detail: Giant Two-Digit Countdown Clock