In a previous blog, Using MicroPython for real-time software development, I examined the idea behind using MicroPython for real-time embedded software. Now, let’s examine some of the core pieces that developers need to understand to get started using MicroPython.
The first step a developer interested in MicroPython must take before diving into a real-time embedded application is to select a supported development kit or microprocessor. The best place for a developer look for a supported development kit is to check-out the MicroPython Github Board Summary page. Developers who want to get up and running quickly should consider the PyBoard, which comes with MicroPython already installed. Developers who want to use a development kit that is suitable for working with Arduino shields and don’t mind the extra step of putting MicroPython on the development kit (to learn how to compile and install MicroPython see Jacob’s videos) should consider using the Netduino Plus 2.
Once a developer has hardware running MicroPython, getting started with programming in MicroPython is relatively straight forward. The developer simply plugs their device into a PC over USB, which allows them to access the REPL (Read Evaluate Print Loop) terminal. The REPL allows a developer to test out commands and scripts using MicroPython simply by typing.
For example, a great first thing to try is to learn to control the on-board LEDs. Control of any microcontroller peripheral in MicroPython is done using the pyb library. The first step is to type “import pyb” into the REPL and press enter. A developer can then access any microcontroller peripheral through the pyb library. For example, a LED can be turned on by typing pyb.LED(LED #).on() or turned off by typing pyb.LED(LED #).off(). A simple example of how four different LEDs can be turned on with MicroPython can be seen in Figure 2.
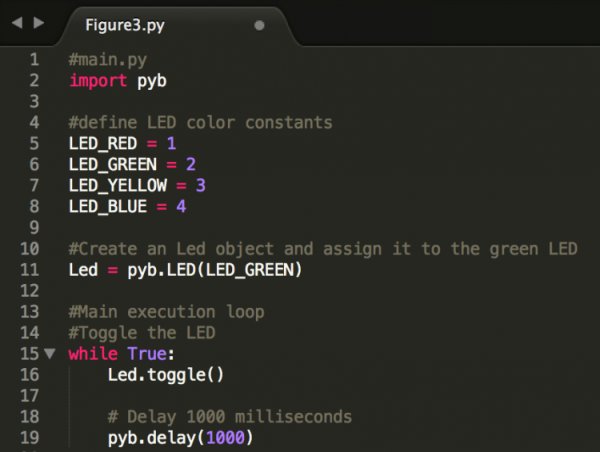
One of Python’s advantages it isn’t just a scripting language; Python is an object oriented programming language. A developer can, for example, create an LED object that controls all of the LEDs on the development board. The PyBoard has four different LEDs; red, green, yellow and blue. Each LED is assigned a number starting with red at one and ending with blue at four. A simple script could be written that toggles the green LED every one thousand milliseconds by assigning an object, named Led, to pyb.LED(2). An example of what the LED toggle script would look like can be found in Figure 3.
Read more: Getting Started with Micro Python