In this project we are going to build a piece of entertainment using Arduino. We all have that habit of tapping Table or Pen for creating any random music. Of course it might not be considered as a good mannerism, but we all enjoy doing it at least once. Hence I thought of taking it to the next level by using Arduino’s ability to play tones. Once you build this project you would be able to Generate tones by Tapping your fingers on anything conductive and create your own rhythms, its like playing Piano on your palm. Sounds cool right so, let us build it.
Components required:
The materials required for this project is listed below, it is not mandatory to stick on to the same. Once you grab the concept you can use your own way of building it.
- Arduini Pro Mini
- Peizo Speaker
- Flex Sensor
- Finger Gloves
- 10K Resistors
- BC547 Transistors
- 9V Battery
Circuit Diagram and Explanation:
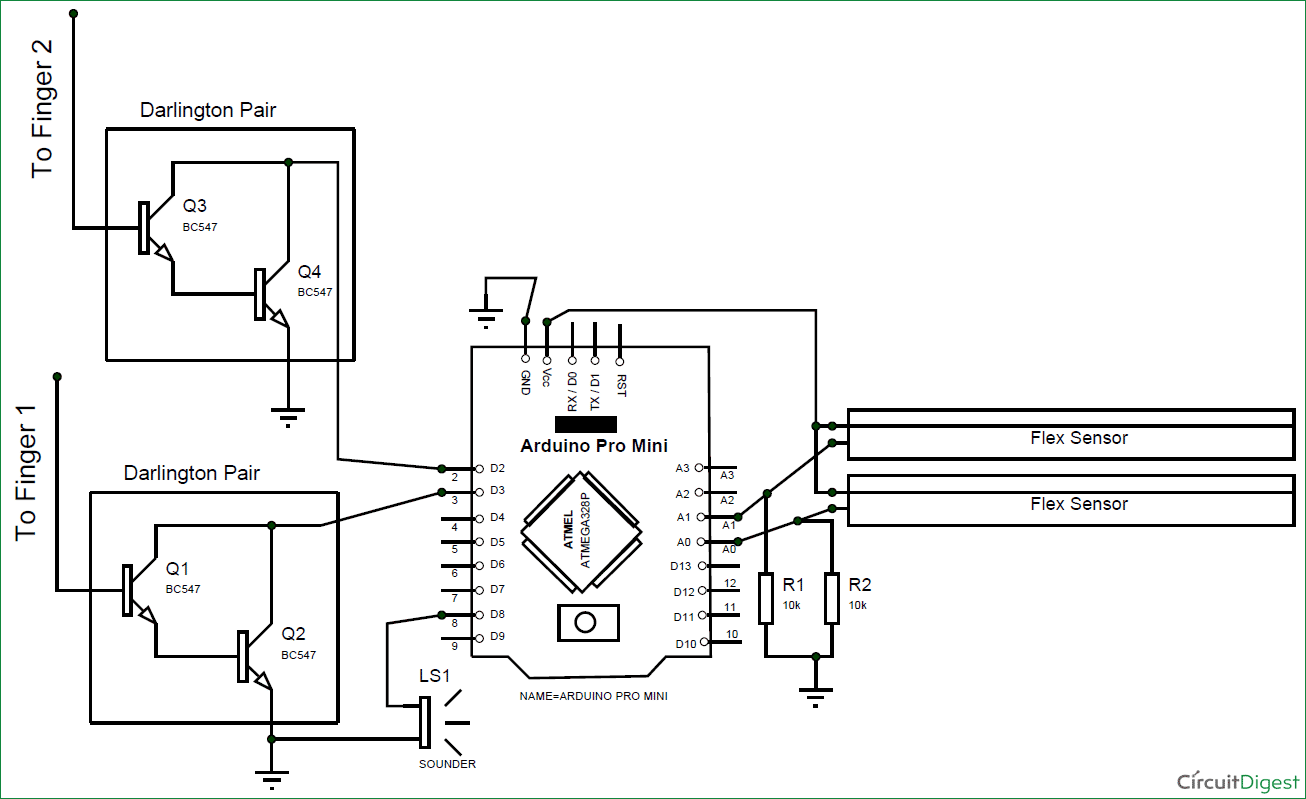
The circuit diagram for This Arduino Palm Piano is shown below.
The project uses a total of four sensor, that is two flex sensor and two Darlington pairs acting as a touch sensor. We have also used two pull down resistors R1 and R2 of value 10k each, which will act as a pull down resistor for the Flex sensor. Here Flex sensor is used to generate Three different tones by using one finger, based on how much it has bent. So we can produce 6 sounds using two fingers. Learn here about the Flex Sensor.
Darlington Pair:
Before we proceed it is important to know what is a Darlington and how exactly does it work in our project. Darlington pair can be defined as two bipolar transistors connected in such a way that the current amplified by the first one is further amplified by the second transistor. A Darlington pair is shown in the image below:
As shown above we have used two BC547 transistors whose collectors are tied to gather and the emitter of the first transistor is connected with the Base of the second transistor. This circuit acts as an amplifier with a gain, meaning any small signal given to the base of the first transistor is enough to bias the base of the second transistor. Our body acts as a ground here so whenever we touch the base of the transistor the second transistor gets biased. Using this to our favour we have built the touch sensor for this project.
Pin number 2 and 3 are the interrupt pins on the Arduino which will be pulled high using internal pull-up resistors and then these pins will be held to ground whenever the Darlington switch closes. This way each time we touch the wire (from the base of 1st transistor) an interrupt will be triggered from the Arduino.
Using two fingers can produce only two types of tones hence I have also added up a flex sensor which will alter the tone based on how much it is bent. I have programmed to produce three different tones per finger based on how much the finger (flex sensor) is bent. You can increase the number if you would like to have more tones at your finger tips.
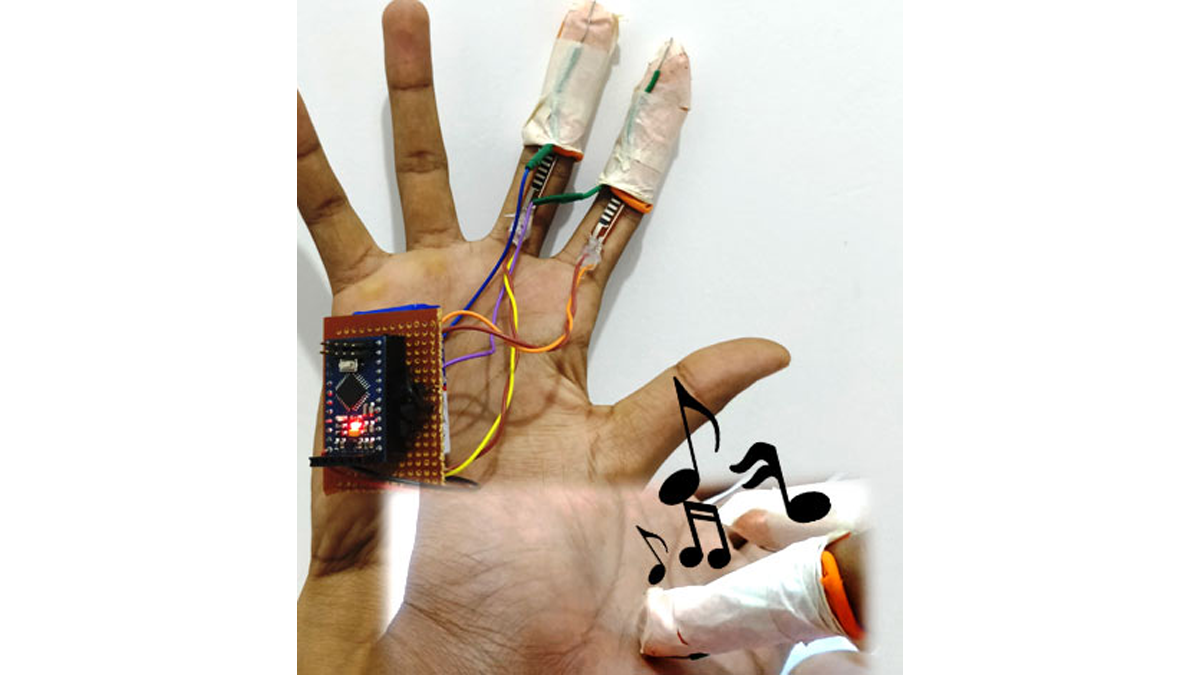
I made the complete board on a perf board so that it fits easily into my palms, but you can use a breadboard as well. Just make sure your body touches the ground of the circuit at some point. Once you solder everything it should look something like this
I have used two finger gloves to secure the wires from Darlington pair and the flex sensor in position as shown above. You can come up with your own (better if possible) idea to secure them in place while you are playing your tones.
Arduino Programming:
The program for this Arduino Tap Tone Generator is pretty straight forward. We just have to look out for interrupts from the Darlington wires and if found one we have to play tone which depends on how much flex sensor is bent. The complete code is given at the end of this post but I have explained few important chunks below.
Note: This program works with help of library “pitches.h”. So make sure you have added the header file to your program before you compile it. You can download the pitches.h header file from here.
In the setup function, we initialize pin 2 and 3 as Input with pull-up resistors. We also declare them as interrupt pins and execute the tone1() when there is an interrupt on pin 2 and the tone2() function when there is an interrupt on the 3rd pin. These interrupts will be triggered whenever these pins get LOW from their pulled-up state.
void setup() {
pinMode(2, INPUT_PULLUP);
pinMode(3, INPUT_PULLUP);
attachInterrupt(digitalPinToInterrupt(2), tone1, LOW);
attachInterrupt(digitalPinToInterrupt(3), tone2, LOW);
Serial.begin(9600);
}
Inside the loop function, we constantly check how much the flex sensor is bent. My FlexSensor 1 for example gave values around 200 when left flat and went down all the way to 130 when I bent it to its maximum, so I have mapped the value from 200 to 130 as 1 to 3 since I have to play 3 different types of tones. You have to tweak these two lines based on your Flex sensor values and number of tones.
void loop() {
 flexSensor1 = map(analogRead(A0),200,130,1,3); //Map up with your own values based on your flex sensor
 flexSensor2 = map(analogRead(A1),170,185,1,3); //Map up with your own values based on your flex sensor

}
As we saw earlier the function tone1() will be executed when an interrupt is detected on pin 2. What happens inside the tone1() function is shown above. We look at the values of FlexSensor1 and play a tone based on the flexSesnor Value. Tones will be played using Arduino’s Tone function. We have explained the tone() function in our previous project.
void tone1()
{
if (flexSensor1==1)
tone(8, NOTE_D4,50);
else if (flexSensor1==2)
tone(8, NOTE_A3,50);
else if (flexSensor1==3)
tone(8, NOTE_G4,50);
else
tone(8, NOTE_D4,50);
}
The below line is used to play the tone. You can play any tone that is available in the “pitches.h” header file. The above line for instance plays the NOTE_A3 on pin for duration of 50 milli seconds.
tone(8, NOTE_A3,50); //tone(PinNum,Note name, Duration);
Working:
Once your hardware is ready, upload the code and mount them on your fingers. Make sure your body is touching the ground of the circuit at some point. Now simply touch any conductive material or your body and you should be able to hear the respective tone. You can play your own melody or music by tapping at different intervals and different positions.
The video below shows the complete working of th project. Hope you enjoyed building the project, any suggestions or questions can be posted in the comment section below. Also check our Arduino Audio Player and Arduino Tone Generator Project.
Read more: Generating Tones by Tapping Fingers using Arduino