UPDATE: V1.1 of clock packages uploaded for compatibility with latest IDEs.
Video at:: http://youtu.be/ikNw1iLE9vg
Alarm demo video: http://youtu.be/jlZBCuQeswA
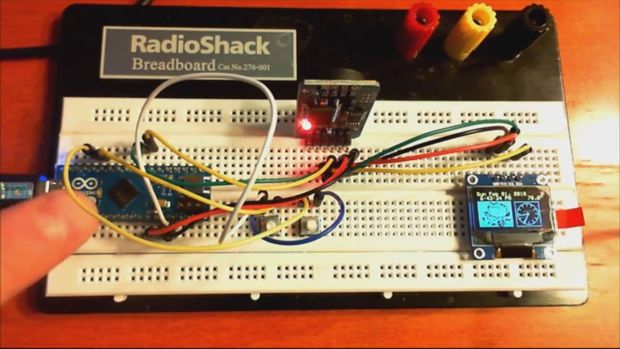
This is an OLED alarm clock I built using an Arduino Micro, a tiny OLED 128×64 display using the SSD1306 controller and I2C interface, and a precision DS3231-based real-time clock module with rechargeable battery backup. It features a menu system for setting the RTC (no serial port or USB required)
Two versions are shown – the basic digital/analog clock and a version with “Pusheen” graphics and animation.
It uses the Adafruit graphics libraries and DS3231 library, included in the distribution.
Code for both, including needed libraries, may be downloaded directly from the link below in Step 4.
Step 1: Connect the DS3231 module and 128×64 OLED module to the Arduino
- Connect ground connection from Arduino to the DS3231 RTC module and OLED display.
- Connect +5v from the Arduino to the +5v connections on the DS3231 RTC module and OLED display.
- Connect the pin assigned to the SCL function on your Arduino to the SCL pins on both the DS3231 module and the OLED display.
- Connect the pin assigned to the SDA function on your Arduino to the SDA pins on both the DS3231 module and the OLED display.
- Connect one side of two SPST normally open push buttons to an Arduino ground connection.
- Connect the other side of one push button to pin 8 of the Arduino. This is the time/date/alarm set mode select button.
- Connect the other side of the other push button to pin 9 of the Arduino. This is the time/date/alarm set change button.
- Connect the black wire on a piezo 5 volt buzzer/beeper to the Arduino ground connection. Connect the red wire from the piezo buzzer/beeper to pin 10 of the Arduino. Be sure to use a piezo beeper (NOT a piezo speaker) that generates its own tone when 5 volts is applied. If you use a piezo speaker instead of a piezo beeper, it will only click rapidly when the alarm is triggered. A unit that sounds continuously when power is applied is best, as the code generates a 5Hz interrupted voltage source to pin 10 on its own.
- Download either the regular or “Pusheen” version of the clock code from here or the link in the introduction.
- Install the Arduino libraries in the software distribution .zip file.
- Compile and download the code to your Arduino. The clock and display will start to run.
- Set the clock and alarm per the instructions in the next step.
Step 2: Set your clock
- Press the mode set button , then release. The cursor will flash on the day-of-week field. Press and hold the set button to advance the day-of week to the next day at a 5Hz rate, or do a short press to advance to the next setting. Note: the RTC will use whatever day-of-week you set. It will not automatically calculate the day-of-week for the date and year.
- Press and release the mode set button to advance the cursor to the month field. Press and hold the set button to scroll through the months quickly, or do a short press to advance to the next setting.
- Press and release the mode set button to advance the cursor to the date field. Press and hold the set button to scroll through the dates quickly, or do a short press to advance to the next setting. Note that the clock chip knows the correct number of days in each month. However, you can set an illegal date for months with less than 31 days, like “February 30”. If you do, the clock will advance the date at midnight until the 31st is reached, then roll over to the first. Thereafter, the date will roll over to 1 at the correct date for the set month. Just don’t set an illegal date and all will be well!
- Press and release the mode set button to advance the cursor to the year field. Press and hold the set button to scroll through the years quickly, or do a short press to advance to the next setting. Valid ranges are 2000 to 2099. The RTC keeps track of leap years automatically. When you first power up the clock, the date will be January 1, 1900. Just advance the year to the correct value as normal.
- Press and release the mode set button to advance the cursor to the hour field. Press and hold the set button to scroll through the hours quickly, or do a short press to advance to the next setting. The clock uses only the 12–hour mode with AM/PM indications.
- Press and release the mode set button to advance the cursor to the minutes field. Press and hold the set button to scroll through the minutes quickly, or do a short press to advance to the next setting.
- Press and release the mode set button to advance the cursor to the seconds field. Press the button momentarily to reset the seconds to zero, or hold the button to freeze the seconds at zero and release to synchronize with an external time source.
- Press and release the mode set button to advance to the alarm setting screen. Press and hold the set button to scroll through the alarm hours setting quickly, or do a short press to advance to the next setting.
- Press and release the mode set button to advance to the alarm minutes setting field.Press and hold the set button to scroll through the alarm minutes setting quickly, or do a short press to advance to the next setting.
- Press and release the mode set button to advance to the alarm enable/disable field. Press and hold the set button to toggle repeatedly between alarm on and off settings, or do a short press to advance to the alternate setting. Note that when the alarm is on, an asterisk appears in the lower left corner of the analog clock. When the alarm is triggered, a flashing asterisk appears in the lower right corner of the analog clock. The piezo buzzer will also beep at a 5 Hz rate. The alarm will time out after 60 seconds if not manually silenced. A short press of the set button silences the alarm, leaving it on for the next day. In the event of a power failure, the alarm will be enabled when power is restored so that an alarm will not be missed. If an alarm has occurred during the power failure, the alarm will sound immediately when power is restored. The alarm will sound, even if the clock is left in the setting modes.
- Press and release the mode set button to return to normal mode.
For more detail: DS3231 OLED alarm clock with 2-button menu setting and temperature display