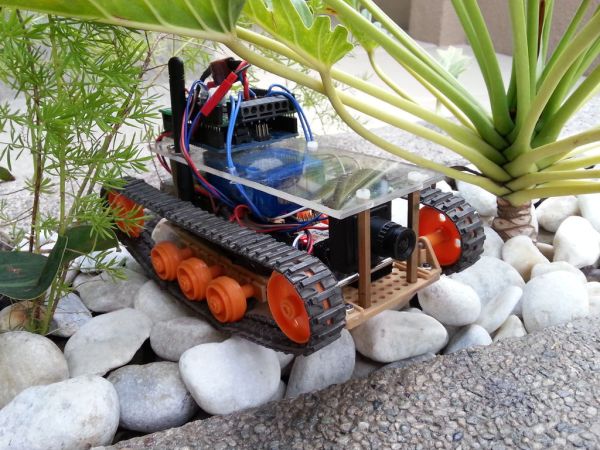
Lets build An FPV tank that could be controlled within 2 kilometers! With the help of my best friend ASCAS I was able to borrow his old parts for this updated version. Ok So Roverbot version 2 is a highly educational Arduino based ATV-drone. It’s simple to make, easy to program and is a great starter project for hobbyists! The bot is very fast and agile, not to mention of it carrying two powerful motors! It can surely outrun humans regardless of the terrain you’re on!
This RoverBot is still a soft prototype even after months of thinking, well maybe its because of funds or other projects we have but anyways. With this progress we hope to 3D design and print a Water resistant cover and upgrade to metal gears .
What is FPV?
Fpv stands for First Person View. Usually we get to see FPV while playing video games specifically for racing games. Fpv is used in military purposes to spy, guard or monitor an area, Even us hobbyist use them for our quadcopters to take aerial photos or just to have fun. Awesome as it sounds it is quite expensive building a quadcopter so we decided to make something smaller and cheaper that runs on land.
How Do You Control It?
RoverBot is based on the famous Arduino development board. Since Arduino supports a wide variety of shields and modules (RC/ WiFi/ Bluetooth), you can choose any type of communication. For this set up we will be using special parts that will give it the capability of long range control, we will be using 2.4Ghz Transmitter, receiver modules to take control over the bot. In the previous version we used Bluetooth which was not really a good combination with FPV since Bluetooth is only good for about 20 meters, but now with my parts and ASCAS’ parts we are able to achieve more range.
You can watch the video on the last step
Step 1: Tools & Materials
I got mos of my parts from local hobby shops, that includes all the Tamiya products and my Arduino Uno clone, the rest were bought online and were given to me by ASCAS. Please canvas for cheaper prices. Compared to where I buy Tamiya products, Pololu retails Tamiya kits that costs 2x more. If you live in the Philippines then you are lucky enough to have “Lil’s Hobby Shop” (located @ SM Megamall & Glorietta 2).
Parts & Matterials:
– Arduino UNO R3 Clone
– Pololu Dual VNH5019 Motor Shield (2x30A)
-Male Pin headers
-4x Standoff
– Extra M3 screw and nut
– 2.4 Ghz Transmitter Module (Planes/Cars)……. READ step 13 for more info about thid
-2.4 Ghz Receiver module at least 2ch
– 2x Tamiya Plasma Dash Motors/ Hyper dash 3
– Tamiya Twin Motor Gearbox Set (stock motors included)
– 2x Tamiya Universal Plate Set
– Tamiya Track & Wheel Set
– 3 cell 1500mAh LiPo Battery
– FPV CAMERA with pan and tilt
–5.8Ghz 200mW FPV Transmitter and receiver 50$!
– Super Glue Bottle
– Sugru Sachet/ Hot Glue
Tools:
– Leatherman
– Screwdriver Set
– Dremel Rotary Tool
Step 2: Assemble The Twin Gearbox
Time to unbox the gearbox! Simply follow the instruction inside and you will be fine
HUGE REMINDER: USE THE “58:1” GEAR RATIO!
Tips & Reminders:
– Grease the gears after assembling the gearbox. (not before)
– Don’t forget the metal spacers, or the gearbox will screech.
– Go for the 58:1 gear ratio, it’s faster than the 204:1 gear ratio.
Step 3: Upgrade motors? Why not!
The gearbox includes stock motors which are pretty slow if you ask me. So I decided to use my old Hyper dash motors for this project instead of using my friends Plasma dash which consumes more energy.
So far Plasma Dash Motors are still the fastest in Tamiya’s 4WD mini motor series. The motors may be pricey but, you’ll get the most out of your money. It’s a carbon brushed motor that spins 29,000 rpm (@3v) and 36,000rpm (@7v). The motors are designed to operate with a 3v power source, increasing the voltage would result to a higher rpm rate but would wear out the c.brushes a lot quicker. It would be ideal to stick with a 3v-6v output. With the Pololu 2×30 Motor Driver and a 2 cell LiPo battery, the Arduino’s program must be set to a max speed of 320/400, you’ll soon find out what this means in the coding step/ page.
Step 4: Motor drivers!
I’ve been into robotics for a long time now and so far the best motor driver you could get is from pololu “Pololu Dual VNH5019” When it comes to power and efficiency this is the best but when it comes to price this is not really your friend.
Another choice is making an L298 motor driver. 1 L298 is for 1 motor that is the best idea for using high curent motors. I will show you guys how made my own version of this
Step 5: Assemble The Track Set
Get wild! maximize your space do as you wish for track configuration
Step 6: Screw in the Standoffs and attach the FPV
be creative position your stand offs and FPV parts in place and apply small amount of hot glue to set everything in place. Attach the top deck and drill some necessary holes for the FPV Antenna and standoff holes, after that screw in some M3 screws.
Step 7: Put the top deck
My purpose for adding the top deck is so that we can have more space since the FPV parts consumed a lot of space at the bottom. leaving no space for the arduino uno clone and motor driver.
Step 8: Mount The Arduino & Motor Driver
Simply screw or glue the Arduino in place on the top deck then stack the motor driver above it.
Step 9: Get your 2.4Ghz Receiver
It time to connect the Rx module to the arduino
Using channel 1 and 2 Connect 1 to A0 and 2 to A1
Supply the receiver With 5V and the ground from the arduino pins.
Step 10: Connect your motors and battery
Solder some wires on the motor then connect it to the motor driver according to channel
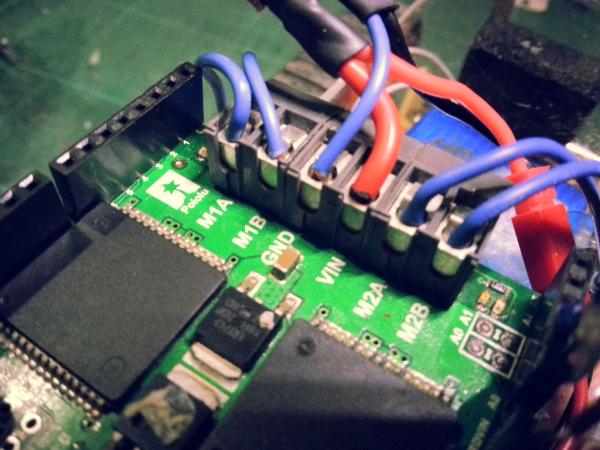
For the battery you will need to DIY your own connector by using a male JST plug and male deans plug look at the picture to better understand how I made mine
Step 11: Battery!
Get your battery and plan out where to put it when its done.
When you have an idea where to place it Make a male adapter for the batteries plug . With the 3S 12V Li-po you will supply the FPV cam and the motor driver and arduino so you will need to make a connector for the motor driver supply line and for the FPV supply line.
For more detail: DIY FPV RC Tank V2 [2km RANGE upgrade!] using Arduino