Bioprinting is printing with biological materials. Think of it as 3D printing, but with squishier ingredients! There’s a lot of work being done at research labs and big companies like Organovo on print human tissues and human organs, with an eye towards drug testing, and transplantation into humans. Check out these amazing TED talks by Anthony Atala, for example:
Anthony Atala: Growing new organs
Anthony Atala: Printing a human kidney
All this sounds incredible complex, but the fact is that the basic technologies are very accessible – it’s all based on inkjet and/or 3D printing! So a bunch of us at BioCurious decided we wanted to play around with this technology ourselves – and the Bioprinter Community Project was born! (Come join us, every Thursday evening at BioCurious!)
We wrote this instructable in part to document our project for our fellow Citizen Scientists in the DIYbio community, so it’s getting a little long. For those who want a quick 1-minute intro, you may want to check this little video:
Step 1: Hacking an old inkjet printer to print biomaterials
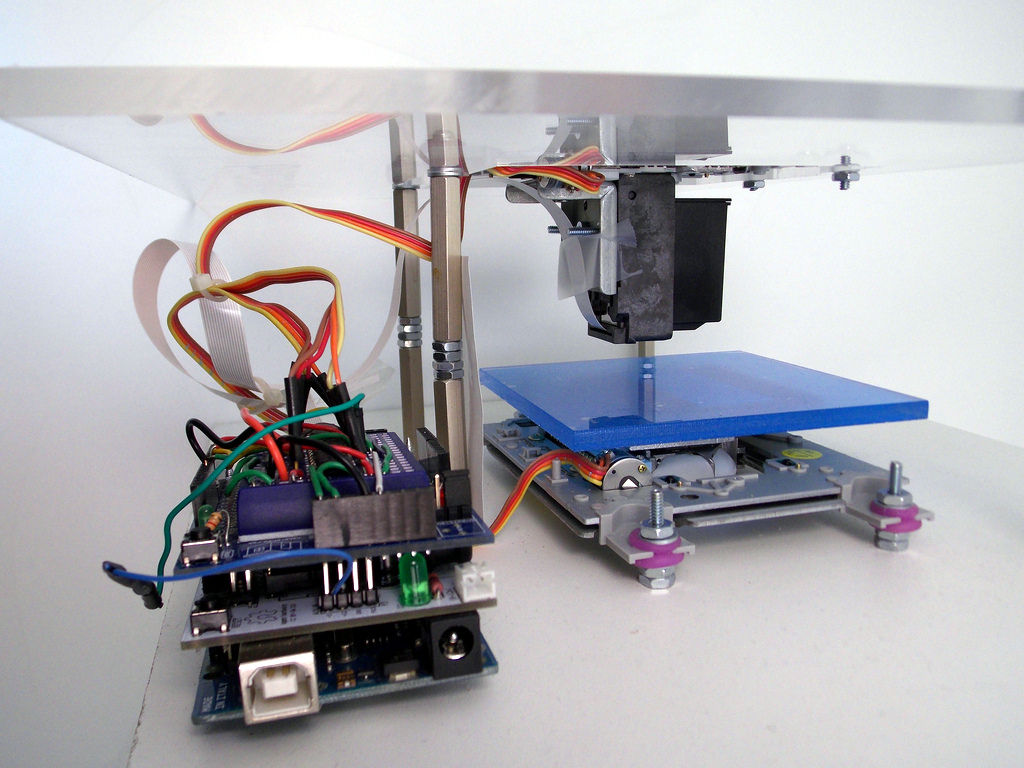
We started out by messing around with an old inkjet printer that we literally saved from a sidewalk somewhere. There’s already plenty of interesting things you can do with an low-end off-the-shelf inkjet printer, but they do have some limitations, which we’ll get into in the next Step (or skip straight to Step 3 for how we built our own bioprinter from scratch, that you can see in the first picture above).
Undressing the Printer
We disassembled an abandoned HP 5150 inkjet printer for use as a bioprinter. Just rip off all the plastic covers you can find, but make sure you can still operate the reset buttons etc. on the front panel.
There’s a little momentary switch that senses whether the cover is open. After you’ve ripped off the cover, you will need to close that switch to be able to print anything. You can just press it down by hand or with a toothpick, glue a little piece of plastic or a screw onto it to make it easier to depress, solder on an on/off switch, or even just bridge it with a piece of wire (so it thinks the cover is always closed).
There’s also a momentary switch inside the paper handling mechanism that senses whether paper has been loaded. You may need to rewire that one as well is you plan to mess with the paper handling.
Once you’ve got your printer all undressed, and figured out how to activate the cover-closed switch – print something! It’ll be a good test to see if you’ve knocked something loose and whether you can still operate all the buttons. Plus, it’s just darn cool to see an inkjet printer do its job up-close. Keep your fingers out of the way though – those cartridges move fast!
Cartridges Prep
Next task is prying open an ink cartridges, so you can fill them with something more interesting. We will be using brand new cartridges for the printer, because old cartridges tend to have residual ink clogging their nozzles. However, you might want to practice opening expired cartridges first. Wouldn’t hurt to do a test print, and flush the print head, if your printer software provides that option.
After taking off any labels, you’ll see that most cartridges have a lid that’s glued into place, usually with some small vent holes to let air in as ink flows out. If you run an Exacto knife or box cutter along the seam long enough, you should be able to cut through some of the glue, and pop the lid off fairly quickly. WARNING – boxcutters are SHARP! If you’re a kid, get some responsible adult to help you with this! If you’re an adult – consider protecting your hand with a knife-proof glove, and/or clamping down the cartridge in a vise while you’re doing this.
Alternatively, you can cut off the lid using your favorite power tool. *Much* easier, but not quite as clean. Keep in mind that you may need to be able to put the cartridge back together again, to get it to fit into the cartridge holder. If anyone knows of an easier way to open inkjet cartridges, post something in the comments! Maybe there’s some solvent that will loosen up the glue without dissolving the cartridge itself?
Once the cartridge is open, you’ll see that the entire ink reservoir is taken up by a little sponge that holds the ink in place. Color cartridges have separate ink compartments with their own sponges (typically Cyan-Magenta-Yellow, not Red-Green-Blue, since printing colors on white paper is a subtractive color process). You can squeeze out any remaining ink and keep it for later experiments (e.g. for some paper chromatography). Next, rinse, rinse, and rinse some more with distilled or deionized water-we don’t want to clog the print head with mineral residue. We want to get all that ink out of there, so it doesn’t interfere with our experiments.
Once the ink reservoir is completely clean, fill it partway with distilled or deionized water, put the lid back on, pop it back into the cartridge holder, and print something. Chances are, no matter how well you rinsed, you’ll still see some residual ink coming out. Just keep printing until it’s printing clear, and then print some more.
We discovered that our cartridge actually slowly leaks through the print head when you fill it completely with water, but it does not leak when you only put in a small amount. That actually provides a very convenient way to flush out the print head, without having to print.
Filling the Cartridges
At this point, what you want to put in the ink cartridge is entirely up to your imagination! We started out by putting some green food coloring in the formerly black ink cartridge, and printed out a test page to show that it worked. You could also try filling up the color cartridge with fluorescent dyes of your choice, and print out you own blacklight posters. Or, put some invisible ink in the black cartridge, and print invisible messages to your friends.
As our first real “bioprinting” experiment, we wanted to start with something simple, instead of jumping straight into printing with live cells. We decided to print with a solution of arabinose onto filter paper. Then we cut out the filter paper, and put it onto an agarose plate on which we had grown a lawn of E. coli that we had engineered to carry the pGLO plasmid. This plasmid carries the Green Fluorescent Protein (GFP), under control of an arabinose-sensitive promoter. (Stay tuned for an instructable on how to make your own GFP-expressing E. coli).
As a result, wherever we had printed arabinose on the filter paper, we now saw the E. coli light up green under UV light! Note that the beauty of this experiment lies in its simplicity: we only had to print with a simple sugar solution, rather than with bulky live cells; and we were printing on paper, so we didn’t even have to change the paper handling machinery. You could also try printing with antibiotics, or even proteins, such as enzymes or growth factors.
The second-to-last image above shows our first test print, where we has printed arabinose over half of the filter paper – and half of the plate lights up under UV light. In the second image, we had printed the BioCurious “eyeball” logo. Success! Unfortunately the sharpness of the image definitely leaves much to be desired. Presumably, the arabinose tends to diffuse through the filter paper, which smears out the printed pattern. We should be able to do much better by printing directly on the agarose.
For more detail: DIY BioPrinter With Biological Materials Using Arduino