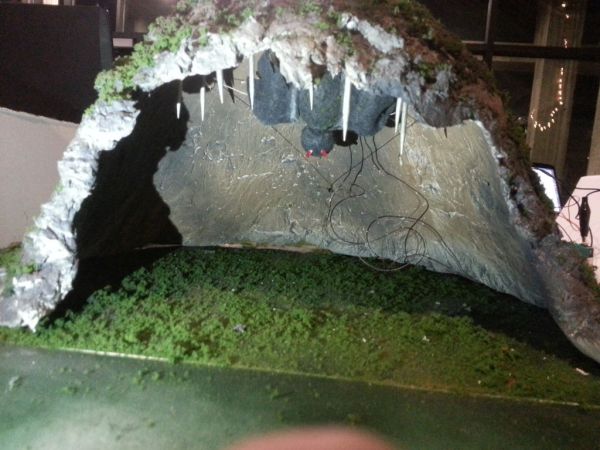
The purpose of this instructable is to outline our development of this bat in the cave as well as provide instructions and tips for future engineers hoping to complete a similar project or use components of our project in theirs. The goal of this project was to create an diarama that could educate people. The main functionality of the bat in the cave is for bat to react to a light source in the cave by stretching the wings and lighting up its eyes. Some goals we had in conjunction to the movement of the bat was to make the cave from paper mache and paint it with some of the decoration for the cave to be looking realistic. This tutorial will start with a little background information, then show the development of the basic pieces, and finish by showing the final product.
Tools Needed: Laser-cutter, scissors, 3d printer, wire cutter/stripper, strong flashlight, superglue, drills.
Materials Needed: Arduino Uno, Arduino Motor Shield, Breadboard, Wire, Tape, LEDs, photocell sensor, DC Hobby motor, plastic for laser cutter, resistors of various resistance, 9V batteries, fishing string, Gorilla glue, small screws, paper mache, hook screws. sharp wooden sticks, spray painter(green/grey), grey painter, fake green turf, rubber band.
Step 1: Step 1: Making the Cave
Making the cave is an important step in building this project; it determines the size of the entire diorama as well as the bat and other components! Using tin foil and cling-wrap liberally, make a sturdy base over objects in the shape of the inside of the cave to use as a mold. Then use a pre-made paper mache mix or make your own (flour, shredded newspaper, soap, and water will work) and cover the mold in a thick layer of paper mache. Once the outside is generally dry, take the cave off of the mold and pull off the tin foil from the inside of the cave. This will help the inside of the cave to dry. Let the rest of the cave sit until dry; this may take 36 hours.
Step 2: Step 2: 3d modeling the base of the bat
We used google sketchup to make a simple hollow sphere for the head of the bat and oval shaped hollow sphere for the body.
First, draw two circles perpendicular to each other. Then use the follow-up feature in the Google Sketchup. After making the sphere select the whole sphere and use outer shell on the tools bar. Your sphere is now hollow. Then make a copy of the sphere, scale it twice as large, and you are left with the body of the bat. Now, download the Google Sketchup plugin called skp_to_dxf.rb from
http://www.guitar-list.com/download-software/convert-sketchup-skp-files-dxf-or-stl
and move the file to the plugins folder to the same location as your Google Sketchup file.
Print the 3d models.
Step 3: Step 3: Making holes into spheres/Painting the sphere
Drill holes vertically into the spheres for the wires to get pass through.
Make two more holes for the LED lights on the eye.
Make two more holes for the wings on the body sphere.
Make one more hole for the tail of the bat on the body sphere.
Step 4: Step 4: Wing Mechanics
We used acordian gate mechanic for the wings.
We modeled 2 inch long plastic sticks with holes on each end and middle, then laser cutted the model.
We used small screws to connect each sticks then duck taped the other side so each plastic sticks were stablized.
Then we cut one of the plastic stick to half, jointing the wings into the body of the bat.
Use rubber band to give tension to pull the wings toward the body back.
Step 5: Step 5: making paper mache look like realistic
Attach fake turf on top of the cave and ground. Add any other foliage you want to be in the diarama.
Step 6: Step 6: Attaching hook screws onto cave
We will use these to pull the wings with fishing line by running them through the hooks and connecting them to the wings.
Step 7: Step 7: Attaching icicles to the cave
Step 8: Step 9: Covering wings with fabric
Step 9: Step 8: Connecting wires with LED into head of the bat
Step 10: Step 10: Setting up motor for wing movement
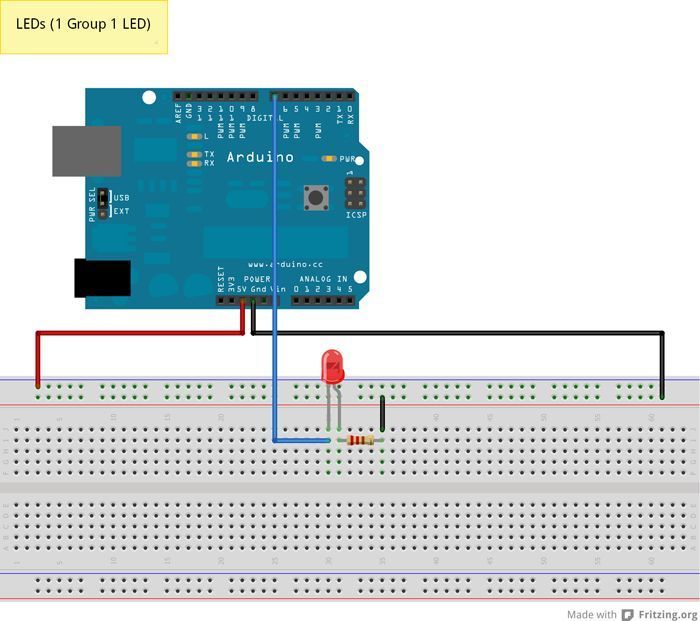
Step 11: Step 11: Set up Light Sensor
The light sensor will be used to determine whether the bat is awake or asleep. The light sensor can be placed anywhere in the diorama, and is wired as in the diagram.
Step 13: Step 11: Arduino Code
int photocellReading3; // An integer to store the reading from the light sensor
boolean ledStatus = false; // A boolean to help debug whether the LEDs should be on or off
int counter = 0; // A counter to help control when the motor should be on or off
[box color=”#985D00″ bg=”#FFF8CB” font=”verdana” fontsize=”14 ” radius=”20 ” border=”#985D12″ float=”right” head=”Major Components in Project” headbg=”#FFEB70″ headcolor=”#985D00″]
significant
Establishes
significant
diorama
[/box]
For more detail: Diorama, Bat in the cave using Arduino