We have published a digital code lock using arduino some weeks before. This one is a little different. The earlier version was based on a defined password, where the user can not change it. Moreover there was no LCD display interfaced with the project to output lock status. This project is a much improved version of the same digital code lock which comes with a user defined password and LCD display. The user will be prompted to set a password at installation. This password inputted at installation will continue to serve the lock until it is changed. The user can change the current password with a single key press. The program will check for current password and allows the user to change password only if the the current password is input correctly.
Required Knowledge
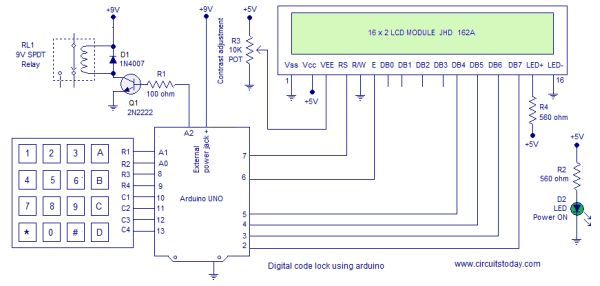
You should learn two important device interfacing concepts before attempting this project. The very first one is to interface hex keypad with Arduino. The second one is to interface LCD with Arduino. Once you understand the concepts behind interfacing LCD module and interfacing hex keypad, its just a matter of adding few lines of code to build the Digital Code Lock. I recommend to read the simple digital code lock using arduino as well to gain insights into basics of a code lock.
Note:- In this program, I have reused the code developed for interfacing hex keypad with arduino. There are two versions of the program in the interfacing tutorial. I used version 2.
About the Program
I will be explaining important points about the program only. As mentioned before, you are supposed to know the codes of interfacing hex keypad and lcd module.
Usage of Device
Installation – You will be asked to input 5 digits as password at the initial boot/reset of the device. The first 5 digits you input at installation will be saved as your SET PASSWORD. The device will go LOCKED after setting PASSWORD.
Key A – for unlocking the device. Input correct password and press A for Unlocking.
Key B – for locking any time. Just press B and you will see the LOCKED message.
Key C – for changing the password. Input the correct password and Press C. You will see message asking to ENTER NEW PASSWORD. Enter 5 digits as password. The first 5 digits you enter will be SAVED as NEW PASSWORD.
Exceptions – You can not use keys ‘A’, ‘B’ and ‘C’ inside the password combination. These 3 keys are control keys of the device with specific functions. The program checks for these key presses (at the password setting time – you may see the SetPassword() function and look the condition to check for invalid key press) and identifies them as Invalid Keys. You will have to input 5 new digits as password after an Invalid Key press.
For more detail: Digital Code Lock using Arduino with LCD Display